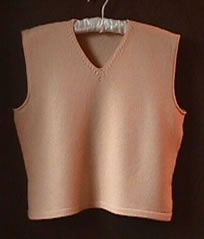
Cable Trim V-Neck from The Knitting Fiend!
Navigate my site!
HOME of my site
Email Lucia
My site is supported by donations. Please
click the paypal logo to make a $3 donation.
|
Knit this Vest from The Knitting Fiend!
This page and its related lessons teaches you how
to knit the
vest.
You can recalculatethe shaping directions in your
size using
your yarn.
Just visit the OrderForm
page and use the sweater pattern generator. |
I bought a used Brother 910 knitting machine. I'd never
knit with a
Japanese machine, so I needed a simple project. My first practice
project
was a head band. on Friday, September 7.
Feeling
confident, I moved on to making a complete sweater.
Since this is my first sweater on my 910, I decided to
knit in stockinet.
Because I'm a show off, I wanted an accent. After all, I don't
want
my family to say: "Uh, you knit a plain sweater? A plain
sweater?"
So, I flipped through The Neckline Encyclopedia by
Gerda Stitt.
I picked neckline number 6. I wanted an unobtrusive hem, so I
decided
to use a double hem for the body welt. I picked a rolled
stockinet
trim for the armholes. With a length of 22" the sweater is 1" shorter
than
most my pullovers.
I shaped the vest along the body. The vest
nips in 4" at
the waist compared to the bust. Don't reduce any more than 4"
between
the bust and waist. If you want a more form fitting sweater, you
will need to wait until I program in waist darts. (This will not happen
soon!)
I knit the sweater using two strands of Jagger Superfine
Merino. My
vest required 7 oz which is about $16 worth of yarn.
I calculated the shaping directions using The
Knitting Fiend sweater
pattern generator. You can too. Before you generate the
pattern,
read this page for specific information on style
selections.
You should also read all the tutorials for descriptions of knitting
techniques.
(If you don't "get" the idea of a pattern generator as
opposed to a
pattern, visit the easy pattern generators. Pick one: Hat
, Socks, Headband.
)
Lucia
|
|
Style selections:
-
Units: I used inches, but you can use cm if you wish.
-
Neckline type: V
-
Sleeve length: Doesn't matter.
-
Sleeve cap type: Fitted.
-
Body Shaping: Hip_waist_chest. (Allows the nipped in waist.)
-
Cuff shaping: Doesn't matter.
-
Hip rib shaping: Yes. ( You will increase stitches after the welt.
Otherwise,
it will flare.)
-
Bust size: Enter yours.
-
Hip size: Enter yours.
-
Neck circumference: Enter yours.
-
Size range: This setting is used to "guess" the rest of your
measurements.
I used Misses. Large women should select Women.
-
I used stockinet for both the main and welt portions of the
sweater.
My gauge was 60 st = 7.3"; 80 rows = 6.8".
Other style information to change:
-
Length: 22" (This is 1" shoter than my standard pullover.)
-
Neck ribbing length: Read "Cable Neck How
To"
page for information.
-
Length of welt at bottom of sweater: 1.0". See "Double
Hem How To" page for more information.
-
Length of cuff welt: Doesn't matter.
-
Shoulder ease: 0". (The standard usually drops them slightly
because
that has been in style.)
For all other style information, use the defaults. That is, don't
change the values for the ease. They are fine!
Do adjust body dimensions if you are a non-standard size. Pay special
attention to the following:
-
Back waist length: If you pick hip_waist_chest, this will affect where
the waist nips in.
-
Shoulder width: This affects how wide the shoulders fall.
-
Bust circumference.
-
Waist circumference.
-
Hip circumference.
Hem, Neck and Armhole Trim. 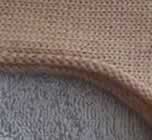
To make the vest you proceed in the following order:
-
Knit the front and back starting each from the hem.
-
Then assemble the two pieces at the shoulders.
-
Apply the armhole trim.
You will find close up and directions for the hem, neckline and
armholes in separate tutorials with illustrations and hints.
-
The stitch is stockinet. (Stocking stitch to you Europeans!)
-
The hem is a double hung hem; click here for a
tutorial.
-
The cables along the neckline are created as you knit. Click
here for tutorial.
-
The armholes use a simple rolled trim. Click
here for tutorial.
Visit the tutorial pages to learn how to make the neck
, hem, and armholes.
Comments on Armhole Trim
So far, I haven't implemented a sleeveless choice on the program.
(I will be soon.) I was planning to make a pullover with
sleeves!
But, after knitting the front and back I really liked the look without
sleeves. So, at the last minute, I decided to make this a sleeveless
vest.
(Am I indecisive, or what?)
Since I hadn't planned room for the armhole trim, I figured
out
something inconspicuous and small. Usually when I want a small
inconspicuous
edge, I make a row of single crochet and then add a row of crab
stitch.
But I know many visitors to my page don't crochet. I thought a
little
while and came up with this. (This is not an original
invention.
As Elizabeth Zimmerman, the hand knitter, always said "I unvented it".)
I've added a close up of the trim here so you can see it. Click
here for instructions.
Finish Assembly
-
Sew front to back at sides using your preferred method. (Mattress
stitch
is the preferred method of sewing up by hand. I used my DL 1000 linker.)
-
Tidy up all ends.
-
If fabric is wool, steam to block. Be careful not to flatten the
cables.
-
If fabric is acrylic, test steaming methods on swatch.
 Wear
Wear
On Friday, I finished assembling. Jim emailed and suggested we go to
Founder's
Hill for dinner and a candle vigil in honor of those affected by the
bombing.
Everyone in the bar and restaurant went exited the restaurant at 7 pm,
stood on main street and lit a candle. The group spontaneously
sang
"God Bless America"!
I plan to wear this to the Interknit MK seminar on Oct. 13, 2001
which
will take place in West Chicago. Charlotte Miller will be giving
a seminar called "Color in Stitches". Click
here for details!
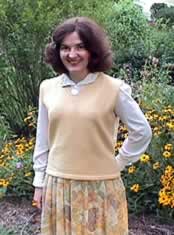
Comment on Fit.
Notice that the vest falls well above my hips. It is only 22" long.
It also has a trim but not tight fit. The vest draws in very
slightly
at the waist. If it drew in more, the diagonal wrinkles you are
seeing
at the sides would become pronounced. If you change the style to
"straight" the sweater will be boxy. If you change it to
"hip_waist",
the sweater will narrow from hips to bust. (At least in my case because
the sweater is only 22" long. If it were 30" long, it would
be larger at the hips! )
If you read the hung hem directions, you will see that I increased
stitches
after the hem. According to my schematic, the hem draws in about
2". Doesn't look that way to you? Well, that's because
hems,
and edges in general, have a tendency to flare when worn. I find I need
to plan them to draw in to make them hang straight! Weird, huh?
The armholes are high enough to permit wearing this vest as a shell,
but low enough to pass over a fitted sleeve blouse. If you want to wear
this vest over a T shirt or any blouse with deep sleeves, you will want
to drop the armholes. To figure out how much to drop them, take
the
T shirt from the closet, and measure the depth of its armholes.
Then
add 1/2".
This is my standard V neck depth. You can make it deeper or
shallower
by adjusting the ease in the program.
Knit away, fiends!
Lucia
Copyright © The Knitting Fiend, All Rights Reserved.