• HOME of my site
  • Blog
  • Ponchos
  • Hats
  • Slippers & socks
  • Purses
  • Mittens & Gloves
  • Argyle Sock
  • Email Lucia 

  •  

    My site is supported by your annual $3 donation.

    Hey! If you're knitting socks at Pacifically Passap, send me pictures, and I'll post them at my blog.

    I wish I were there knitting with you!
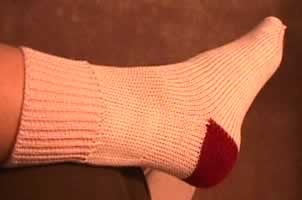
    Rosie's Sock,

    Shaped Sock Knitted on a Double Bed

    From The Knitting Fiend.
    My mother-in-law, Rosie, and I each had a problem.  I've solved them both! 

    Rosie's problem: She won't wear shoes and she's worn holes in all her socks!  My problem: I have lots and lots of left over yarn I acquired when I bought my used knitting machine. 

    What to do?  Well, I decided to write this "sock-u-lator" web page. 

    I don't like long seams on my socks, so I made these socks on my Passap E6000, it's a double bed which permits me to knit circular. This page describes how to make these socks on the Passap. If you have a Japanese machine and a ribber, you will need to translate the lock setting to the appropriate carriage settings.  You will also need to read how to short row on your machine. (It's really easy to short row on a Japanese machine, but it's done differently. )

    If you are willing to measure your feet, you can make your own custom socks using the spare yarn around the house. 

    Some advice about yarn.  Need I even say it?  Machine washable.  The yarn should also be elastic, that way the ribbing will be springy.  Acrylic and washable wool work well.  If you want cotton socks, you will need to learn how to knit the ribbing along with a strand of woolly nylon.  It really helps make the ribs springier, but I don't teach you how to do that on this page.

    Good luck.
    Lucia

    Google

    Yarn & Tools required:

    • Approximately 6-8 oz of fingering weight yarn.
    • Double eyed bodkin.
    • Yellow tool.
    • 2 prong tool.
    • Decker comb (Optional.)
    • Some waste yarn.
    • Tapestry needle.
    • Scissors.
    • A double bed knitting machine.

    How to Create your Pattern. 

    To create your pattern, you must make a swatch, and then input data into the form.  This page will perform all calculations required for your sock.

    The default sock size corresponds to small ladies sock.  If you don't change the numbers for the foot size, that's what you are going to get!   (I was writing slipper patterns, and added a foot  length estimator at the end of this pattern!)

    Make a gauge swatch.


    Input data: REQUIRED.

    Fill in the following boxes to customize your sock pattern for your gauge and the wearer's size. Fill in all the boxes provided here.  NOTE: You must also  scroll down and enter the location of the "column" for the leg decrease in the section on the leg.

    The page will indicates all units as inches. However, you may enter data in inches, cm, furlongs, km or any units you prefer. Just be consistent.  Afterwards, interpret the term "inches" to mean the units you used. 

    Gauge:  st/in (or cm.), 
    lock passes / inch (or cm.) 
    Tension dial setting: T=.
    Sock Length: inches (or cm) 
    Length of ribbing:inches (or cm).
    If you want to guess your foot length based on sock size, use the estimator.
    Body measurement: Calf circumference at the bottom of the ribbing: inches. 
    Reduction factor%. 
    The knitted ankle circumference will be reduced by amount you specify.  However, it will never be reduced below the knitted foot circumference value shown below.
    The knitted circumference just below the ribbing will beinches.
    Body measurement:
    Distance from base of foot to bottom of the ankle bone: inches.
    Body Measurement:
    Foot circumferenceinches.
    The real foot circumference will be reduced by 10% to make a snug sock. 
    The knitted foot circumference will be:inches. 
    Body Measurement:
    Length of footinches.
    The knitted foot length will be reduced by 15% to make a snug sock.
    The knitted foot length will be:inches.
    (I advise that you knit one sock, check the length and decide what you like.  I found the fabric tends to stretch, and the knitted sock needs to be shorter than my foot.)

    Click here to read table of shoe size vs. foot length measurements.

    Knit Your Sock 

    Cuff

    (Photo illustrates the needle arrangement and the zig-zag row.)


    Rehang


    Leg

    You will be decreasing stitches from the top to the ankle of the sock.  The directions will tell you to perform double full fashioned decreases on either side a center "column" of stitches on the front bed.  You should decrease on either side of a column of 5 center stitches; if there is an odd number of needles on the front bed decrease on either side of 6 center stitches. These needles will form a "column" of stitches and the decreases will be on either side of the column.


    How to perform decreases:

    INPUT: REQUIRED
    I've created input boxes because you may just miss centering when rehanging.  It doesn't matter that much anyway.  If you rehang an even number of stitches and center the work perfectly, you should type (3 and 3) in the two boxes below.  If you don't center perfectly, type the actual locations for the center stitches.  When I rehang odd stitches, I usually put the extra one towards the right.  That makes 2L and 3R the 5 center stitches.  But sometimes I miss by a few stitches.  I'd rather type in different numbers here than rehang! (Note: If you feel like it, you can make the column wider or narrower!)

    Note the left edge and right edge needles that will form the "column".  Type the numbers here: L,R.  (Note: If you centered the work when you rehung, one of these stitches will be to the right of the 0 mark; the other will be to the left of the 0 mark. )

    To perform the double full fashioned decrease you will:
    Insert the two prong tool into needles:R andR. Remove these stitches and place them on needles:R and R. (One full fashioned double decrease.)
    Insert the two prong tool into needles:L and L. Remove these stitches and place them on needles:L andL.
    You have decreased 4 stitches total on the front bed.

    How to Shift & Fill

    Shift stitches on front bed to fill the two empty needles.  Find a pronged tool with the largest number of prongs you can find. In the photo to the right, I am using a 20 stitch decker comb.

    On the right hand side of the bed, insert the prongs of the decker comb into the hooks needles to the right of the two empty needles.  Transfer the stitches to the decker comb and shift all of stitches two needles to the right.  If necessary, repeat until the empty needles have migrated to the far right. Hint: I like to use my free hand and pull down on the fabric when transferring the stitches to and from the decker combs.

    Repeat for left side. Lower the left most and right most needles on the front bed to take them out of work.  Transfer the stitches on the edge needle on the back bed to the empty needles on the front bed.  Lower the empty back bed needle out of work.

    Note: When you become more accomplished, you can perform the double decrease and shift and fill operation all at once.  Just use the decker comb right from the start!


    Knit Leg
    1. Knit  rows.
    2. Do the following  times:
    3. RC= . Do the following  times:
    4. You have reached the ankle.  A total ofstitches remain on each bed. ( There arestitches total). RC =
    5. K all stitches on both beds to RC =for a  inch long sock.


    You have reached the top of the heel.


    Heel

    You will work decreasing short rows on the front bed side needles to form the the "pouch" for the sock heel.  You will then work increasing short rows.  The heel turn rows addinches to the length from the top to the bottom of the heel.  The second set of heel turn rows add a similar length to the foot of the sock.

    During short rows, you may perform and optional "wrap" to prevent a hole as follows:

    When the lock is on the right, lay the yarn in the needle just to the right of the first needle in work on the right hand side.
    When lock is on the left side, lay yarn in the needle head just to the left of the first needle in work on the left hand side.
    Knit Heel
    Decrease stitches on front bed:
      Note: For each repetition of operations 2 & 3 below, the number of needles in work position decreases by 1 on either side of the heel. You may wish to hang weights on the heel as you knit it.
       
    1. Reset rows counter to RC = 000.  Set machine so back bed does not knit and front bed knits partial rows.  (Passap LX/GX.  Raise all front bed pushers under needles in work.)
    2. *COR.  Lower in work pusher furthest from lock to out of work position. (This is the furthest pusher in work  on the left side.) K 1 row. Opt: Wrap.
    3.  COL.  Lower in work pusher furthest from lock to out of work position. (This is the furthest in work pusher on the right side.) K 1 row.  Opt.: Wrap.*
    4. Repeat instructions 2& 3 noted between the two *'s times until  RC = and only stitches remain in WP on front bed.  Note: COR.
    Increase stitches on front bed.
    1. ** COR On the opposite side of the lock (i.e. the left side) raise the out of work pusher next to the first in work pusher K 1 row.
    2. COL On the opposite side of the lock (i.e. the left side) raise the out of work pusher next to the first in work pusher K 1 row. **
    3. Repeat instructions 1 & 2 written between double ** 's times until  RC = and all needles on right side of the lock are in work.


    Foot

    The foot will be inch long foot.  Some of this length is taken up by the heel and toe.
    Set machine to knit circular ( CX/CX, Black strippers.).


    Toe

    You will be performing 4 full fashioned decreases on the sides of the toe.  To do this you should:
    Insert two pronged tool into the two right most stitches on the front bed.  Shift them 1 stitch to the left.  Lower the outer most needle.  There will be 2 stitches on the 2nd needle in from the right edge.  (One full fashioned decrease complete.)

    Repeat on back bed.  Repeat on left side of front and back beds, this time taking the left most stitches.


    Knit toe:


    Assembly

    The photo to the right shows the sock after steaming to flatten the waste yarn.  Notice that I knit the heel pouch in burgundy to better illustrate the heel.  In the picture, I folded the heel pouch toward the ribbing.

    Knitting directions

  • If you need a tutorial, follow the long directions in this window to knit your socks.
  • If you want shorter directions, follow the diretions in the other window. (If it isnt' there, click: )
  • After the window opens, click this button to refresh the numbers in the window: 

  • Abbreviations

    RC = Row count. T = Tension setting. WY = Waste Yarn. WP = work position.

    What have you learned?

    If you have never done these things before you have learned how to do the following:


    Other Ideas for Socks

    These socks were knit in stockinet and ribbing. You saw that I knit the heel in a contrast color.  If you like hand manipulating, you could add cables to the sock.  You could also make some fun striped socks.

    Have Fun,
    Lucia


    I'm adding this!
    Foot Length Estimator
    This optional portion of the entry form will estimate a foot length and width in inches based on an American shoe size. Enter a shoe size and this portion of the form will guess in the wearer's foot length and width. (For those unfamiliar with US shoe sizes: stores carry size Women's size 6-11 and Men's size 7-13.) After you use the estimator, you must enter the calculated values in the boxes above.

    US Shoe Size:
    Estimated foot length:  inches.
    Estimated foot width:  inches.
    .
    Copyright, Lucia Liljegren.  The Knitting Fiend. 2001.