Lesson: Double Hem on Single Bed Machine

Navigate my site! 

  • HOME of my site
  • This page describes how to create a double hem on a single bed knitting machine.  I used this on my Cable V-Neck Vest.  
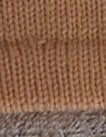
This is a very inconspicuous hem that  can be made on a single bed machine.  A few stitches of a 1" deep hem are illustrated at right.

    When I make a double hem, I always set The Knitting Fiend hem and cuff options to permit increasing and decreasing at the cuffs and hem. I do this to prevent the hem from spreading.  Although the schematics will show the hem drawing in, you will not notice this at the knitted hem.  If you examine carefully, you will see that I increased stitches after the hem.  The extra stitch is visible in the picture because I specifically took a close up of the increase!

    The Knitting Fiend directions will tell you the number of stitches for the front portion of the hem. But, you must create the back portion and a turning row to make a double hung hem.  This page will also do all the calculations to determine the number of rows you need to knit and tell you when to adjust the tension dial.  It will also indicate the location of the carriage at key points.

    Knitting the hem has a number of steps. The first step, "Make Waste Yarn Base" is optional. If you don't make the waste yarn base, then you don't need to remove it. I do recommend using the waste yarn because I find it easier to see the loops when hanging the EON row. 

    You should swatch a hem over a small number of stitches before casting on the full number of stitches.  After swatching, verify that the fold row falls on the fold.

    Some abbreviations are defined at the end of this document.

    Input Data to Personalize your instructions.

    Type value of garment tension setting on your machine, tension =M =
    Type number of hem rows. (Note, this is listed as "welt rows" on the Knitting Fiend direction created by the full generators. It is equal to 1/2 the number or rows for the EZ generator. )


    Make Waste Yarn Base. (Optional)

    1. Carriage on right. Hang cast on comb. Raise every other needle (EON). Set row count 000. Set tension to M-1=. Knit 1 row.
    2. Lower cast on comb.  Knit rows. RC ). Break waste yarn.
    3. Loosen tension to M+2= .
    4. Use a piece of ravel cord at least 3 times as long as the distance between the outer needles in work.  Place one end in yarn feeder.  Holding ravel cord below and above, knit 2 across.  (RC= 11; COL ).
    5. Drop both ends of ravel cord.
    The illustration above shows the waste yarn and ravel cord.  Notice that the ravel cord is hanging down.  I used a cotton yarn.  You may use anything non fuzzy and slippery.  You may secure the ravel cord in the cast on comb if you wish.


    Make Underside of Hem.

    1. Tension M - 1 =. Reset RC=000. With fashion yarn, knit 1 row on every other needle. (Note, you should swatch this hem.  If the tension on the first row is too loose, it will throw off the fold line. )
    2. Bring the all needles in work using flat side of needle selector tool as illustrated.
    3. Knit rows. (RC = ; COL).
    4. Loosen tension to M+1=. Knit fold row. (COR )

    Knit front of Hem.

    From now on, your row count will match The Knitting Fiend directions!
    1. Reset RC = 000. Tension to M =. Knit rows. ( ).
    2. Remove cast on comb if desired.

    Increase or decrease stitches. (If required.)

    Increase or decrease stitches if required. To increase or decrease you may: 1) take work off on waste yarn and rehang.  2) Use a garter bar and rehang over the current needles.  3) Use a 7 prong transfer tool, and move 7 stitches at a time.   I needed to increase 6 stitches.  So, I left 3 raised 3 needles on each side of my work.  Then I used the 7 prong transfer tool to move groups of stitches outward.  I left 3 empty needles more or less evenly spaced on the bed.
    1. To "fill" the stitches, stick the tool into the bar of a stitch below the needle to the left (or right) of the needle you need to fill.  See illustration. (This step prevents a hole from forming on the front side.)
    2. Then place that loop on the empty needle.  (No illustration.)

    Transfer EON Row.

    1. Place the transfer tool in the loop formed in by the EON row.  See illustration below, left.  I have placed the tool in the third loop from the end.
    2. Then, place the hole of the transfer tool in the hook of the needle.  See illustration below, right.
    3. For the most part, you will be placing loops on every other needle. But, you must skip a few if you increased stitches after the hem. (Likewise, don't skip a few if you decreased after the hem.)
    4. Sight along a column of stitches to see where the loop should go.  You don't want to twist the hemline.


    Knit to Seal

    1. Set tension to M + 1 =.  Bring stitches forward to position E. Push stitches behind latches. See illustration to below left.
    2. Knit 1 row to seal. See illustration below right.
    3. Set tension to M =. Continue knitting sweater following Knitting Fiend instructions.


    Rev HemRemove Waste Yarn

    If you made the waste yarn hem, you must eventually remove it. To remove, simply pull on the ravel cord. It will slip out and the waste yarn will come off. Some people prefer to leave the waste yarn on until after blocking. Some people remove it as soon as it is no longer needed. Some never use it! (I use it and remove after blocking.)

    The picture to the right shows the hem from the inside.  The waste yarn has been removed and the hem has been steamed. (If you use acrylic be very careful when applying heat.)


    Abbreviations:
    COL Carriage on Left. COR Carriage on Right. RC Row Count. M Main Tension


    Copyright, Lucia Liljegren.  The Knitting Fiend. 2001.