Lesson: The Cable Trimmed V Neckline.

Navigate my site! 

  • Home 
  • Hem lesson
  • Kitchener stitch lesson.
  • Email Lucia 
  • My site is supported by donations.  Please click the paypal logo to make a $3 donation.
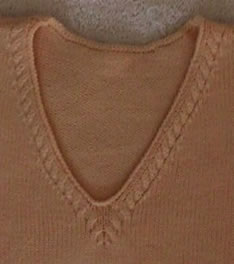
    This page describes how to make the Cable Trim V Neckline which I used on a vest.  This elegant technique can be created on any knitting machine. Because the cables are hand turned, the level of difficulty is "intermediate".  An elastic yarn, like wool or acrylic, is recommended. I used Jagger Spun Superfine Merino.

    To create my neckline, I adapted this technique very slightly from "The Neckline Encyclopedia" written by Buerkel and Michler translated to English by Stitt.   My adaptation permits a slightly curved shaping for the V neck decreases, which I find more flattering than a straight decrease.  It can also be applied to very deep or very shallow V necks. This particular V-neck is shallower than permissible following the books directions.

    I really love this neckline.  So, I'll be making it again.  To help myself next time,  I made wrote a small program to recalculate row number.  If you scroll down, you can use the program too.  If you don't want to get mixed up and accidentally "modify" the neck design, write the cable turn rows on row/stitch table on your  The Knitting Fiend directions. 

    Historical Note:  I knit to the base of the cables at 10 pm on Monday September 10, 2001.  I figured I'd go to sleep and begin the somewhat complicated neck shaping and cable turning in the morning.  I worked on the neck all day Tuesday, September 11, 2001.  I ripped it out and reshaped the neck Wednesday, September 12, 2001.


    Customize Knitting Fiend Pattern.

    Before generating your pattern, you need to know the correct neck welt depth to request.  You will later ignore the welt directions printed on the instructions, but specifying a depth makes room for the 4 rows of stitches added to the back neck using this technique.  If you enter number in the following boxes, this page will calculate the neck welt depth to request.

    Input Data to Required for Additional Calculations:

    To compete the neckline, you will need to know a few more numbers.    They will be calculated if you fill out these boxes.
    Type value of row number for the neckline divide (given on The Knitting Fiend directions.)  RC = N =
    Enter your stitch gauge:  st/in (or cm if that's what you use.)
    Enter front neck length (given on The Knitting Fiend directions.):  in (or cm if that's what you use.)


    Knit Front.

    Cast on hem using your preferred technique.  I knit a hung hem, click for tutorial.
    Knit follow shaping directions up to the first cable.  If you filled in above, this occurs at row count  RC= N-16 = 

    Start Cable

    Divide for neck.

    Work sides of neckline.

    Work right side of neck.  While knitting, you must decrease and form cables at appropriate rows.  When required, you must also decrease for shoulders. The decrease rows are already listed on the row count cheat sheet created using The Knitting Fiend directions.   It is best to write the cable rows on the cheat sheet. When you complete the right side of the neck,

    Finish Front.

    Hang front neckline over needles on main bed (back bed) wrong side facing you; be sure to pick up the 2 center stitches.  Set tension setting 1 tighter than used for the main tension. Knit 1 row. Set tension setting to 10 .  Knit 1 row to form  long stitches on last row. (If you are knitting with a thick yarn and your main tension is already looser than 5, you will need to knit these stitches manually to form even longer stitches. Practice this on a swatch.) Bind off using latch tool bind off.

    The illustration to the right shows the full fashioned decreases along side the cables.  Although knit in stockinet, the cable itself will lie flat even before blocking.  The trim rows will roll forward.

    Knit Back

    Raise needles centering work on bed. Cast on using hem you prefer.  Knit back following The Knitting Fiend directions for shaping.  You may decrease the shoulders however you wish. (I decreased the back shoulders by binding off.)  However, you must use short rows for the neck.  To shape using the short row method, knit up to the first row of neck shaping listed on The Knitting Fiend directions. This will be an even row, carriage is on right (COR)

    You will now shape the right side.

    1. Set carriage to hold.
    2. Place all stitches left of zero in hold position and set carriage to H.
    3. In addition, place stitches you need to decrease on the right side of the at neck less 1 needle in hold position.
    4. Knit to left.
    5. Bring left most needle forward to hold, being careful not to unknit the stitch on this needle.
    6. Knit to right. The yarn will "wrap" around the left most needle.  This prevents a hole.
    Now continue decreasing at the rate described in the directions raising 1 needle less than instructed when moving the carriage to the right, and then raising 1 needle and wrapping when knitting to the left.

    Shape left side similarly, mirroring directions.  The back neck stitches are now hanging on the machine.

    Knit Back Neck Trim

    The trim Gerda suggests for the back neck is shown to the right.  Notice the two rows of reverse stockinet.  These are required to prevent the back neck from curling out.  The bind off will roll out slightly. Note: It is very important for the last row knitted to be loose to permit the latch tool bind off.

    It similar to garter stitch, which tends to spread a little. I recommend doubling up every 10th stitch to reduce the number of stitches in the trim before taking off on waste yarn.  But this is not necessary.
     

    1. Take off back neckline on 10 rows of waste yarn.
    2. Hang back neckline on machine right  side facing.  (You've turned it around.)
    3. Tighten the tension 1 setting.  Knit two rows.
    4. Take neckline off on waste yarn and re-hang wrong side facing.
    5. Knit two rows forming long stitches on last row by setting tension dial to 10. If this is a thick yarn, hand form the stitches to make them really long.
    6. Bind off using latch tool bind off method.


    Assemble Shoulders.

    Hang Stitches
    Attach front to back at shoulders using your preferred method.

    Since I shape the front shoulders using short rows, but bind-off the back shoulders I do this:

    1. Hang the back shoulder with right side facing me.
    2. Hang the live stitches of the matching front shoulder with wrong side facing me. See above left.
    3. Unravel to remove waste yarn from front shoulder. The work will look as in picture above right.
    4. Push back shoulder toward machine behind latches while letting front shoulder with the needles fall in the hooks.
    5. Close latches over front shoulder stitches, and pull through. See picture below left.
    6. Bind off by transferring the right most stitch to neighboring left needles and then manually forming a stitch through both stitches.  Repeat. See below right.  Stitch is transferred.  I am using the free strand to manually form a stitch.
    7. With a tapestry needle, tidy up all hanging strings.
    Bind off

    DONE!

    Finish the rest of the garment that you are making!  When blocking, do not press down on cables; you don't want to flatten them.  If the garment is knit from wool, you may steam heavily without resting the weight of the yarn on the cables.  If the garment is made from acrylic, be cautious when you steam; you don't want to kill the yarn.  Practice on a swatch first!


    What did you learn?

    If you haven't done them before, this lesson taught you several things. These are:
  • How to turn cables.
  • How to make a full fashioned decrease. Full fashioned decreases can be done as close as 2 stitches from the seam or as far as 7 stitches from the seam. Well, I guess you can do them even further from the seam, but that's often pointless and tedious!
  • Other Uses For Cables

    Cables make very nice accents.  You might consider using them to highlight all sorts of edges.  Consider adding them to: Lucia


    Copyright, Lucia Liljegren.  The Knitting Fiend. 2001.