This page shows these three types of buttonholes: Cable, Loop, and Frogs. |
This page shows these three types of buttonholes: Cable, Loop, and Frogs. |
Preparation
|
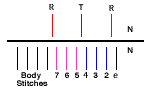
Needle Set Up.
 |
| You are now ready to start making the button band. This will
require alternately working ordinary cables and buttonhole cables.
Ordinary cable.
|
| Buttonhole cable.
Prepare to cross a cable by:
|
Work right side by:
|
| Repeat
|
| Button Band.
Work exactly as buttonhole band except |
| Attribution.
This buttonhole band is adapted from Diane Pikwo's article in the Nov/Dec. 1998 edition of Machine Knitters Source. The MKS article describes how to make cable buttonholes on a Japanese machine. Diane's method used an extra strand of yarn. When adapting the directions, I took advantage of the double beds on my Passap to automatically form the ribbing, provide the extra tuck for turning the cables and I eliminated the extra strand of yarn. |
Loop ButtonholesLoop buttons can be used to embellish plain sweater fronts. They can be knit as you knit the main pieces, but it's much easier to knit the buttons as a separate band and attach the band to the main pieces afterwards. Make one for the front and back sides and overlap the two bands.
You don't need to put a button through every hole. Decide how many you want and sew them on the band side. If you like racy clothes, why not knit idiot cord and use it to lace the sweater closed? You can also use this as a hem by first creating the trim, and then rehanging the trim. Pick up stitches just next to the button loops and knit your piece from bottom to top! This sample was knit using Brown Sheep Naturespun using tension settings 5/5. |
Preparation
|
Make 1 buttonhole.
|
Block
 Ok,
so you followed my directions and the buttonhole didn't look right?
Yuck, you said? So, you tried again. Still yuck? Ok,
so you followed my directions and the buttonhole didn't look right?
Yuck, you said? So, you tried again. Still yuck?
The most important trick to making these buttonholes is proper blocking. I ran a knitting needle through all the loops. I steamed the stockinet portion flat. I then pulled the loops out with the needle while steaming. I did not press the loops because I want them to stay nice and fluffy. If you use acrylic, please practice steaming to gain experience. You can kill acrylic with steam. Cotton and wool are easy to steam. |
| Attribution
I first saw these loop buttonholes in Edges and Hems by Sandy Lightfoot which describes how to make similar buttons on a Japanese machine. I adapted the technique to the Passap. The major changes I made were
|
|
Preparation.
|
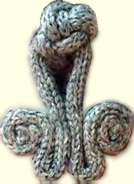
Make frogs.
|
Frog with button.
|
|
Copyright © The Knitting Fiend, All Rights Reserved.

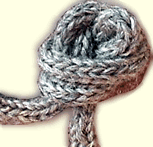
 Cable
buttons are an attractive touch to add to a simple cardigan. They
can be knit at the same time as the sweater front thus eliminating any
sewing up. If you would like to add the cable buttonholes to a sweater
with a fancy stitch pattern, you can knit the bands separately and attach
them later.
Cable
buttons are an attractive touch to add to a simple cardigan. They
can be knit at the same time as the sweater front thus eliminating any
sewing up. If you would like to add the cable buttonholes to a sweater
with a fancy stitch pattern, you can knit the bands separately and attach
them later.
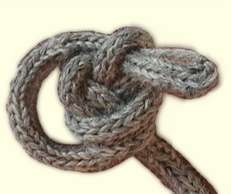
 Frog
Closures
Frog
Closures