Mom's Headband! (Especially for beginners.)

This page calculates the number of rows and stitches to knit a head band. You can knit the headband by hand or machine.

To create the head band, type in your head circumference and the head band width.  The head band circumference will be 85% your head circumference. These makes it nice and snug.  My head band is 2.5 inches wide; and fits my head.  You can select your own width. By the way, if you use cm, just enter everything in cm. Afterwards ignore the fact that the page says inches. Also, don't enter some things in inches and other things in cm!

Navigate my site! 

  • HOME 

  •  
  • Yarn to buy yarn from The Knitting Fiend!

  •  
  • Email Lucia 

  •  
  • Interknits Machine Knitting Club.

  •  
  • Support my site
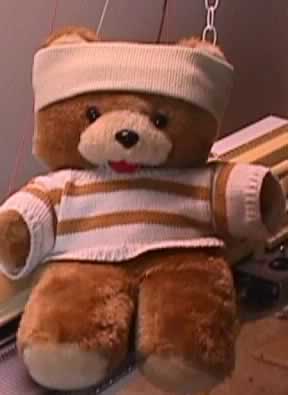
  • This head band was the first project I knit with my Brother 910 knitting machine. Hubby is on vacation, so I put it on Teddy and took his picture.  He's sitting on the knitting machine!  If you want to see this head band on me, scroll down to the bottom of this page.

    Strangely enough, my first hand knit project was a similar headband.  We had just moved to Buffalo, NY from San Salvador, El Salvador. It was January. My ears were cold. I was six years old.  Mom taught my older sister and me to knit.  Meanwhile, she knit headbands for the two younger ones.  I no longer have that head band!

    I guess Mom designed this head band. I'm sure I didn't do the calculations when I was 6 years old! And guess what? Your six year old doesn't have to calculate them either! Keep scrolling and use this page to calculate the whole thing.

    When making this headband, I recommend using wool or high bulk acrylic. My head band is made from Brown Sheep Nature Spun fingering weight which is left over from making my turtleneck sweater.

    This is a good beginner project. However, directions are written as though you already know how to knit. If you don't know how, you will need to consult a knitting techniques book. I'm cheap, so I advise you go to the library and check one out.  If you machine knit, read the manual.

    When you find your reference, read about the following techniques:

  • Casting on. You will do this once. Pick the easiest technique you find.
  • Selecting a stitch pattern. Beginners should pick stockinet, reverse stockinet or garter stitch. Mine is made in reverse stockinet. The one I made when I was six was in garter stitch.  Believe it or not, these were so popular with my classmates, Mom made 12 of these for my friends. She knit those in stripes.
  • Grafting live stitches. This is also known as "Kitchener Stitch". Click here for a tutorial.
  • Making a gauge swatch and determine your stitch and row gauge. Click here for information.

  •  


    I hope you  have fun making the head band. Good luck,
    Lucia

    Tools/Materials

    You will need these tools and materials.
  • A tapestry needle for grafting and seaming. (Click for tutorial for grafting.)
  • A knitting machine or knitting needles.  You must determine the appropriate needle size or the appropriate tension for your machine.
  • A row counter if knitting by machine.
  • A tape measure.
  • A few ounces of fashion yarn for the head band.
  • A small amount of waste yarn.  This is just left over yarn you don't need anymore.
  • A very, very small amount of ravel cord, or a slippery, non-splitting yarn. I used crochet thread.
  • Enter Data

    Type data into these boxes to customize your directions.

    Head Circumference =inches. Width of head band =inches.
    Make a swatch and enter your stitch and row gauges. Stitch gauge: st/inch. Row gauge: rows/inch.

    Directions:

    Cast on stitches using waste yarn. ( This will be inches wide.)  If your stitch requires a specific stitch multiple, you may add or subtract a few stitches.  This will affect the width.

    Machine knitting: Knit 4 rows in stockinet using waste yarn. Break yarn. Knit 1 row stockinet using ravel cord, or any slippery yarn you have at hand. Set machine to free pass and bring carriage to right. Set row counter to zero.
    Hand knitting: Cast on using a method that leaves the stitch live. My preferred method is to cast on, knit 1 row. Break yarn. Find a slippery yarn, knit 1 row. Break yarn.

    Both: Later on, you will just pull the slippery yarn out leaving live stitches.

    Knit the Head Band.

    With fashion yarn, knit rows ( inches) using your fancy stitch pattern.

    Machine Knitting: Take off on waste yarn. Hand knitting:Pull a strand of waste yarn through the stitches to keep them live. If the head band is wool, steam to flatten the edges and live stitches. This makes it easier to graft and seam. If it is made from acrylic, steam the edges only at very, very low heat. (Test on the gauge swatch. You don't want to kill the yarn.)
     

    Make Up

    Fold head band right sides together along the long axis. This will make a inch wide strip. Seam long edges to form a long tube.  You may use mattress stitch (also called grafting.)  I used a sewing machine.

    Pull tube right side out.  Fold band so ends meet. This will form a circle. Don't twist. The seams on both ends should line up.

    Using a tapestry needle, graft first row above the ravel cord used at cast on to the last row of stitches.

    If you have not already removed the ravel cord, pull ravel cord (or slippery yarn) to remove. This will free the waste yarn; pull it away and throw it out. Tidy up all seams. Rotate long seam to inside of head band.

    If the head band is made of wool, steam press. If head band is made of acrylic, steam at very low heat. (In fact, practice with your gauge swatch. You don't want to over steam acrylic for a head band or it will go flat. This is called "killing" the fabric.)

    Wear your head band.

    That's 
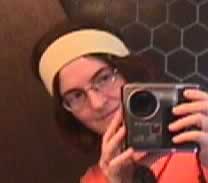
me.  As you an see, the headband coverse my ears.  It fits nice and snugly.  It will be very warm because it's a double thickness.

    Guess what?

    This beginner project teaches lots of things other than knitting techniques. Do you realize that you:

  • Learned to create your own design. (You picked the stitch and yarn. That makes it your design!)
  • Learned the importance of shapes in knitting. This is just a rectangle. You can always recalculate the number of stitches if you use another gauge.
  • You may have learned to pick your own technique. What cast on method did you use? Did it matter?
  • OK, you learned some techniques too. You probably learnred to, graft, cast-on, use waste yarn, seam etc.!
  • You've learned that my bathroom is chocolate brown!

  •  


    Knit Fiendishly!
    Lucia


    Copyright, Lucia Liljegren.  The Knitting Fiend. 2001.