How to Estimate Yarn Requirements & Find Your Gauge Using The Knitting Fiend! 

Navigate my site! 

  • Home


  •  
  • Email Lucia.

  •  

    It's easy to design a great fitting a sweater and estimate the yardage using The Knitting Fiend programs  at this site.  This page describes how to obtain the data you will need. 

    You can go straight to the specific directions you want by clicking these internal links:


    Of course the yardage estimator  doesn't count for major goof-ups like making a sleeve and burning it with an iron!  (I didn't do that to this sweater.  But I've done it.) So, it's best to buy extra yarn.

    Knit away, 
    Lucia.


    Determine the Stitch and Row Gauge

    Obtaining data for the stitch and row gauge involves 4 steps.  These are:
    • Knit a swatch.
    • Wash swatch and let it rest.
    • Measure the swatch.
    • Open the sweater pattern generator.  This form has a narrow left hand frame and a wide right hand frame.
    • Click on the "Gauge" button in the left hand panel.  The gauge entry form will load into the right hand frame.
    • Entering data in a form provided by The Knitting Fiend.
    • When you enter data, the gauge will be calculated and displayed for you.
    One method of accomplishing the steps is described below.
    Step 1: Knit swatch.

    To ensure accurate charting, it is best to knit a swatch that is at least 4" wide by 4" tall (10 cm x 10 cm).  Larger swatches will provide greater accuracy in the final sweater.

    Pictured at below and to the right is a swatch I knit for a cardigan I knit.  I cast on 60 stitches on the front bed of my knitting machine.  I knit 8 rows in a Jagger Spun Super Lamb  in a shade of green.  Then I knit two marker row in a gray waste yarn of a comparable weight.  Then I knit 120 rows.  I knit a row in gray waste yarn; 10 more rows using green, and scrapped off using gray waste yarn.

    You probably can't tell in the picture, but every 30 rows, I made a small eyelet by moving 3rd stitch from each edge over one needle.   After finishing the swatch, I threaded gray yarn just inside the third column of stitches from the edge.

    I recorded the relevant numbers.  These are:

    • 80 rows from marker row to marker row.
    • 54 stitches inside the gray marker threads.
    Step 2: Treat swatch.

    The swatch shown below in Step 3 is knit using a single strand of Jagger Spun Super Lamb   knit using a simple double bed tuck stitch.  The swatch has been machine washed using Eucalan wool wash.  I laid the swatch flat to dry.  Then I pressed the swatch very lightly being careful not to flatten the tuck stitch.


    Step 3: Measure the swatch

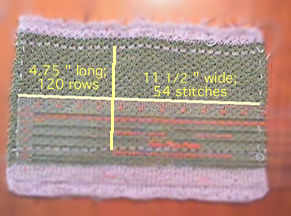
    After treating the swatch, I measured the length of the swatch from horizontal marker row to marker row.  The distance between the 120 rows was 4.75".

    The width between the vertical marker threads was 11 1/2"; the number of stitches was 54.  (This swatch is much wider than I usually knit!) 

    Notice: 

    • Tuck stitches tend to provide extremely large stitch gauges relative to row gauges.  Because they are also beautiful, you should consider them when making dresses that need to drape around womanly hips! 
    • My knit marker rows are wavy.  I just measured a few lengths and averaged.  If your stitch is very wavy, make sure you make a nice long swatch.
    Super Lamb swatch
    Step 4: Entering data into a form.

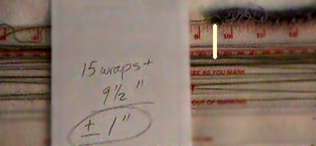
    The gauge form will have a portion that looks sort of like the piece of form shown at the right.  The words "Main swatch" indicate that you need to provide data for the main swatch.  Now, enter the data you collect for your swatch in the appropriate boxes.  I've entered mine for the swatch used in this example.

    A similar entry region for "welt" data will appear on the design form.  Just make a welt swatch (e.g. ribbing swatch) and collect similar information. 

    Main swatch Number of rows 
    Length (inches) 
    Main swatch Number of stitches 
    =
    Width (inches) 
    =

    Step 5: When you run the program, your gauge will be calculated.  You will see the boxes right on the form.


    Estimate the yardage using the length method.

    You may estimate the yardage using the length or the weight method.  This section describes the steps required for the length method.

    Collecting data to estimate yardage involved 3 steps.  These are:

    • Knitting a swatch.
    • Unravel and measure the swatch.
    • Enter data into a form.
    Step 1: Knit a swatch.

    For this technique, you will want to knit a fairly small swatch. However, it shouldn't be too small!  How large should the swatch be?  You will need to use your judgment.  But, here are some principles.
     

    • The swatch must be at least 10 stitches wide and 4 rows long.  Otherwise, I won't estimate yardage for you.
    • The swatch uses at least 3 yards (or 3 meters) of yarn.  That way, you won't have too much measurement uncertainty. 
    • Make sure the swatch provides a "reasonable" fraction of the pattern repeat.
    • This is the "laziness principle". You don't want to make the swatch so large you spend too much time knitting it or it's a pain in the neck to unravel!


    The main principle: Your goal is to make a sample swatch that uses about the same amount of yarn per unit area as the final sweater.

    Read to the right to see how I applied these principles to decide on my yardage swatch

    How I applied  these principles to my swatch.

    I had selected a double bed tuck stitch with a grid pattern that looks like this:
     

    . .
    . .

    On the main bed,  each black square tucks over 4 rows; each white square knits over 4 rows.  So, the tuck stitch pattern is complete after 8 rows.

    Based on the third principle, I concluded that my yardage swatch would give me a "representative" sample after  8 rows because 8 rows is a full repeat of the stitch pattern.  In fact, I could get a "representative sample" after 4 rows-- since row 1 and row 2 of the grid pattern should use the same amount of yarn per stitch. 

    I had no idea how much yarn that would take, but I decided to knit a swatch 10 rows long and 30 stitches wide.  I figured: That should give me at least 3 yards. 

    To the right you can see my swatch.

    I cast on 30 stitches in gray waste yarn.  I knits a few rows.  Then I knit 4 rows in fashion yarn. Then I knit two rows in waste yarn.  Then I knit 10 rows in green fashion yarn. Then I knit some more rows in waste yarn and scrapped off.

    Note: Don't treat the swatch!  You want the length of the yarn before washing and shrinking it.

    Yarn Est.
    Step 2: Unravel and measure.

    I wanted to measure the length of yarn required for the 10 rows and 20 stitches of green fashion yarn.

    My next step was to cut all the yarn strands off the edges.  This makes it  easier to measure the length of the yarn. 

    Next, I unraveled the green yarn just up to the gray waste yarn strand. I found a handy 15" long plastic ruler and wrapped the yarn around it.  When I wrapped, I tried to be careful not to stretch the yarn, but I also didn't want the yarn to hang loosely.  So, I made sure I could slide the yarn off easily, but the yarn wouldn't just slide off on it's own.

    I wound the yarn completely around  the ruler 7 1/2 full wraps (or 15 half wraps)  plus about 9 1/2 inches.  My ruler is 15" long.  Multiplying, 15 x 15" and adding 9.5, my measurement was: 234.5 inches.  Dividing by 36 this is 6.5 yards. I wasn't completely confident about my ability to measure.  I could tell that I could only read the yardage to within an inch.  So, I decided I had an uncertainty of 1 inch.  This is 0.028 yards.

    Measure
    Step 3: Enter data into a form.

    The table requesting yardage data will look similar to the one shown to the right.  I have entered the appropriate data for the main stitch yardage swatch I discussed above. 

    The number of rows was 10; the number of stitches was 30. The length was 6.5 yards with an uncertainty of 0.028 yards.

    Since I did not apply the weight method, I just leave the boxes asking for weight information blank.  Although it is unnecessary to do so, I typed in "none" for units.  This will remind me that I did not enter weight information when I later read the knitting directions.

    You will need to repeat all these steps for the welt stitch.  Remember, most people call this the "ribbing".  But, the word "welt" applies even if it's garter stitch!

    Oh-- remember, if you double strand the yarn, multiply all your yardage measurements by two! 

    Main stitch 
    (for yarn estimate.) 
    Number of rows 
    =
    Minimum = 4
    Number of stitches 
    =
    Minimum = 10
    Units for yardage: 
    (e.g. yards, meters, feet etc.) 
    Total length of yarn 
    =
    Uncertainty in length 
    Units for weight: 
    (e.g. ounces, grams, pounds etc.) 
    Total weight of swatch 
    =
    Uncertainty in weight 
    = ±

    Welt stitch 
    (for yarn estimate.) 
    Number of rows 
    =
    Minimum = 4
    Number of stitches 
    =
    Minimum = 10 
    Units for yardage: 
    Same units as for main.
    Total length of yarn 
    =
    Uncertainty in length 
    = ±
    Units for weight:
    Same units as for main.
    Total weight of swatch 
    =
    Uncertainty in weight 
    = ±
    Weight method

    If you wish to use the weight method, just knit a swatch and weigh it.  When weighing swatches, it is best to make a large swatch because you probably can't find a scale to weigh a 0.001 ounce swatch! You will need a very accurate scale.  If you don't own one, consider visiting the post office and using their postage scale.
     

  • TOP of site-- to pattern generators
  • Click here to save on yarn from The Knitting Fiend!

  •  


    Have Fun!
    Lucia