Visit All Brands!Silver Reed SK-840 Studio Standard Gauge  Metal Single Bed Knitting Machine 4.5mm Needle Spacing x 200 Needles

Machine Knit Baby Poncho

Lucia Liljegren, The Knitting Fiend. December 22, 2004.


Doll in PonchoThis page has a generator (program) to create a square poncho pattern to knit by machine.  The hand knit version is available here. The generator has a pull down menu to suggest dimensions for 6 months to 3 years old.   The pattern can be made for adults and older children, but you'll need to pick "customize" for them, and choose your 
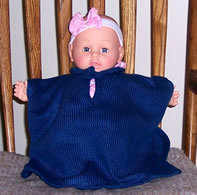
own dimensions.

My mom wanted me to make baby poncho for her friend's daughter's twins (who will be born in February 2005 and will then live far, far away. That's why the doll is modeling.  By the way, thsat the size for a 1 year old.)

I've got tons of poncho patterns, so you'd think I'd knit one of those, right?  I realized they were no good when I looked up baby's head and shoulder sizes and realized I needed to modify styles I found to ensure the head opening was large enough, but the neck width wasn't so large the poncho fell off the baby's shoulders.  I also surfed the web to get ideas.  Some patterns just have small head openings, which means parents of sitters need to yank the poncho over the baby's head. Doctors will explain that's not a good practice.  Some have large head openings tighten by cords -- which present a choking hazard. 

I added a slit which is closed with a frog. (The frog is very easy to make.)


Lucia Liljegren

P.S. I have tons of free knitting patterns and may some day add crochet. (Well, $3/ year donation requested.)  Visit poncho, mittens and gloves, hats, slippers and socks, knitter's graph paper.... It's best to go to the blog, or the main page.  I forget some of the links when I make individual pages.
My site is supported by your annual $3 donation.


Google
 
Web thedietdiary.com

You will need:
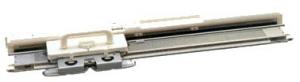
  • A single bed knitting machine. Here is a list  of machines available at All Brands.
  • Yarn.  I used Tamm Sport 2/7 which I purchased from Bonnie Triola.

Looking for more?

Visit the whole site!  Or to find all the patterns and generators, visit the blog.  To see other poncho generators, visit the poncho index.


Enter Data for Your Poncho

You must modify the following data to match the gauge and shape you want!  Just change the  numbers, and click "calculate" when you are finished.

Enter Your Gauge Swatch Information
Stitches per inch: schematicSelect size to the left. If you select a custom size, you must enter your own width and length -- replacing the values current in the boxes.  Click for typical head size information.   If you want to adjust the head opening, change the neck width.  The head opening is very elastic and stretches.
  • Width = inches,
  • Length = inches,
  • Neck width = inches,
  • Neck depth = inches and
  • Head opening =  inches. (Customize by adjusting neck width or depth.)
Rows per inch:
Poncho size:


To calculate the results, click the button!

Results

Don't try to edit anything below this point.  If you want to change them, change values in the table above. The summary tables are for informational purposes only.   Stitch Summary Table


Knitting materials

Yarn Estimate & supplies:

I used about 200 grams of TAMM 2/7 for swatching and the poncho.  (I messed up one swatch badly because I thought I was going to knit this yarn in Fisherman's rib on my Passap. It's too thick for that.)

Knitting Directions:

I Cord Trim:
  1. I Cord for poncho: Make two.  Cast on over 5 needles. Set machine to partial knitting so the carriage knits in only one direction ( i.e. push part button on Brother) and set machine tension 1 setting tighter than for poncho. Work a few rows.
    1. Set row counter to zero (RC=0).  Hang marker.  Work rows I cord. (This previous bit gets hung on the side of the poncho and goes from the hem to the neck.)
    2. Hang marker. Set row counter to zero. Work rows.  (This bit gets hung just in step 1 of making the poncho.)
    3. Hang marker. Set row counter to zero.  Work rows hang marker. (This bit gets hung from the neck to the hem on the side of the poncho.)
    4. Work a few more rows of I cord, take off on yarn using double eyed bodkin.  Apply to bottom and sides.
  2. You may also make about 300 rows of I cord for the frog closures now. (It is best to make too much and cut off the extra. I make this when I finish the poncho though. 
Poncho Pieces.
  1. Front: Begin at bottom edge.  Raise needles.  Hang the portion of I cord between center markers on needles, hanging 1 loop per needle, and 2 loops on each edge needle. 
  2. Set Row counter to zero (RC=0); thread carriage and set tension to that required for the poncho.  Pull needles out, push work against gate pegs and move carriage across carefully. (This acts as a cast on.)
  3. Work until RC=   rows. ( The neck divide will measure inches from cast on.) 
  4. Divide for neck. Set row counter to zero (RC=0).  Take stitches on   left hand needles off on waste yarn; remove needles from work. (You will now be knitting stitches on the right hand   needles). 
    1. Work on one side until RC= rows.   (This  measures  inches from neck divide. ). 
    2. Bind off knit  stitches furthest to the right and move those needles to rest position. (Or take off on ravel cord and waste yarn).  
    3. There should be  needles in work.  Raise one needle  on the right (shoulder) side. Fill with a bar from the adjacent stitch.  Knit 8 more rows. Bind off.   
    4. Bring needles on left hand side to work position, set row counter to zero, and knit left side mirroring the right side. 
  5. (The front is finished; it should measure inches from cast on.  )
  6. Work a neck trim.  Raise  needles.  Open neck divide and hang edge on needles with purl side facing you.  Knit 8 rows. Bind off.
  1. Back: Repeat front, up to neck divide, don't divide or set rowcounter to zero, just continue knitting to  RC= rows.  Set machine to partial knitting.   Bind off outer  shoulder stitches each side. Take empty needles to rest leaving neck stitches only.  (Or take off on ravel cord and waste yarn.)  Bring 1 stitch on each side into work. Fill with the top bar of the adjacent stitch. Knit 8 rows. Bind off.  
  2. This makes a little roll neck width a  inch wide opening slitted opening for the baby's head.
  1. Finish: Seam shoulders.
  2. Attach I cord to sides.  The instructions assume your machine doesn't have enough needles to hang the entire left or right side in one pass. If you have enough needles, just raise twice as many stitches and hang the full side.
    1. Raise 1 needle for every 2 carriage passes you worked in step 1a.  (Two carriage passes made 1 stitch of I-Cord stitch.) Lower 1 needle.  Hang poncho edge between hem and neck with knit side facing you.  Hang 2 loops of I cord in the needle nearest the hem, and1 loop per needle on all other needles.  
    2. If you are right handed, place carriage on the left. Thread carriage. Pull needles out, push work against gate pegs.  Carefully knit 1 row; latch tool bind off. 
    3. Repeat for the other 3  bits of I cord.
  3. Unravel any extra I cord, achor and seam or graft. 
  4. Make an I-Cord button.   I made a  frog as described  here,  but eliminated the little loops on the side. I just made the button, and cut the I-Cord about 3/4 inch long.  Then, I unraveled about 1/4 inch,  and  threaded the yarn through the open loops to anchor them.  Then, I used a tapestry needle and sewed the button about 1/3 rd of the way down from the top of the neck.  I made a plain loop for the closure, and sewed that on; put the button through, and tacked the loop to make it close tightly around the button.
  5. Block as appropriate for your yarn. 


Lucia Liljegren 2004.

All images, programs and text at this site are copyrighted.  Permission is given to knit garments and swatches from the directions provided.  This pattern may be printed for individual personal use, provided the copyright statement remains intact.  Patterns are available without charge at Lucia Liljegren's web pages, and cannot be resold.  @copyright 2004, Lucia Liljegren