Hand Knit Baby Poncho

Lucia Liljegren, The Knitting Fiend. December 22, 2004.


Doll in PonchoThis page has a generator (program) to create a square poncho pattern to knit by hand. The machine knit version is available here.
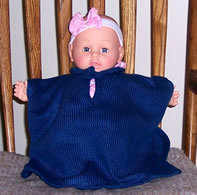
  The generator has a pull down menu to suggest dimensions for babies and toddlers 6 months to 3 years old.  The doll is modeling the 1 year old size.  (It's big but wearable on an infant. So, I think most mothers might like that!) 

It's easy to create a pattern for  adults and older children, but you'll need to pick "customize" from the pull down menu,  choose your own dimensions.  (That's pretty easy, because you just decide if you want a big wide, long poncho or a short one or whatever.)
 
This poncho is extremely good for babies because it has a very large head opening, but a narrow shoulder opening. That lets the parents dress their baby without yanking its head, but ensures the poncho stays on!  This is achieved through the wonders of making a slit at the neck and closing it  frog. (The frog is very easy to make.)

Lucia Liljegren

P.S. I have tons of free knitting patterns and may some day add crochet. (Well, $3/ year donation requested.)  Visit poncho, mittens and gloves, hats, slippers and socks, knitter's graph paper.... It's best to go to the blog, or the main page.  I forget some of the links when I make individual pages.
My site is supported by your annual $3 donation.


Google
 
Web thedietdiary.com

You will need:

  • About 6 ounces of sport weight yarn.    I used Tamm Sport 2/7 which I purchased from Bonnie Triola. (Yes, you can hand knit using yarn from on cones! )
Circular needles
 Bamboo Circular Knitting Needles Size 7  16''

Double pointed needles
8  Rosewood Double Point Knitting Needles -Size #7

Stitch markers
Locking Stitch Marker


Visit the whole site!  Or to find all the patterns and generators, visit the blog.  To see other poncho generators, visit the poncho index.


Enter Data for Your Poncho

You must modify the following data to match the gauge and shape you want!  Just change the  numbers, and click "calculate" when you are finished.

Enter Your Gauge Swatch Information
Stitches per inch: schematicSelect size to the left. If you select a custom size, you must enter your own width and length -- replacing the values current in the boxes.  Click for typical head size information.   If you want to adjust the head opening, change the neck width.  The head opening is very elastic and stretches.
  • Width = inches,
  • Length = inches,
  • Neck width = inches,
  • Neck depth = inches and
  • Head opening =  inches. (Customize by adjusting neck width or depth.)
Rows per inch:
Poncho size:


To calculate the results, click the button!

Results

Don't try to edit anything below this point.  If you want to change them, change values in the table above. The summary tables are for informational purposes only.  

Stitch Summary Table


Yarn Estimate & Supplies: 

Knitting Directions:

Poncho Pieces.

  1. Front: Begin at bottom edge.  Cast on stitches.  Work stockinette until piece measure inches from cast on.  End with knit side facing.  (If you track rows, there should be   rows. )
  2. Divide for neck. Place a row maker. Knit   stitches.   Place   stitches still on right hand needle on a stitch  holder. (I use a thick piece of string.)   
    1. Knit until this side until measures  inches from row marker. (If you are counting rows, the row count is  rows from the neck divide. )
    2. Bind off knit  stitches (for shoulders).    There should be  stitches remaining; these make the roll neck.  Make 1 stitch at the edge and knit across row.  (The "make 1" provides an extra stitch to seam the front and back neck.)   Work 7 more rows ending knit side facing. Bind off.   
    3. Pick up stitches on stitch holder.  Attach yarn with purl side facing, an mirror right side shaping.
  3. The front should measure inches from cast on.
  4. Work a neck trim.  Open neck divide. With knit side facing, attach yarn at one edge and pick up stitches.  Knit 8 rows. Bind off.  (This rolls up on the front. If you think it's too thick, unravel a few rows.)
  1. Back: Work as for front, up to neck divide, then don't divide, just knit to the shoulders ending with knit side facing.  (If you are counting rows, the row count will be  RC= rows. )   Bind off  shoulder stitches. Make 1 stitch at the neck edge,  knit across row.  Turn, bind off the same number of stitches for the other shoulder. Make 1 stitch.  Purl across row. (You are now knitting the collar.)   Work 6 rows, ending knit side facing. Bind off.  
  1. Finish: Seam shoulders.
I Cord For Button:

  1. Make  4 stitch I cord about 1 ft long for the  frog/button closures as follows:    Using a double pointed needle, cast on 4 stitches.  ** Without turning the needle, slide all stitches to the right edge of the left hand needle.  Pull yarn firmly around back of work, and knit stitches**  Repeat until cord is the desired length.  (If you are doing this right, you will notice this makes a closed tube.)
  2. Make an I-Cord button.  Using I cord, I made a  knot as described  here,  but eliminated the little loops on the side of the frog. I just folded the I Cord near the end, made the knot.  Then, I  cut the I-Cord about 3/4 inch long.   I unraveled about 1/4 inch, and  used a tapestry needle to thread the yarn through the open loops and pulled to anchor.  Then, I used a tapestry needle and sewed the button about 1/3 rd of the way down from the top of the neck.  I made a plain loop by folding the remaining I cord, and anchoring those ends. Then I sewed,  that on the poncho neck.  I slipped the button through, and tacked the loop to make it close tightly around the button.
  1. Make "knit on I cord".   This is very similar to the I-Cord you just worked. The only difference is you perform a "k2tog" operation which seams the I-Cord to the edge.  (You can also work plain I cord and sew it to the poncho.  Some people prefer to do that.)
    1. Wind off a long tail of yarn from the main ball of yarn. Don't break. You want a little ball with  sufficient to pick up stitches all around the four edges of the poncho.  (The purpose of this step is to minimize breaking yarn and having to weave in ends while not forcing you to pick up stitches around the whole poncho all at once.)
    2. With knit side facing, starting with yarn between the main skein and the little ball you wound off, and using a circular needle, pick up 2 stitches for every 3 rows from the shoulder to the hem, but pick up 1 extra stitch in the hem corner.  When you do this, have the main ball of yarn be at the shoulder, and the rest of the yarn be at the corner. 
    3. At the shoulder, cast on 4 using backward loop cast on.  With double pointed needle using main ball of  yarn, **knit 3 stitches, k2 together. (You are knitting a cast on stitch with a picked up stitch.)  Now, slip 4 stitches on the right hand needle to the left needle. Pull yarn firmly. ** Repeat until you reach the corner. (You will be out of stitches to knit.) 
    4. When you reach the edge on the other side,  using the little ball of yarn waiting for you pick up  1 stitch in every cast on stitch in the hem.  Now, starting in the corner where the I-cord is waiting,   work 1 row of I cord without the k2tog part. (That is, just knit 4 stitches, this makes the I-Cord a bit longer so it can curve around the corner. )  Then work knitted on I Cord just as you worked it along the sides. When you reach the corner.  Work the extra row of I Cord in the corner, pick up stitches on the next side and knit on I cord.  Continue until you get to the shoulder where you began.  Anchor I cord and work a little seam.
  2. Block as appropriate for your yarn.


Lucia Liljegren 2004.

All images, programs and text at this site are copyrighted.  Permission is given to knit garments and swatches from the directions provided.  This pattern may be printed for individual personal use, provided the copyright statement remains intact.  Patterns are available without charge at Lucia Liljegren's web pages, and cannot be resold.  @copyright 2004, Lucia Liljegren