Sideways Knit Raglan: Lucia's Hoodie

needs buttonsLucia Liljegren: In Progress (Monday, March 7, 2005).

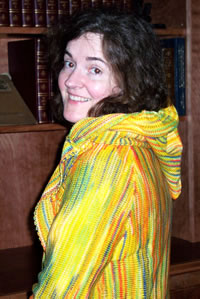
This hoodie is machine knit sideways. It's seamless!  Plus, since it's knit sideways, heavy people will find they don't run out of needles when casting on. (They may need to piece the ribbing on the back, but you can seam that inconspicuously.)

I working on variations.  Toggles on this pate selected to create a zip front hoodie with roll trim at the cuffs and hem. You can change to toggles to knit Jim's Raglan.

 I got the idea for this hoodie when I saw a a seamless hand knit hoodie pattern in the spring 2005 issue of Knit In Style! Theirs is knit bottom up, so the stripes run horizontally. (They also provide machine knit directions for the bottom up hoodie).
Knit 'N Style

Because I'm adding features, the various raglan pages are going to be somewhat disorganized until I code a few variations. But, if you can put up with disorganization, the generators work. There is enough information to knit your sweater, but if you become confused about it, contact me

You can see how the main piece item comes off the machine by reading this article at the blog.

Lucia

PS. If you are shopping for good prices on knitting machines or parts, AllBrands.com supports every brand available today. Their prices and service are excellent.


Features to set using toggles.

Hung hem: zipper inserted.
You will need to measure the front and buy a zipper. Sew it in when the sweater is finished.
zipper
Rolled trim at cuffs and hem.
You will need to hang the edges on the machine and knit stockinette.  It rolls up making a neat trim.
trim
Hood
This is just a rectangle folded in half and attached at the neck. 
hood


The Pattern Generator

Enter your specifications to create your pattern. Just type over my numbers, the directions will automatically change.

Enter Your Swatch Data

Knit two swatches: Data for one of them are entered here.  The swatch for the button band is discussed below.  I don't force you knit a ribbing swatch; I estimate the gauge based on the stockinette swatch.  However, I discuss the ribbing at the blog.

Remember: The gauge you enter here, and the gauge you knit your sweater with must match, or  your sweater won't fit.  Poor fit problems are more often caused by failing to achieve gauge, rather than not knowing your size.
Enter number of rows and stitches knit in stockinette.
stitches by rows. swatch
Enter dimensions measured after washing and blocking.

inches wide by inches tall.

Stockinette gauge. This is calculated based on the dimensions entered above.
stitches/inch and rows/inch.
Machine tension setting you used to knit your stockinet swatch. (Bond users, enter key plate setting.)
T=


Pick the sweater size.

Pull down to select the size range, then use the appropriate menu below.  The program will recommend values for your sweater.
You may also select 'custom' within any size range. If you want to customize, I suggest you first pick the size that fits best, for example "Men's 42". Let the form fill the boxes; then go through the form and set the toggles to the value you want. That will fill in all my recommended values for that size and style.  Afterwards, scroll back up,  toggle back to 'custom' and modify the body or sweater measurements you wish to modify.  

 If you are customizing, you can find handy size information here: Women and Men's, children & teens.

Pull down size range to the right:   (Kids isn't coded yet. Don't pick that.  This is what I mean by "in progress".)
Then, pull down the size from the appropriate menu below.

Misses's size: Men's chest size:
Kids
(Not coded yet. Nothing will happen if you pick this.)
According to the standards table, the a person who wears the currently selected size is about inches tall and weighs about lbs.
(If the boxes say '??' it means the standards table didn't suggest the height and weight for the size you selected.)

Schematic

The schematic to the right is sort of the shape of the main sweater when you knit the hoodie. The top of the "front" is flat in that case. I need to edit the schematic to add the "V" neck shaping. Also, the schematic shows shoulder darts, which I have not coded, so they aren't on the sweater. (I will code the shoulder darts if I conclude I need them for a good fit. I'm beginning to think they are rarely required.)

So, even though it's deficient, do refer to the schematic if you are confused about some of the measurements.

Unfortunately, the raglan armhole depth can't be shown on this illustration (and I  need to edit the figure because it suggests you can tell the depth.)  The armhole depth equal to the depth from that top horizontal line in the schematic to the left to the armhole line (as shown) plus the half width of the top of the sleeve.
raglan schematic

Sweater Design Data.

Body
Enter the chest circumference of the sweater.
This should equal the wearer's chest size plus 1 to 4 inches.
inches.
Enter the shoulder width of sweater.
(This is not currently used. It will be used if and when I code shoulder darts.)

inches.
Enter the Total Length of the sweater including ribbing:
Sweater length is a matter of taste and current fashion. When I knit this sweater for myself, I plan to use used 23" which hits me about 7" below my waist and a bit high on my hips.
inches.
Trim at hem of sweater:

Select ribbing or roll trim. (This selection will apply at the cuffs too.)

Select whether you want ribbing or a roll trim. State whether you want the ribbing to be "not snug", or "snug". I used "snug" for a roll trim, and "not snug" for ribbing, which should draw in by itself. "Snug" has 10% fewer stitches than "not snug". (I discuss ribbing the blog.)
Enter the depth of the ribbing or length of the roll trim when it is unrolled.

Enter the depth of the trim.


inches deep and
Enter the Raglan Armhole Depth:
The absolute minimum value for the depth is equal to 1/2 the circumference of the wearer's upper arm plus another inch to account for the shoulders.
inches.
Enter the Shoulder Slope for the sweater:
This is not used for this design.  (It will be if I add shoulder darts; otherwise, I'd just delete this row.=.)
This affects the shoulder shaping. It is a very, very difficult quantity to measure.  I advise making it 1/2" for an adult with very, very square shoulders (or if you like shoulder pads). Make it 2" if  your shoulders slope a lot.  If I were knitting for myself, I would use a value of 1.2" for my sweater with drop sleeves.
inches.
Neck Width before adding any trim or button band neck trim:
inches.
Select Button Band or Hung Hem for the front of the sweater.
I used a hung hem on my hoodie. Then I sewed a zipper to the hem to close the sweater; I used a button band on Jim's raglan.

If you select button band, be sure to scroll down and design your band. You will need to knit a second swatch, and select the number of buttons to knit.

Enter width to the right.

inches.
Select hood or no hood
If you want a hood, enter the hood height and total width is to the right.
Based on your current choices, the minimum hood half width that can be attached to this neckline is: inches; the maximum is inches. (The maximum would really pouf out around the sides of you head from a narrow neck. It might look dumb, but I'll let you make it, just in case the wearer is going to wear a football helmet or something.  If they are, make the hoodie taller too.)

Height = inches.

Half width =


Design Your Sleeves.
Wearer's arm length. (Click to learn how to measure. )
inches.
Wearer's shoulder width. (Click to learn how to measure.  This is used to estimate the knitted sleeve length that would reach your wrist. ) inches
Knitted length of a sleeve that would reach your wrist: (This value is calculated based on some body and sweater measurements and displayed for information only.  People who customize can decide if they want the sleeve longer or shorter than their wrist and adjust the length below.)
inches
If you want the sweater shorter than your wrist, enter a positive value here:

Result: Knitted sleeve length to  knit for this sweater including the rib. (If you customize, enter the knitted sleeve length you want here. Use the box immediately above for guidance. I entered 1" shorter than the arm length for my doll sweater.)
inches.


inches
Length of trim for cuff. (If you put ribbing on the hem, the instructions will also tell you to use ribbing on the hem. The same applies for the roll trim.)

State whether you want the trim to be "not snug", "snug" or "super snug". I use "snug" when I use ribbing and "very snug" when using a roll trim. That's because I like my trim to draw the hem of the sleeves in a little. 
inches

Cuff width:  Enter the width of the bottom of the main stockinette portion of the sleeve -- not the width of the trim.  For a wrist length sleeve, this must be at least as wide as your wrist and should probably be wider; if you use super snug cuffs, make it at least 10% wider than your wrist! For a elbow length sleeve, it must be at least as wide as your wrist.  

For reference: Based on the degree of snugness you selected and the width after the ribbing, the number of stitches for the ribbed cuff should comfortably fit a inch wrist.  You can change this by either changing the "snug" setting above, or making the cuff width wider.
inches

Sleeve Circumference.  
Based on the current chest dimension and neck width, the minimum sleeve circumference is:  inches. If you need a narrower sleeve, you must either make the chest smaller or the neck wider. (Or wait for me to code a generator with shoulder shaping.)
inches
Back neck depth. (Sorry, you can't change this. It's shown for informational purposes.)
This is calculated based on the chest dimension, the sleeve dimension and the neck width.  It is equal to half the width of the top of the sleeve. When I code shoulder darts it will be possible to adjust this more.   Right now, if you need a larger back neck depth, you must make the sleeve circumference smaller than it currently is, or make the neck wider, or make the chest bigger.  This is simply a limitation of the basic raglan shape.
inches
Front neck depth.  
  • For a V-neck, you should make this fairly deep. I used the default for Jim's sweater. it's the shallowest V neck I think anyone would like.
  • For a crew neck or hoodie, enter zero, the depth will automatically match the  back neck depth, which is the minimum possible with this design.) 
inches

Get your pattern:


How To Make Your Button Band (Knit vertically):

Miscellaneous:
Right now, you can add a button band if you don't knit a hood. You can add a hung hem to the V neck (although it might be a bit weird.)  If you want a button band, enter values here to  design your button band.   You will need this information if and only if you want a button band. It's coded for the V-neck cardigan, and the information is also printed on the pattern directions so you don't need to print this out.   I'm leaving the extra text for my own benefit because it will help me proof read when  I enhance the raglan program to permit button bands and a hood knit together.  


The full button band directions are discussed on separate web pages; please read those if you don't understand what information to enter here.  One discusses how to design a band for any V neck cardigan. The second page, at the blog,  illustrates step by step how to make button holes.    To calculate your band, you will need to knit a second swatch at a tighter tension than you knit for the sweater and enter that data here.  I recommend making a relatively narrow but long swatch, because it's very important the row gauge be accurate. 

Enter data for your button band swatch.
Enter:
Enter:
Calculated results below.
Number of stitches: Width= inches. stitch/inch=
Number of rows: Length = inches. rows/inch=


Details for Button Band.
You can change the number of buttons. The remaining values are calculated based on your raglan. 
Length of band to V: inches.
RC=
Total Length of band: inches.
RC=
Number of buttons: .
(You can modify the number to the left.)
Width of Band = inches. Stitches to cast on: inches.
Stitches for each buttonhole:
Stitches on either side:

Button Details


Extra schematic

This picture if for my (Lucia's) benefit. I plan to add some labels, particularly if I add shoulder darts. If I code in shoulder darts, their purpose will be to permit squarer shoulders.  Finicky people like that; without the shoulder darts, you'll can only achieve a "store bought" fit.  Shoulder darts will let people get an better than store bought fit.

as worn
.