Poncho I: Type: Slim Hand Knit Top Down

Or the "doll poncho" but  you can make it adult size!

Doll wearing poncho

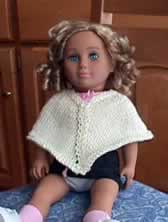
View whole site,  my blog,  my other ponchos,  off site poncho links.

It' s Wednesday, Feb. 4, 2004. Was it Monday? Charlene asked for a poncho design....

We got discussing ponchos and I've started to code a poncho pattern generator. This is the first poncho I designed. I test knit it on my doll yesterday.  It looks pretty cute.  (Although, if you look carefully, you'll see I tried two different increase methods.  The instructions tell you to use the one that doesn't leave little holes....)

I know this looks like a doll poncho, but you can design your own poncho, in your own size, using the yarn of your choice by changing the numbers in the entry form below. 

Strangely, the poncho design actually based on misunderstanding the type of poncho Charlene wanted!  She wanted one knit sideways, which will be Poncho II.

To make sure my reasoning works, I  am test knitting all these poncho's for my doll.  Otherwise, I just don't have enough time or money to spend on the yarn for all the ponchos.  Besides, what if one of them comes out wrong?   I've knit myself four ponchos now. That's enough!

This poncho is:

  • Hand Knit. (It can be machine knit, but most people will run out of needles. You also need to transfer stitches  using the garter bar. I hate doing that!  )
  • Slim fitting (as ponchos go), with darts at the shoulders.
  • Knit from top down.
  • Uses at least 4 rows of garter stitch at the hem and neck. (But you can change that to something else if you want.)

Remember: Like all patterns spit out by my generators, this is mostly shaping directions. You decide how you are going to increase, decrease etc.  I'll make some suggestions, but they won't be detailed. You pick your yarn, needles etc.


I haven't made a schematic of this poncho. However, the schematic would be very similar to the schematic for Charlene's poncho. You can find them schematics at the bottom of Charlene's poncho page.  The difference is this poncho is knit from the top down to the hem and it is always a "slim" two piece  poncho. (I haven't coded any other flare angles.  The only two that would be easy to HK from the top down are "slim" and "wide"; "medium" and "full" would require a slightly different approach than used with this generator).

Lucia


Make a Donation

If you are thrilled with this generator, please click to donate and assist me with my constant quest to buy yarn and pay my mortgage and keep my husband for bugging me for spending too much money! Support my site with a $3 donation!

Please click the to make a $3 donation.


Enter Data for Your Poncho

You must modify the following data to match the gauge and shape you want!  Just change the  numbers, and click "calculate" when you are finished.

Enter Your Gauge Swatch Information
Main stitch pattern: Used for most of the poncho Welt stitch pattern: Used for the neck and hem.
  • I have you enter the welt stitch gauge to let the program instruct you to reduce stitches for the neck and hem when you use a wide stitch like Garter stitch.  if you use a stitch that draws in, like ribbing, I ignore the welt stitch gauge. 
  • The welt row gauge is used to make sure the lengths are right. 
  • If you want a simple to knit pattern that will probably fit just fine, enter the same gauges you used for the main stitch! (Actually, when I use garter stitch, I guess that it has 20% fewer stitches/inch an 20% more rows per inch. I assume the opposite for ribbing.)
  • Main stitch pattern name: Welt stitch pattern name:
    Stitches per inch: Stitches per inch:
    Rows per inch: Rows per inch:

     
    Replace my shape parameters with Your Poncho Shape Parameters
    Click these if you need help with sizes: adult sizes, child sizes

     
    Width of trapezoid at neck : inches.  
    The opening for your head will be twice this value. Make sure your head fits through the hole! Because knitting stretches, my 22" head can often fit through an 18" hole. )
    Your approximate shoulder width: inches. I'm a 5'4" woman and my shoulders are about 14.5" wide, but make ponchos 15" wide to fit over sweaters. Make them wider to fit over heavy clothes.
    Length of Poncho along diagonal seam: inches.
    This will be the length from the neck to the hem along the front of the poncho.)
    Length of "welt" at neck: inches 
    You specify a long or short collar.  The turtleneck on the poncho at linda's craftique is 8-10" long.  I will not let you knit the collar less than 4 rows deep.
    Length of "welt" at hem: inches
    Make this pretty short. I'd pick about 1/2".   I will not let you knit it less than 4 rows deep. (The program takes care of that.)

    To calculate the results, click the button!

    Results

    Don't try to edit anything below this point.  If you want to change them, change values in the table above. The summary tables are for informational purposes only. 

    Knitting Directions:

    The poncho is made from two major pieces that are almost trapezoids; these major two pieces are are sewn together on long diagonal edge to make one piece. Afterward you pick up the neck stitches and knit the neck trim or collar. Finally, sew the other diagonal edge and neck together.  Finish the ends and you are done.

    Unfortunately, simple trapezoids make the poncho too pointy at the neck. To get rid of the pointyness, the poncho needs a dart in the shoulder.  

    Please read the directions from beginning to end. Make sure you understand them.  The values should all add up!

    Here are some general tips for Hand Knitters:

    Here are some general tips for Machine Knitters who want to adapt the pattern:

    Poncho Side:

    Make two.
    Narrative: When you knit this piece you will begin by increasing at both edges and the center of the work. The center increase are a shoulder dart and prevent the neck from being a huge unattractive cone.  When you do this you will increase 1 stitch every two rows on both outside edges and stitches every two rows on on either side of the center .

    The information below here is for information purposes only. I use it to compare poncho shaoes from one generator to another. You do not need to understand this to knit a good poncho!


    Summary of Shape Data I Calculated.
    Alpha This is the flare angle.  The flare angle depends only on your stitch and row gauge.  You can't change it unless you pick another stitch type.

    Narrow ponchos knit in stockinet like the one at lindacraftique usually flare between  30 and 35 degrees.
    Height of trapezoid: inches.
    This the sleeve length of your poncho. You can  increase it by increasing the diagonal length. You can increase it a little by making the neck narrower (but that's a silly way to change it.)
    Width of one trapezoid at hem: inches.
    The full hem is twice this width. 
    Delta degrees 
    This describes the angle on the "shoulder" side of the first little piece you make.
    Honestly, you probably don't give a hoot about this angle.  However, it is  angle of the shoulder dart for your poncho as seen when knit.   It depends on your stitch gauge.
    Beta (shoulder angle): degrees.  


    This is the shoulder angle as measured from the horizontal when the poncho is knit. This value is important, but you can't change it. It depends on your stitch gauge.

    Slim poncho's require darts. The purpose of the shoulder dart is to prevent the neck on the poncho from becoming a cone.  

    For a "very good" poncho design that drapes very nicely on  your shoulders, Beta falls between 5 and 15 degrees.  If beta falls between 0 and 30 degrees, it's a "pretty good" poncho. (In fact, most wide ponchos just have Beta=0).  I estimate that the poncho at lidacraftique has a shoulder angle between  20 -25 degrees

    Larger angles make the neck look like a cone. (This is what makes the devotee's of wide ponchos  tell you slim ponchos don't fit.)
    Negative angles make it look line a cone-- but drop down!
     

    Stitch Summary table

    Location
    Stitches
    Width
    Rows
    Length
    Cast on at neck stitches.
     inches 0 rows
    0 inches.
    End of first shaping stitches.   inches   rows.   inches.
    End of shoulder shaping stitches.   inches.   rows.   inches.
    End of Body Shaping
    stitches. inches. rows. inches.
    Bind off Hem stitches.   inches.   rows.   inches.

    Note: The final lengths may be off off by two rows due to rounding.  If your welt stitch draws in a lot, the width after the hem will narrower than the width above the hem.   Otherwise, the final two widths will be similar, but not necessarily identical.


    All images, programs and text at this site are copyrighted.  Permission is given to knit garments and swatches from the directions provided.  This pattern may be printed for individual personal use, provided the copyright statement remains intact.  Patterns are available without charge at Lucia Liljegren's web pages, and cannot be resold.  @copyright 2004, Lucia Liljegren