Capelet

greenCollar

pinkCapelet

This page has a pattern generator (aka program) to create a pattern for a machine knit capelet or cape.   Like the one I'm modeling to the right.  If you enter a short length, you can also knit a collar.  I'm modeling that to the left.   Hand knitters who want to knit a cape should visit the hand knit cape page.

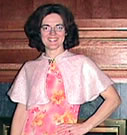
You can make your capelet shorter or longer than mine, use yarn like mine, or use heavier yarn. You can make your capelet flare more than mine. The generator will spit out the pattern you  want.

Main siteblogPoncho & Cape collectionPoncho I, Poncho II, and Poncho III.

You must set your browser to run javascript and to accept cookies to run this program.

Characteristics of the capelet:

  • Knit from center front to center front using short rows.
  • Optional 1.5" attached roll collar.
  • Pinned closed with a decorative pin or Idiot Cord ties.
  • Idiot Cord trim at the center front opening.
  • You can pick the shoulder width, neck opening size and length to fit you.
  • You can enter your stitch and row gauge to get the pattern for your yarn.
  • MK
  • This pattern can be handknit, but you need to count rows and stitches while knitting short rows.  If you want a long cape, buy a row counter and read the notes for hand knitters. You will also want to read how to knit on I -Cord, and adapt that part of the pattern.  (Enter hand knit I-Cord in the google search box.)

Remember: Like all patterns spit out by my generators, this is mostly shaping directions.  The purpose of the generators is to let you be creative, while eliminating the  need to do pesky calculations.  This generator will let you make exactly the cape shown, but I encourage you to add your own touches.

Lucia

Google
 
Web thedietdiary.com


Design your capelet

schematicTo design your capelet, you must pick a neck opening, a shoulder width and a front length.    These three items are illustrated in the very small schematic to the right.   To learn more about this, read the design page, which will show a larger schematic  and explain what you need to enter.  The design page will also indicate the design values I used for  my capelet and collar.


Have fun knitting the capelet,
Lucia

Donation Requested

Remember: Patterns are worth something. Custom patterns should be worth even more.  This is sort of "shareware".   If you knit one of these, send me a donation.  (Pictures are welcome too!)


Enter Data for Your cape

You must modify the following data to match the gauge and shape you want!  Just change the numbers; it recalculates automatically.

 
Replace My Gauge Swatch Information Your Gauge Swatch Information
Advice: Hitting the tab key after entering the number in the box seems the most reliable way to update values. 
Note your machine setting on your directions in pen.  You must use the same machine setting when knitting the swatch and the cape.

Stitches per inch: 
Rows per inch:

Replace My Cape Shape Parameters with Yours 
Data to enter.
Information.
Neck opening
inches
The minimum neck opening based on your row gauge is inches.   If you want a tighter neck,  you must use a finer gauge yarn. 
Shoulder Width: inches. The "shoulder width" is the width you'd like the cape to be near your shoulders. 
Front length of cape: inches.
Enter the length you'd like for the front of the cape. 

Note: Based on the shoulder width, and neck opening you entered, the minimum front length you can pick for your cape is  inches.

Based on the parameters you have entered so far, you will be instructed to cast on between needles    and   .  Enter a value here if you prefer to work between a different range of needles  

I'll code a warning box in the future.  It will warn about too small neck, or any other problem I am aware of that makes the cape unknittable.   Meanwhile, scan down and make sure the instructions don't tell you to knit a  negative number of rows.  (They can happen if you pick a very small neck size.)


Results: Your Cape Pattern

Don't try to edit anything below this point.  If you want to change them, change values in the table above. The summary tables are for informational purposes only.   This is a program. So, please read through al the directions and make sure no negative numbers appear.  (I try to think about where they might appear and create a warning box, but I don't always think of them all.)

Yarn Estimate:

Will exist after I knit a Capelet in something other than mystery yarn.


Knitting Instructions.

Some abbreviations: RC = Row count read out.  COR= Carriage on Right. COL = Carriage on Left.

Make idiot cord:

You will need 2 short pieces. If you are making a tie closure like the one illustrated on the collar, you will also need  and one very, very long piece.  If you don't want to make a tie closure, you only need 2 I-Cord pieces.

Warning: Don't pull the I- cord. It's easier to hang if you don't.
You will be instructed to hang row markers. I advise using two or three different color markers and alternating.  Note which colors you hung at which point.
  1. Set machine one tension setting tighter tension than you will use for the cape.  Cast on over 5 stitches in waste yarn.  Knit a few rows.  Hang a light weight. 
  2. Set machine so it knits in one direction only.  (I push in one part button on my Brother. I set CX on my Passap and knit on one bed only. Change to cape yarn. Knit 10 rows.   (You will unravel these and throw them away. They just help if you miscount when rehanging.)
  3. Notice the trim will start to form a little tube with some bars along the back.  To make it even easier to avoid twisting the I cord when you attach it to the poncho I-Cord later on, you could use a tapestry needle to periodically draw some colored yarn through the horizontal bars as you knit the I-Cord.  You will pull this out later. (Click to see.)
  4. Set row counter to zero.  RC=0  (This will end up aligned with the waste yarn.)
  5. If you are knitting the little stand up roll collar, knit about 2" worth and reset row counter to zero. Just gauge this by eye.
  6. For both neck treatements, set RC=0, and  knit until row counter reads RC= .  
  7. Knit at least 10 more rows to be safe.  
  8. Change to waste yarn, knit a few more rows. Break yarn, remove cord from machine. Anchor live loops with a safety pin or a piece of yarn. (You'll unravel later.)
  9. When you hang I cord, you usually want to hang one loop from the side of a stitch next to the column of bars.   From now on, when I refer to a row of I cord, I  mean one knitted row. If I'm sloppy, I may also say one "stitch" or one "loop".  (Yep, I may use different terms for the same thing.) For reference:  It took two carriage passes to knit 1 row of I cord.  The other pass made that little column of bars.  The column should be "below" the needles.
Next, if you are making the little tie closure, make a very long I-Cord piece.  Put a tape around your neck, and let the ends hang down to where you want the end of the I-cord to hang. (Like my ties.)  Just start making I -Cord, measuring as you knit until the cord is the length you like. Then, knit at least 5 inches more "to be safe".  When you make your cape, you will be folding this long piece in half,  hanging it on the machine and attaching it to the neck. You can always unravel extra. But, if you make a mistake and don't hang it in the center, you will regret not having the extra few inches!

Knit Major Cape Piece

Skill: You need to know how to work short rows. Consult your manual; it may be called "partial knitting". 
Note: The hem of the cape is on the left side of the needle bed, the neck is on the right.  The direction wording assumes you are knitting stockinette and the knit side will be the "public" side of the garment. The purl side is the "wrong" side.  This matters when you are rehanging pieces and assembling on the machine.

Your cape pattern has 8 turning darts and 2 shoulder darts.  I advise writing check marks in one color ink as I work each step.  Then, place crosses by the step when you work them in reverse after you reach the center back.
  1. Bring  needles on the bed to work position. If you want the cheat sheet to match the needle bed, the left needle should be  and the right needle should be  
  2. Take the     needles furthest to the right completely out of work.  The right hand needle is now .
  3. If you want to create the no-roll edging, raise two needles on the far left.  Afterwards, take the 2nd and 3rd needles, and 5th and 6th needles on the far left out of work.   You will later reform 1 column of stitches in each gap.   So, this leaves the same effective number of stitches in work as instructed.   Later, when following shaping directions for darts, consider each gap to correspond to 1 needle.  (Hopefully, this will become clear when  you are getting near the end of the dart shaping.)
  4. Hang I-Cord on   needles, with one I cord loop per needle.  You'll have a few extra I-Cord loops on each side. That's ok; you can unravel them later.  (When you knit the first row, knit carefully.  The I-Cord replaces the e-wraps in an ewrap cast on.  ) 
  5. This is the 1st "main rectangle".  At the beginning of this rectangle, there are needles in work; the right hand needle is .  As you follow the lettered instructions you will bring    needles on the right hand side of the bed into work. (Note: When there are zero increases, all steps after "b" are skipped. The little box in step "c" will indicate this. Hand knitters should find this bit measures inches from the point where the row counter is set to zero.)
    1. Set row counter to zero. 
    2. Knit rows
    3.     Increase 1 stitch on right hand side of the bed. Knit    rows;  repeat   times.
    4. Knit  rows.
    5.  You should have  needles in work.  RC = ; right hand needle is .
  6. You have reached  "turning dart 1".    You will probably want to rehang weights periodically. 
    1. The general instructions for every turning dart are the same. However, the total rows worked changes.  
    2. Set row counter to zero RC=0.
    3. Knit 1 row.  COL 
    4. Set machine to partial knitting. (H on a brother.)
    5. Move needles on right hand side of bed to non-working position.  Knit 1 row, wrap, knit 1 row. (COL) [Note: the right hand needles raised to non-working position won't knit now.  It's a short row.]
    6. Move needles on right hand side of bed to non-working position. Knit 1 row, wrap, knit 1 row.  (COL)
    7.     step f.
    8. Note: You are taking  needles out of work every  rows.
    9. Repeat  c-e until you notice there were    or fewer needles in work during the previous carriage pass.  (Which is to say, when you reach a row where zero needles would be in work if you continued.)  With COL, RC= .  
    10. --------   You are one row past the dart center, and will now begin putting the needles back in work mirroring the first part of the dart -------
    11. Do steps e-c in reverse order.  That is, instead of raising needles on right hand side to non-working position, move them to upper working position so they knit on the next carriage pass.   The dart is complete  when you notice you just worked a row with all needles knitting.  This row mirrors the row knit in step "c".  ( The carriage will be on the right, and the row count will be RC=  . )
  7. This is the 2nd "main rectangle".  At the beginning of this rectangle, there are needles in work. As you follow the lettered instructions you will bring    needles on the right hand side of the bed into work.  (Hand knitters should find it measures inches.
    1. Set machine to full knitting. (N on a Brother.) Set row counter to zero.  RC=0.
    2. Knit rows
    3.    Increase 1 stitch on right hand side of the bed. Knit   rows. Repeat    times.
    4. Knit  rows.
    5. You should have  needles in work.   (RC = ; right hand needle is )
  8. You have reached turning dart 2.  Work as for turning dart 1.  (Step 7.)
    1. However, since there are more stitches in work, when you reach the dart center, RC= .  The dart is complete at RC=  .
  9. You have reached the "shoulder rectangle". It's a rectangle with a shoulder dart in the center.
    1. Set row  counter to zero.  RC=0.
    2. Knit   rows.
  10. ---------------------You have reached the beginning of the shoulder dart.----
    1. Set row counter to zero.  Knit 1 row.  COL
    2. Set machine to partial knitting.
    3. This is worked similarly to the turning darts except the number of stitches per pass is different and, if you designed this to be longer than the minimum length,  you will stop taking needles out of work before you reach the hem.
    4. Move needles on right hand side of bed to non-working position.  Knit 1 row, wrap.   Knit 1 row. (COL) [Note: the right hand needles raised to non-working position won't knit now.  It's a short row.]
    5. Move needles on right hand side of bed to non-working position. Knit 1 row, wrap, knit 1 row.  (COL)
    6.     step e
    7. Note: You are taking  needles out of work every  rows.
    8. Repeat c-e until you reach  RC= .   The carriage will be on the left at this point.
    9. You are one row past the dart center.
    10. Now, move needles into work at the rate just described.  When you finish, COR and RC= .
  11. Knit  rows.
  12. You have reached turning dart 3.   Work this like turning dart 1. 
    1. When you reach the dart center,  RC= .  When you finish RC= .
  13. This is the 3rd "main rectangle".  At the beginning of this rectangle, there are needles in work. As you follow the lettered instructions you will bring    needles on the right hand side of the bed into work.  Hand knitters should find it measures inches.
    1. Set machine to full knitting.  (N on a Brother.) Set row counter to zero.  RC=0.
    2. Knit rows
    3.   Increase 1 stitch on right hand side of the bed. Knit     rows. Repeat "c"  times.
    4. Knit  rows.
    5. You should have  needles in work. (RC = ; right hand needle is )
  14. You have reached turning dart 4. Repeat step 6. 
    1. When you reach the dart center,  RC= .  When the dart is complete, RC= .
  15. This is the 4th "main rectangle".  At the beginning of this rectangle, there are needles in work.   Hand knitters should find it measures inches.
    1. Set row counter to zero.  RC = 0.
    2.  Knit rows
  16. ------------You have reached the center back.  There are there are needles in work; the right hand needle is .  Go have a piece of chocolate!------------
  17. Now, work everything but mirror the directions. You need understand two things to mirror:
    1. Work the steps in in reverse order.  I've written the instructions so you work steps 19, 18, 17 etc. However, follow the lettered steps in the order written: that is: (a, b, c,)  You checked each step as you worked it, right?
    2. Where the instructions previously said "increase a stitch on the right hand side", decrease the stitch.  I decrease by transferring the two right hand stitches in one needle using my two prong transfer tool. Then I take the needle out of work.  Other than that, the instructions are the same!
    3. The number of stitches the program indicates at the beginning of the rectangle will now be the number at the end of the rectangle.
    4. I advise writing "Xs" in a different color ink you as work backwards.
  18. When you reach the center front, take work off on waste yarn or garter bar.
  19. Optional: If you decided to work the non-roll edge, do the following: 
    1. With the purl side facing you, use a crochet hook or your latch tool and latch up 1 knit stich in one of the column of bars formed by the two out of work needles. This is called reforming the stitches.  There will be a purl bar on the knit side and a knit column on the purl side. Anchor the stitch you just made by hanging it on one of the empty needles. Repeat for the second column of bars.   
  20. Raise the number of needles used for the cast on.  With the knit side facing you, rehang the open stitches of the cape piece.  Remove the waste yarn, and check that all the stitches are hung.  Hang I-Cord, one loop per needle.  Thread the carriage with yarn that matches the cape.  If you are right handed, place the knit carriage on the left side of the bed.  Knit across the row.  Bind off very loosely from right to left. (If you are left handed, reverse the left/right instructions! )

Neck treatment and finishing.

  1. Raise  needles. 
    1. If you are attaching the I-Cord ties, hang neck with knit side facing you.  Fold I -Cord to find center and hang the center loop in the center of the bed.   Knit 1 row.  Bind off loosely.  Sew up I -Cord pieces with the side I-Cord raw edges hidden behind the neck I-Cord. Unraveling extra loops if necessary and anchor the raw stitches.
    2. If you want the 1.5" roll collar which you will pin shut, hang neck with the purl side facing you.  Knit  until RC=  bind off loosely.  Sew the little extra bits of I-Cord to the collar edge. Unravel any extra, anchor and tidy up.
    3. If you want a 1.5" roll collar and a little tie, hang the I-Cord first. Then hang the cape with the purl side facing you. Then knit the collar. This works just fine!  The only hitch is you'll have to run the 2" of I-Cord for collar edge trimming behind the little ties.  That's probably not a big deal. (I haven't done this, because I don't want the tie closure and the little collar. )
  2. Tidy up all extra pieces of yarn.
  3. Steam (if appropriate for your yarn.)
  4. Wear.
  5. Take a picture and sent it to Lucia! Tell her she can post the picture to her blog.
  6. If you love your capelet and haven't donated, donate!


Notes for Hand knitters.

You can convert this cape  pattern to hand knitting.  However, since you need to work quite a few short rows and count, I recommend buying a row counter and using stitch markers to simplify keeping track of rows and stitches when working short rows.  These tips may also help:
.
Google
 
Web thedietdiary.com


All images, programs and text at this site are copyrighted.  Permission is given to knit sweaters and swatches from the directions provided.  @copyright 2004, Lucia Liljegren