Visit the whole site or read today's Article at my blog.

purse

Short Rowed Felted Machine Knit Purse

Google
 
Web thedietdiary.com
This page has a generator that calculates directions to create a pattern to knit a "lunch box" shape purse.  The body is a rectangle, with straps added.   I knit this on a single bed  knitting machine, but it is very, very easy to adapt to hand knitting. 

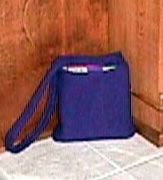
The purse is knit from side to side in stockinette.  That means you can easily knit vertical stripes by changing colors every few rows.  Mine is purple, and is currently holding a box of Tender Vittles cat food to show its shape and size.  You can't see it in the picture, but the straps and top of purse curl.  The top curls slightly, forming a nice edge. The straps curl a lot; you can press this out with an iron leaving only a slight inward curl. I didn't press it out because I like the curl.  If you hate curling, you can apply some sort of edge treatment.

My purse is knit in Jagger Spun 2/8 wool, in royal purple, then felted by throwing it in the washing machine with a load of whites. I used hot water.   You can knit yours in any wool that felts; most 100% animal fibers do.  I used about 2 ounces to make a 8" tall, 7" wide, 2" deep purse with  26" straps.   If you are using worsted weight yarn,  budget about 4 ounces for a purse of this size.  If you make it twice as tall or twice as wide, you'll need twice as much yarn as for a purse this size. If you make it twice as tall and twice as wide, you'll need 4 times the yarn!

Can you knit this by hand? Yes.  However, you will need to understand the directions and adapt them to hand knitting.  I've tried writing directions simultaneously in MK and HK, but it seems to confuse people. So, I'm  not trying any more!  (Anyway, there is a much more efficient way HK a purse this shape.  Visit the
white purse page to see the HK version. )

Good luck,
Lucia


Enter your purse design parameters

Knit a swatch, and felt it by throwing it in the washing machine. Afterwards, enter data in the boxes below to design your purse data.  To understand the purse dimensions, you can examine this figure.  The directions will update automatically provided you have javascript running. If everything is running properly, the warning box will say "filled directions", otherwise, the box will say something else.

This is a warning / informational box:


Lengths
Stitches or Rows
(You could use the formulas to calculate the purse yourself. Notice all these numbers appear in the pattern!)
Enter the number of stitches per inch measured after felting:
SG= stitches/inch

Enter the number of rows per inch measured after felting:
RG= rows/inch

How deep do you want the sides?
D = inches DRows = D * RG = rows.
(Rounded to nearest multiple of 4. )
How tall do you want the purse to be?
T = inches
TSt = T * SG = stitches.
How wide do you want the purse to be?
(Note, this must  be greater or equal to the depth.)
W = inches
WRows = W * RG = rows.
Round to multiple of 2. 
Maximum number of stitches left out of work when making short rows:

SRSt = DRows/4 = stitches.
Cast On:

CO = TSt + SRSt stitches
Number of rows of straight knitting

SRows = WRows - DRows =  rows
Round to multiple  of 2.
Strap Length SL = inches
 SLRows = SL * RG = Rows.
Strap Stitches

SSt =  DRows * (SG / RG) = stitches.
Pairs of short rows for top (optional)

SRPairs = SRows / 20=
Number of rows per pair of short rows.

NPairRows = (SRows- 6 ) / (SRPairs -1) =
Row count for first short row

 FirstRow = [  SRows - NPairRows * (SRPairs -1 ) ] /2 -2 =
Round up to  even  number.


Directions:

Note: Read your machine manual to learn how to knit short rows  this may also  be called "partial knitting" in  your manual.  I do not give machine specific directions for procedures. (You know the whole, move needle to "B" position, or "H" etc. Those directions vary from machine to machine.)  I give functional directions.  I will periodically give you row counts and note where the carriage should be at the end of the row. 

Abbreviations: RC= row count, COR = Carriage on Right, COL = Carriage on Left.  For the time being, I have the formulas in parentheses next to blank spaces; you must calculate to create your pattern. (I plan to enter the formulas in a generator.)

The directions will tell you where to change colors if you'd like the sides to be a different color from the front and back.  (I'm making single color purses. You can make a two color one if you want to understand the construction of the purse better.)
Color 1: The color you want the sides and straps.
Color 2: The color you want the front and back of the purse.

  1. Raise needles. Waste yarn cast on over all these needles. Knit at least 6 rows. Break yarn, thread purse yarn color 1, that is, the color for the side of the purse. 
  2. Make short row V on right hand side of machine.  You will first take needles out of work, then return them to work.
    1. Set machine for partial knitting.
    2. Begin COR. Set RC=0 on your counter.
    3. Row 1: Knit across row.  Move 1 needle on far right hand side of machine to non-working position, so that it won't knit on the next pass.  [ End: COL, RC=1].
    4. Row 2: Knit across row.  Wrap. [End: COR; RC=2]
    5. Repeat rows 1 & 2, permitting row counter to increment,  until    needles have been taken out of work, ending on an even row.  [End: COR: RC =   ].
    6. Hang a yarn marker on the left edge of the purse. (This helps you find the correct spot to pick up stitches later.)
    7. This is the first edge of the purse. As you proceed, you will notice the right hand side of the work starts to fold over.   Click here to see a picture of my finger stuck in the wedge made after finishing step l.
    8. Optional: Change colors.
    9. Reset row counter RC=0.
    10. Row 1: Knit across row. Raise first out of work needle on right to working position, so it will knit on the next pass.  [End: COL, RC=1]
    11. Row 2: Knit across row. [End COL, RC=2].
    12. Repeat rows 1 and 2, permitting row counter to increment until all needles are back in work.  End on an even row. [ End: COR, RC= ].
    13. You have made half of one side of the purse.
  3. Knit front of purse.   
    1. Reset Row Counter: RC=0
    2. Knit  (SRows) rows plain.  Read next direction for option before proceeding.
    3. Optional:  While knitting the rows required for 3b, work = pairs of short rows every (NPairRows)  rows working the first row pair when the row count reads RC & .  When working the short rows,  leave   needles on the left side of the machine out of work.  For convenience,  calculate the rows and note the rows here: ___________________________________________.  (Working the short rows tightens up the top of the purse about 10% which keep the purse opening from flaring over time.   It doesn't matter exactly which rows you pick to work the short rows, but you want them evenly distributed.)
  4. Reset counter.  Make a short row V as in step 2.  (This forms the second edge of the purse. You will be finishing the front of the purse as you take needles out of work, then you will be working the side.)
  5. Reset counter. Make another short row V as in step 2. (This forms the third edge of the purse.  You will be finishing the side, then beginning the back of the purse.)
  6. Reset counter.  Repeat step 3. (This makes the back of the purse.)
  7. Reset counter. Make short row V as in step 2. (This forms the final edge of the purse. You will be finishing the back of the purse, then half of the final side.)
  8. Break yarn leaving a tail with sufficient yarn to knit 2 rows.
  9. Optional: If you want the knit side of the purse to be show (and you probably do), remove stitches on waste yarn.  Rehang these stitches with the knit side if the purse facing you.  If you want the purl side to show, skip this step.
  10. Hang base of the loops from the cast on row.
  11. If you are right handed, place carriage on left, thread the carriage, and knit 1 row.  Latch tool bind off.   (Note: If you are left handed, you might want to start with the carriage on right.  That makes it easier to bind off!)
  12. The purse should look like a rectangle with a big hole at the top. The bottom should have formed as you knit.  You will need to seam the bottom, now or later.
  13. Raise needles on the machine. Hang a short side of the top edge of the purse purse with the wrong side facing you. (You want to hang the short bit between the markers  you placed on the edges.  If the outside of the purse is the knit side, hang with purl side facing you.)
  14. Knit rows.
  15. Take off on waste yarn.
  16. Hang the other edge of the purse with right side facing you. (That is, if the knit side is the outside, the knit side should face you. ) Hang strap stitches with wrong side facing you.  Check to be sure the strap isn't twisted.  Manually pull the strap stitches through the purse.  Latch tool bind off. 
  17. Remove all waste  yarn.  Click here to see the bottom of my purse.
  18. Sew long bottom seam. Finish off extra threads and tidy up. Click here to see the purse before throwing in the wash.
  19. Throw in washing machine to felt the purse. Steam after felting.
  20. If you like, make a lining, and add a snap to the inside of the purse. (Sorry, I'm not giving directions for this. You need to measure the purse, make appropriate rectangles, sew then together and slip the lining in.)

I hope you love your purse!
Lucia

My site is supported by your annual $3 donation. Please click and donate if you use my patterns or information.


Copyright 2004, all rights reserved. (You may print out directions and knit the purse!)