Hand Knit Felted Purse From The Knitting Fiend

Visit the whole site or read today's article at my blog.

purse


Google
 
Web thedietdiary.com

My site is supported by your annual $3 donation. Please click and donate if you use my patterns or information.

This page has a generator that calculates directions to create a pattern to hand knit a "lunch box" shape purse.  The body is a rectangle with straps added.  

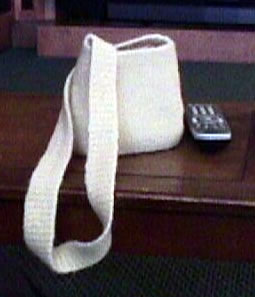
The purse is knit from top down in stockinette.  I blogged as I knit this purse, and took pictures as I knit the purse. You can read about making the purse
here, here, here and finally here.  The various discussions show the purse at different stages of knitting.

My purse is knit in Lion Brand Fisherman wool,  then felted by throwing it in the washing machine with a load of whites.  You can knit yours in any wool that felts; most 100% animal fibers do.  I used about 3 ounces to make a 5 1/2" tall, 6" wide, 2" deep purse with  26" straps.   If you are using worsted weight yarn,  budget about 4 ounces for a purse of this size.  If you make it twice as tall or twice as wide, you'll need twice as much yarn as for a purse this size. If you make it twice as tall and twice as wide, you'll need 4 times the yarn!

Felting can be an "iffy" process in the sense that the amount of shrinkage can vary depending on laundering conditions. I'm getting better and better at it.  However, I am not a felting guru.  I've read lots of advice from guru's, but so far, the only things that seem essential are: 1) Use an animal fiber that felts. 3) Try to have a medium full laundry tub. You want it full enough to actually agitate, but you want the swatch or purse to have room to move. 2) Try to subject the swatch and the purse to very, very similar laundry conditions. Otherwise, you can stop the laundry and keep checking to see if the purse has shrunk enough. But, that's  too much trouble for a purse.  If you use similar laundry conditions, and enter the data as I suggest, your purse will come out very close the the size you specify when designing.

Lots of machine knitters visit, and are likely to ask me: "Can you knit this by machine?" Sort of; it can be knit very easily on a double bed machine.  However, you will need to understand the directions and adapt them to machine knitting.  You'll also probably want to substitute something for garter stitch at the top because that's a pain in the neck.   I've tried writing directions simultaneously in MK and HK, but it seems to confuse people. So, I'm  not trying any more!  In any case, is a much more efficient way MK a purse this shape.  I already knit one, and I wrote a
pattern generator for that one. 

Good luck,
Lucia


Enter your purse design parameters

Knit a swatch, preferably with one needle side larger than you normally would use for a particular yarn. Measure the row and stitch gauge; record that somewhere. (You will need to enter that here).  Then, felt the swatch by throwing it in the washing machine with a light load of laundry.  Measure the stitch and row gauge, and record that.  (You'll need to enter that below.)

Afterwards, enter data in the boxes below to design your purse data.  To understand the purse dimensions, you can examine this figure.  The directions will update automatically provided you have javascript running. If everything is running properly, the warning box will say "filled directions", otherwise, the box will say something else.

This is a warning / informational box:


Enter your values here.

Enter the number of stitches per inch measured before felting the swatch: SGb= stitches/inch
Enter the number of rows per inch measured before felting: RGb= rows/inch
Enter the number of stitches per inch measured after felting the swatch:
SG= stitches/inch

Enter the number of rows per inch measured after felting:
RG= rows/inch

How deep do you want the sides? (This is also the width of the straps.)
D = inches I won't let you make this fewer than 2 stitches wide or the directions will make no sense.  
How tall do you want the purse to be?
T = inches

How wide do you want the purse to be?
W = inches
I won't let you make this fewer than 4 stitches wide or the directions will make no sense.
Enter the Strap Length you want.
SL = inches


Directions:

Note:  This purse is knit in the round. You need a circular needle that is sufficiently long to hold all the stitches.  You will probably also want an extra needle to finish -- size doesn't matter much but it's best if it's about the same diameter is the one you knit the purse with. You will need a tapestry needle and scissors.  And yarn.

I have included links to articles showing photographs of each step. You ca visit my knitting blog to read them.

Neat idea: You could knit the first garter stitch part using one strand of your wool and one strand of eyelash.  Looks cool!

K2 tog= knit 2 together. P2 tog= purl 2 together.
  1. Cast on stitches on your circular needle.
  2. Row1:  Slip 1, Knit up to last stitch, slip final stitch.  Now, join beginning and end; slip stitch on right point to left point, then knit 2 together. (This knits the two slip stitches together, and prevents a "jog" in the knitting.  Place a stitch/ring marker. (Or use a small loop of yarn.)  You will now knit rounds. (If you are confused by the first two steps read my blog article: How to join to knit circular.)
  3. You will now knit rounds of garter stitch.  To do so, purl the next round.  Then alternate knit and purl rounds until work measures inches from cast on.  End with a purl round. (Machine knitters, this is rows from the cast on. )
  4. You will now increase  stitches evenly across the purse and begin to knit the body of the purse in stockinette.  Every row will be knit. Precision is not required when increasing evenly, but I suggest:  knit stitches, (inc 1, knit times, knit stitches.  You should end up with  stitches.
  5. You can get rid of the pesky stitch marker.
  6. Knit stockinette until work measures  inches inches from cast on. (Machine knitters, this is rows from the cast on.)
  7. You will begin to work the bottom back and forth. If you have never worked a slipper or a saddle shoulder, I advise looking at  this blog article.  I'll refer to it from time to time. 
  8. No matter where you stopped knitting, you are on the bottom is one corner of the purse bottom.   (If you are a perfectionist, line this up with the transition in garter stitch way up at the top of the purse. Otherwise, who cares? It won't show after felting.) 
  9. Row 1: Knit 2 stitches together,  knit stitches.   SSK.  Turn work .  (For more details, see this blog article.)
  10. Row 2: Slip the first stitch knitwise,  Purl  stitches.  Slip 2 stitches.   Turn work. 
    1. From now on:
    2. On odd rows 3, 5.  Repeat row 1.
    3. On even rows 4, 8  repeat row 2. 
    4. On row 6,  repeat row 2 except, slip an extra stitch at the end of the row. This is to prepare for row 7.
    5. On  row 7, etc.  repeat row 1 except K3 together at the beginning, work to the ring marker, then end with slip1, slip1, slip 1, knit all three together.
    6. Now, repeat rows 1-8.  (Basically, you are "consuming" and extra stitch every now and then. This prevents the bottom from begin longer than the top of the purse!)
    7. If you want, read this blog.
  11. You will notice you are reducing the number of stitches that are not worked, and a little band is crawling across the bottom of the purse.  You will almost certainly want to put roughly half of these stitches on another needle at some point, because the stitches won't stretch across the needle you are working with. I recommend the second needle be a similar diameter as the one you are already using, but nothing horribly bad will happen if you get one slightly bigger or smaller.
  12. Continue until there are only  stitches not being worked facing the ones between the ring markers, plus the extra two just outside the ring markers. (If you are a perfectionist, stop knitting before the purl row because grafting adds a row. You should have  stitches altogether.  Refer to this blog to see how things should look). 
  13. Slide the work over and "seam" the stitches you would have seamed on the next purl row together.  Click to see what the bottom of the purse should look like now!
  14. Graft the stitches you  have been working to the stitches left facing them! See this illustration for help.
  15. Note: What, if to your horror, you realize you have an even number of stitches on one needle and an odd one on the other.  Don't worry. You need to fudge the edges when grafting anyway-- because the stitches you knit one way are "upside down" relative to the other group.  So, just fudge when grafting at the edges. Make sure the outside stitch on the edge with 1  more stitch is on the "outside" and the edge with one less is always on the "inside".  It will work just as well.  (And if your stitch numbers matched perfectly and you are frustrated because things seem 1/2 stitch off-- that's right. They are.   They are off 1/2 stitch in 90% of knitting patterns. No one tells you.   Even if you are perfect, and read the grafting directions perfectly, you have to fudge 1/2 on the end for this purse.)
  16. Identify the "side"  of the purse by tracing a column of stitches up from the bottom. Pick up    stitches for the strap. Knit back and forth in garter stitch until strap measures    inches. Graft stitches to other side, pretending the cast on for the other side has "live" stitches, or just bind them off and then whip stitch the strap where it belongs.  (Because garter stitch is very elastic lengthwise, long strips of garter stitch grow in the wash. I didn't force you to make a long garter stitch swatch and felt it, so I'm assuming it will grow about as much mine did.  BTW, when knitting in rows, garter stitch is worked knit all rows, But you knew that, right?)
  17. Throw your purse in the wash with about the same amount of laundry as for your swatch.  It should shrink to the size you want.  Take it out, steam into shape, and use.