mirror vestThree Mirror Vest

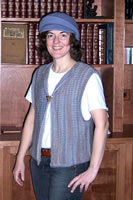
Hand knit version. A very similar machine knit version is available here.
Completed Jan 12, 2005

This page has a generator to create a pattern for a simple hand knit vest.  It's a  fairly easy generator to use, and a very easy pattern.  I've named the "Three Mirror Vest" because you mirror the shaping at 3 different points.

Features of this design pattern:
  • Cast on at center front.
  • Knit back and forth.  I knit on Denise circular knitting needles, but you can use straight knitting needles.
  • Stockinette body.
  • Garter stitch trim.
  • Front closed with a decorative pin. (You could knit I-Cord ties to close.)
  • Generator asks gauge before and after washing and blocking swatch. This is useful if you use a yarn that shrinks, or decide to felt the vest.
  • Pattern generator has a pull down menu for a range of dress sizes, but you can also customize to the measurements you like.
  • Looks especially nice in a variegated, or self striping, yarn.

I'm thinking of writing a pattern for a jacket based on this design. I'll just pick up stitches at the armholes and knit sleeves.  I'm tempted to get a luxury cashmere merino blend yarn for total knitting pleasure. But, cotton would be nicer for spring!  We'll see.

Lucia Liljegren
Visit the whole site!


I've got loads of free patterns, all generated like this one.  See my HOME, or blog.  Or patterns for: slippers & socks, pursesponchos & capes, hats, dog sweater, mittens & gloves, knitter's graph paper... (I have more, I just can't even keep track.)

My site is supported by your annual $3 donation. Please click.

Google


The Pattern Generator

Enter data to create your pattern. Just type over my numbers, the directions will automatically change.

Enter Swatch Data

Do knit a swatch.  The gauge you enter here, and the gauge you knit your sweater with must match, or  your sweater won't fit.  Poor fit problems are more often caused by failing to achieve gauge, rather than not knowing your size.
Enter gauge knit in stockinette.
stitches by rows.
swatch
Enter dimension measured when knitting is just taken off needles-- before washing or blocking. 
inches wide by inches tall

Enter dimensions measured after washing and blocking.
(If the dimension doesn't change when you wash and block the swatch, pull "same" below.)
inches wide by inches tall.

This is calculated based on the dimensions after blocking.
stitches/inch and rows/inch.
Enter the needle diameter you used to knit your swatch.
Size needles mm.


Enter Sweater Design Data.


Design Your Vest Shape
Pick a misses dress size, and the program will recommend values for all the boxes below.  You can also pick "custom" and modify these to your liking.
If you are customizing, or if you only know the wearer's claimed dress size, you can find handy size information here: Women and Men's, children & teens.
 Misses's size: schematic
Enter the chest width of the vest.
This should equal the wearer's chest size plus 1 to 4 inches.
inches.
Enter the Shoulder width of the vest.
This should be the wearer's shoulder width plus a little more.
inches.
Enter the Total Length of the vest:
Sweater length is a matter of taste and current fashion.  I used 20" which hits me about 5" below  my waist and well above my hips.
inches.
Enter the Armhole Depth for the vest:
The absolute minimum value for the depth is equal to 1/2 the width of the wearer's upper arm plus an 1".  Most people want even deeper armholes, particularly on vests. (The value I suggest makes very deep armholes, as you can see above.)
inches.
Enter the Shoulder Slope for the vest:
This affects the shoulder shaping. It is a very, very difficult quantity to measure.  I advise making it 1/2" for an adult with very, very square shoulders (or if you like shoulder pads). Make it 2" if  your shoulders slope a lot.  I used 1 for my sweater.
inches.
Neck Width before adding the neck trim:
inches.

The Pattern

Estimated Yarn Requirements:

I don't know how much yarn your vest will require.  My vest was knit at a gauge of 3.16 st/inch and required 300 grams of "dorothea bis" virgin wool.  I used 375 meters.   I'm working on developing a yarn use theory, as you can read an very rough estimate about yarn requirements at the bottom of the pattern.

Equipment:

You'll need

Abbreviations:

SSK = slip slip knit. (Looks the same as slip 1, knit 1, psso.) K2tog= knit 2 together, M1= make 1 (an increase).

Instructions

I give lengths and approximate row counts. Most hand knitters use lengths, but row counts can be more accurate if you want all four parts of the vest to mirror exactly particularly if you knit with a thick yarn, as I did.  If you are using very fine yarn, you will probably want to ignore some instruction to count rows and rely on lengths only.   To make row counting easier, use safety pins or thread to mark rows referred to as "row 1" as you knit it. (I mark the row below every row called "row 1" in the pattern.)

A few boxes are intentionally blank. You will fill them in as  you knit.

Center Front:
  1. Work a cheater's provisional cast on.   (I've posted illustrations of this technique at this blog article for discussion and photos. )
    1. With some type of waste yarn, cast on  stitches.  Knit 1 row. Break  yarn. Attach slippery yarn with thickness similar to vest yarn. (Like crochet cotton used double or triple, or some sort of smooth acrylic.)  Break yarn.
  2. Change to vest yarn.  You are going to work in stockinette. 
    1. To avoid having an two extra end to weave in at this critical point in the knitting-- right on the front of your sweater -- I advise winding off  enough yarn for the number of rows than indicated in step 12 a plus the reduction row plus the bind off,  don't break, but tie it in a little bow and leaving that dangling.  Then begin the knitting with yarn at that point.  Later, you can just pick this yarn up and work the trim.   (Don't worry if you wind off a bit too much, you can use that to sew the shoulders! ) This is especially useful if you use variegated yarn, since the color change pattern will remain consistent.
    2. Row 1: With  main  yarn, knit across row. ( I will refer to the bottom of this row as the cast on.  "length from cast on" refers to the base of this row. )
    3. Row 2: purl all stitches.
  3. Work even in stockinette until work measures inches from waste yarn. ending with a purl row. (Note:  If you entered your row gauge precisely, you work approximately   rows from cast on when you reach this length. Regardless, get knit as close as possible to the correct length, but end with a purl row.   Hang a marker in the middle of the row to permit measuring later and record the number or rows worked since the beginning of step 3 here  . The number in the box must be an even number for the rest of the directions to work out. )
  4. Shape neck: Mark previous row.  Knit side must be facing you. 
    1. Do the following  times** Row 1: Increase 1 stitch, knit across row.  Row b: Purl back.**
    2. Use backward loop method to increase 2 stitches, knit across row. (Hang a marker on this row.  The edge of this row is on the shoulder seam.)
    3. There are now stitches on the needle.
  5. Shape shoulders.  Mark previous row.  Purl side is facing.)
    1. Row 1, work rows.
    2. Do the following  times:  Knit side facing, SSK then work rows, counting this one. 
    3. Do the following  times:  Knit side facing, SSK then work  rows, counting this one.
    4. Knit side facing, SSK, then work straight until total length is inches from cast on ending knit side facing.  (Probably  more rows, but you should knit an extra to make the number knit even.  Note the number of rows you actually worked here_____; subtract 1 enter in box .  When you mirror, work the number of rows you actually worked. )
    5. There are now  stitches on the needle.
  6. Shape armhole: Mark previous row.  Knit side facing. 
    1. Row 1: Knit across row. (This is the last row on the shoulder.)
    2. Row 2:  Purl  stitches.  Attach crochet cotton and purl  remaining stitches onto crochet cotton.  Pull a long tail.
    3. Row 3: Still using crochet cotton, knit stitches on crochet cotton. When you reach the vest yarn, pick up vest yarn and knit across row.  Put stitches on crochet cotton on a holder. (You can wait a row to do this if you are using a straight needle.)
    4. Knit until work measures inches from cast on. You've reached the point where you'd have a side seam, if this vest had a side seam.
    5. Explanatory note: Counting the row in step "6a" as one, you'll probably have to knit rows when you get to the measurement in "6d".    Note actual number of rows starting from 6a:  _________.  Subtract 1 from this number, and write this down  .  (This number is allowed to be even or odd.)
    6. You've reached the first mirror point.

    7. Row 1: Work the number of rows you noted in the box in step 6e.
    8. Next row: Purl side facing. Put stitches on holder back on needle, purl across row, including the stitches on crochet cotton. (This mirrors the row in step "a".)
  7. Mirror previous shoulder shaping (step 5).  This means work in reverse order, but increasing rather than decreasing stitches at the shoulder edge instead of decreasing.  That is, call the first row 1, begin knit side facing:
    1. Row 1: Work the number of rows you noted the box in 5d . On next row, begin purl side facing; work across until only 1 stitch remains. M1 stitch, p1. (You've increased a stitch.).
    2. Mirror 5c:  Do the following  times:  Knit side facing; work  rows; purl side facing; purl across until only 1 stitch remains, M1, p1. 
    3. Mirror 5b: Do the following  times:  Knit side facing; work rows, purl side facing; purl across until only 1 stitch remains, M1, k1. 
    4. Mirror 5a: Work rows.
  8. half doneMirror neck shaping in step 4.  This means:
    1. Row 1: Purl this row. Slip last stitch.  Turn, SSK. Slip stitch on right needle back to left needle. SSK again. (This mirrors 4b as best as possible.)
    2. Do the following  times** Row a: Knit across row.  Row b: Purl back until only two remain, p2 together.**
  9. Work to center back.
    1. Row 1: Begin knit side facing; work even until piece measures inches from cast on. (This should require approximately more rows than the number you worked in step 3a. Write down number of rows you knit since starting 9a here: .  This can be even or odd.)
    2. You have reached the center back.   Fold the vest along the crochet cotton, and verify that the front and back are the same width. (I pinned the edges down. They will curl.)
    3. This is the second mirror!

  10. Mirror all shaping. Beginners: Believe it or not, many patterns would just stop here-- or they'd use the term "reverse shaping".  This saves paper.   Having read numerous posts on email lists, it seems large number of knitters don't understand. By the way, if you are using thick yarn, row counts are useful for making sure the sections are exactly the same length.  So, here's what you do:
    1. Mark center back.  That's the top of the previous row, and the bottom of the next one. Note: many measurements are about   inches longer from the measurements from the cast on. This is because you are going to add a trim to the cast on last.
    2. Row 1: Work number of rows you wrote down in  step 9a. Work should measure   inches from center back.
    3. Begin with knit side facing. Work exactly as step 4. (Shapes neck.)
    4. Repeat step 5. (Shapes shoulder.) When you knit the last row, work should measure inches from center back.
    5. Repeat 6. (Armhole)  Replace 6d with: Knit until work measures inches from center back. (That's where the side seam is.)
    6. Repeat 7 by row count, not length. (Shoulder).
    7. Repeat 8 by row count, not length. (Shapes neck.)
    8. Knit even, but work the number of rows you noted in the box in step 3: .  or work measures  inches from center back.
  11. Reduce stitches across row as follows: Begin knit side facing.
    1. Knit stitches,
    2. **k2tog knit stitches ** times,
    3. **k2tog knit stitches ** times,  
    4. **k2tog knit stitches ** times,
    5. k2tog  knit stitches.
    6. There should be stitches on the needle. )
  12. Garter stitch trim.
    1. Work rows, knitting all stitches in all rows. (garter stitch.)
    2. SSK, put stitch back on left needle to bind off across row. 
  13. Turn work over. Pick up garment stitches at cast on edge with  a needle.  (See blog for pictures of picking up stitches from cheaters cast on.)  Pull out crochet cotton and throw out waste yarn. There will be stitches on the needle.  Attach garment yarn on the same side where the yarn is dangling. The purl side will be facing you.  Work a reduction row as follows:
    1. Purl stitches,
    2. **p2tog, purl stitches ** times,
    3. **p2tog, purl stitches ** times,  
    4. **p2tog, purl stitches ** times,
    5. p2tog,  purl stitches.
  14. Trim:
    1. Work garter stitch-- purling all rows-- for rows.
    2. Bind off in purl. (**p2 tog, slip stitch on right needle to left needle**, repeat across row.) Anchor last stitch.

Trim.

You will add a garter trim at the  hem, neck and sleeves. In all cases, pick up stitches, work the same number of rows as for trim on the front and side edges, then bind off.
  1. pick up stitchesHem: Pick up about stitches at hem, distributing evenly. (It's ok to be off a few. Your goal is to have a trim that doesn't draw in or pull out the hem.  For reference, the hem is approximately   rows long. Usually, you'll find you need to pick up about 5 stitches every 9 to 10 rows. ) Attach yarn at an edge. If you attached with knit side facing,  work rows in garter stitch knitting all rows, bind off. (If you begin knitting with purl side facing work garter stitch in purl. Why? Since you are picking up a side edge of stockinette, beginning with a knit row when the knit side is facing counter the rolling better than beginning with a purl row.)
  2. Armhole trim. (Do twice. I've posted additional illustrations at this blog article.)
    1. Pick up stitches on three circular or double pointed needles as shown above to the right;  pick up 1 stitch every 2 rows on the short underarm edge. (The needle diameter you use to pick up stitches is unimportant.  ) 
    2. Snip crochet cotton and pull out.  The armhole will look as to the right and below.
    3. stitchesWith knit side facing, attach yarn on an outside edge. 
      • Row 1: P2, **P2 tog, p6** repeat until you get to the first inside corner, purl a stitch on the long edge to a stitch on the short edge.   Purl across until you are one stitch away from the next inside corner.  Purl stitch on short edge together with a stitch on long edge.  Purl across the second long edge, reducing stitches as for the other edge.  Turn. 
      • Row 2: **Purl until there in only one stitch before  inside corner; purl last stitch on long edge with first stitch on corner**, repeat, purl to final edge.
      • If necessary, repeat row 2 until you have purls a total of  rows.
      • Bind off in purl.
  3. Mattress stitch shoulders to join.
  4. Pick up stitches at neck edge, distributing evenly.  Work    rows garter stitch, bind off.
  5. Remove all markers.  Weave in all loose ends, block, fold over neck line. 
  6. Take a photograph of yourself wearing the vest, blog about it and send me the link!  Or send me a donation. Or email me a picture and let me blog about it. Or...


Block

  • Remove waste yarn. 
  • If you like to block, block the sweater pieces.  I like to steam my pieces to set the stitches. Some people don't. Do follow manufacture's directions for the yarn, and practice any steaming on the swatch.
  • Assemble

  • Mattress stitch  shoulder seams.  
  • Tidy lose ends of yarn. 
  • Wear!

  • End Note or "You can help with  my knitting empiricism experiment.":

    You can help me collect knitting data to test a theory!
    My New Year's resolution was to develop a theory to predict how much yarn items knit in stockinette require without knitting a gauge swatch.  I'm actually fulfilling it, as I will discuss at this blog article. The following information is calculated so I can test my theory.  
    You can help by emailing me the following 7 bits of information for your vest, it will give me more data:
    1. The numbers in the three boxes just above.
    2. The weight of the vest you knit. (Weigh it at the post office, or any place reliable. Send the data in grams, ounces, kg, lb. etc.  You can use any units provided you tell me which you use.  )
    3. The yardage and weight of one skein or cone of your yarn. (You can read this on the ball band. Send me the yardage in meters or yards and the weight.  If you list the brand of yarn, that would be nice too.  If it's hand spun,  let me know; it's possible hand spinners don't know their yardage as well as manufacturers or vice versa.)
    4. Tell me if your vest was knit in stockinette. (If not, tell me what the stitch. I'll compare outcomes.)
    5. Tell me the brand of yarn, or yarn "type".  "I don't know" is an acceptable answer.  I just want to keep track of whether the yarn is "plain old ordinary smooth yarn", "boucle", "ribbon" etc. just in case that makes a difference.  
    If you use the metric system, you may provide information in metric.  Not a problem for me.

    Just so you know according to the current, entirely untested, theory, to knit your vest and a decent 4" x 4" gauge swatch, you will need  yds or    meters of yarn. But, this could be totally wrong.

    If you send me data, thanks in advance!
    Lucia


    All images, programs and text at this site are copyrighted.  Permission is given to knit garments and swatches from the directions provided.  This pattern may be printed from the screen for personal use, provided the copyright statement remains intact.  Patterns are available without charge at Lucia Liljegren's web pages, and cannot be resold.  @copyright 2004, Lucia Liljegren