mirror vest
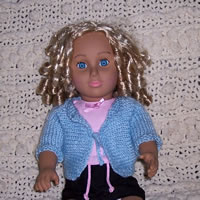
Yarn: Caron Simply Soft Baby Sport
Model: Colocha

 mirror vest
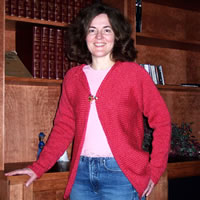
Yarn: Cascade Quatro
Model: Lucia

Mirror Sweater

Hand Knit, Drop Sleeve Sweater Pattern.

This page has a generator to create a pattern for a simple hand knit sweater.  It's a  fairly easy generator to use, and a very easy pattern.  The design is similar to my mirror vest, but I've added sleeves, made the armholes tighter, and made the front panels overlap just a tiny bit.

The pattern is set to load with the default measurements for size 6; these match my sweater (except for the simplifications that result from making a drop sleeve.)  I programmed sizes between 4 and 22 and the dolls size into a pull down menu; it also also has a "custom" feature to permit you to modify the default choices for these sizes. (My arms are short, I always shorten the sleeves. )

Features of this pattern:
  • Cast on at center front, knit body sideways.
  • Drop shoulder sleeves knit circular. (Easy, little shaping.)
  • Default has full length sleeves; Colocha, my doll is modeling 3/4 length ones because I got tired of knitting long sleeves for a stupid doll sweater! 
  • Body knit back and forth; sleeves knit in the round. 
  • Stockinette body and sleeve.
  • Garter stitch trim; decreasing across row prevents it from spreading.
  • Front closed with little crochet ties or a pin. (You could knit I-Cord ties to close.)
  • Neck folds back.
  • Generator asks gauge before and after washing and blocking swatch. This is useful if you use a yarn that shrinks, or if you decide to felt the garment.  If you are knitting with a yarn that didn't shrink when you treated it, just pick "same" and enter the gauge you measured after treating the swatch.
  • Pattern generator has a pull down menu for a range of dress sizes, but you can also customize to the measurements you like.

Lucia Liljegren
PS. If you are shopping for good prices on knitting machines or parts, a sewing machine or any household appliance, AllBrands.com has them. Their prices and service are excellent.


I've got loads of free patterns, all generated like this one.  See my HOME, or blog

My site is supported by your annual $3 donation. Please click.

Google


The Pattern Generator

Enter your specifications to create your pattern. Just type over my numbers, the directions will automatically change.

Enter Your Swatch Data

Do knit a swatch.  The gauge you enter here, and the gauge you knit your sweater with must match, or  your sweater won't fit.  Poor fit problems are more often caused by failing to achieve gauge, rather than not knowing your size.
Enter gauge knit in stockinette.
stitches by rows.
swatch
Enter dimension measured when knitting is just taken off needles-- before washing or blocking. 
inches wide by inches tall

Enter dimensions measured after washing and blocking.
(If the dimension doesn't change when you wash and block the swatch, pull "same" below.)
inches wide by inches tall.

This is calculated based on the dimensions after blocking.
stitches/inch and rows/inch.
Enter the needle diameter you used to knit your swatch.
Size needles mm.


Enter Sweater Design Data.


Design Your Sweater Shape -- body
Pick a misses dress size, and the program will recommend values for all the boxes below.  You can also pick "custom" and modify these to your liking.  (If you pick custom, you should overwrite my values. If you pick a standard size, you can't.  Be certain to click outside the box or hit return after entering values.)

If you are customizing, or if you only know the wearer's claimed dress size, you can find handy size information here: Women and Men's, children & teens.
 Misses's size: schematic
Enter the chest circumference of the sweater.
This should equal the wearer's chest size plus 1 to 4 inches.
inches.
Enter the Shoulder width of the sweater.
Note: This can only be modified by changing the chest dimension. For this style, it will be 1/2 the chest width.
inches.
Enter the Total Length of the sweater:
Sweater length is a matter of taste and current fashion. When I knit this sweater for myself, I plan to use used 23" which hits me about 7" below my waist and a bit high on my hips.
inches.
Enter the Armhole Depth for the sweater:
For this sweater, the armhole depth is equal to half the sleeve circumference.  The absolute minimum value for the depth is equal to 1/2 the circumference of the wearer's upper arm measured over the clothes they plan to wear plus an 1".  Most people want even deeper armholes.
inches.
Enter the Shoulder Slope for the sweater:
This affects the shoulder shaping. It is a very, very difficult quantity to measure.  I advise making it 1/2" for an adult with very, very square shoulders (or if you like shoulder pads). Make it 2" if  your shoulders slope a lot.  If I were knitting for myself, I would use a value of 1.2" for my sweater with drop sleeves.
inches.
Neck Width before adding the neck trim:
inches.


Design Your Sleeves.
Wearer's arm length. (Click to learn how to measure.  My family is average height. I find everyone's arms are shorter than indicated by the standards table.  I tested the fit as I knit and shortened the sleeves by 1".)
inches.
Wearer's shoulder width. (Click to learn how to measure. ) inches
Knitted length of a sleeve that would reach your wrist: (This for information only.  It is calculated based on wearer's shoulder width, arm length and the width of the shoulders on the sweater.  People who customize can decide if they want the sleeve longer or shorter than their wrist and adjust the length below.)
inches
Knitted sleeve length to  knit for this sweater. (If you customize, enter the knitted sleeve length you want here. Use the box immediately above for guidance. I entered 1" shorter than the arm length for my doll sweater.)
inches.
Cuff width:  For a wrist length sleeve, this must be at least as wide as your wrist.  For a elbow length sleeve, it must be at least as wide as your wrist.   For this garment style, I advise making it wider.
inches
Calculated: Sleeve Circumference. ( For this style sweater, you can only change the sleeve depth by modifying the armhole depth up above.)
inches


The Pattern

Estimated Yarn Requirements:

I don't know how much yarn your sweater will require.  I'm working on developing a yarn use theory, as you can read an very rough estimate about yarn requirements at the bottom of the pattern.

Equipment:

You'll need

Abbreviations:

SSK = slip, slip, knit. (Looks the same as slip 1, knit 1, psso.) K2tog= knit 2 together, M1= make 1 (an increase).
(If you don't know how to do these, google on the abbreviations or the terms.  There are lots of "how to" pages, but they keep changing URLs, so I don't put links up.)

Instructions

Note: I give lengths and approximate row counts. Most hand knitters use lengths, but row counts can be more accurate if you want all four parts of the sweater to mirror exactly particularly if you knit with a thick yarn.  I provide some blank boxes for you to record row counts if you want to use those to mirror precisely.  To make row counting easier, use safety pins or thread to mark rows referred to as "row 1" as you knit it. (I mark the row below every row called "row 1" in the pattern.)

If you are using very fine yarn, you will probably want to ignore some instructions to count rows and rely on lengths only.  

Center Front:
  1. Work a cheater's provisional cast on.   (I've posted illustrations of this technique at this blog article for discussion and photos. )
    1. With some type of waste yarn, cast on  stitches.  Knit 1 row. Break  yarn. Attach slippery yarn with thickness similar to sweater yarn. (Like crochet cotton used double or triple, or some sort of smooth acrylic.)  Break yarn.
  2. Change to sweater yarn.  You are going to work in stockinette. 
    1. To avoid having an two extra end to weave in at this critical point in the knitting-- right on the front of your sweater -- I advise winding off  enough yarn for the number of rows  indicated in step 12 a plus the reduction row plus the bind off,  don't break, but tie it in a little bow and leaving that dangling.  Then begin the knitting with yarn at that point.  Later, you can just pick this yarn up and work the trim.   (Don't worry if you wind off a bit too much, you can use that to sew the shoulders! ) This is especially useful if you use variegated yarn, since the color change pattern will remain consistent.
    2. Row 1: With  main  yarn, knit across row. ( I will refer to the bottom of this row as the cast on.  "length from cast on" refers to the base of this row. )
    3. Row 2: purl all stitches.
  3. Work even in stockinette until work measures inches from waste yarn. ending with a purl row. (Note:  If you entered your row gauge precisely, you work approximately   rows from cast on when you reach this length. Regardless, knit as close as possible to the correct length, but end with a purl row.   Hang a marker in the middle of the row to permit measuring later and record the number or rows worked since the beginning of step 3 here  . The number in the box must be an even number for the rest of the directions to work out. )
  4. Shape neck: Mark previous row.  Knit side must be facing you. 
    1. Do the following  times** Row 1: Increase 1 stitch, knit across row.  Row b: Purl back.**
    2. Use backward loop method to increase 2 stitches, knit across row. (Hang a marker on this row.  The edge of this row is on the shoulder seam.)
    3. There are now stitches on the needle.
  5. Shape shoulders.  Mark previous row.  Purl side is facing.
    1. Row 1:  Work rows.
    2. Do the following  times:  Knit side facing, SSK then work rows, counting this one. 
    3. Do the following  times:  Knit side facing, SSK then work  rows, counting this one.
    4. Knit side facing, SSK, then work straight until total length is inches from cast on ending knit side facing.  (Probably  more rows, but if necessary,  knit extra to make sure the length is sufficiently long.  Note the number of rows you actually worked here_____; subtract 1 enter in box .  When you mirror, work the number of rows you actually worked. )
    5. There are now  stitches on the needle.
  6. Create armhole: Mark previous row.  Knit side facing. 
    1. Row 1: Knit across row.
    2. You're at the underarm, you are now beginning to mirror the shaping. 

    3. Row 2:  Purl  stitches.  Attach crochet cotton and purl  remaining stitches onto crochet cotton.  Pull a long tail; break yarn. Slip stitches on crochet cotton back to empty needle.  Pick up sweater yarn and purl stitches on crochet cotton until you reach the end of the row.
  7. Mirror previous shoulder shaping (step 5).  This means work in reverse order, but increasing rather than decreasing stitches at the shoulder edge instead of decreasing.  That is, call the first row 1, begin knit side facing:
    1. Row 1: Work the number of rows you noted the box in 5d . On next row, begin purl side facing; work across until only 1 stitch remains. M1 stitch, p1. (You've increased a stitch.).
    2. Mirror 5c:  Do the following  times:  Knit side facing; work  rows; purl side facing; purl across until only 1 stitch remains, M1, p1. 
    3. Mirror 5b: Do the following  times:  Knit side facing; work rows, purl side facing; purl across until only 1 stitch remains, M1, k1. 
    4. Mirror 5a: Work rows.
  8. half doneMirror neck shaping in step 4.  This means:
    1. Row 1: Purl this row. Slip last stitch.  Turn, SSK. Slip stitch on right needle back to left needle. SSK again.  (This mirrors 4b as best as possible.)
    2. Do the following  times** Row a: Knit across row.  Row b: Purl back until only two remain, p2 together.**
  9. Work to center back.
    1. Row 1: Begin knit side facing; work even until piece measures inches from cast on. (This should require approximately more rows than the number you worked in step 3a. Write down number of rows you knit since starting 9a here: .  This can be even or odd.)
    2. You have reached the center back.   Fold the sweater along the crochet cotton, and verify that the front and back are the same width. (The picture shows the sweater; I forgot to snap a photo when I knit the doll's sweater.  Your sweater will not have that cut out area at the armhole; at this point, it will look a lot like a rectangle with just a little shaping at the neck and shoulders.  By the way, I pinned the edges down. They will curl.   )
    3. This is the second mirror!

  10. Mirror all shaping. Beginners: Believe it or not, many patterns would just stop here-- or they'd use the term "reverse shaping".  This saves paper.   Having read numerous posts on email lists, it seems large number of knitters don't understand. By the way, if you are using thick yarn, row counts are useful for making sure the sections are exactly the same length.  So, here's what you do:
    1. Mark center back.  That's the top of the previous row, and the bottom of the next one. Note: many measurements are roughly   inches longer from the measurements from the cast on. This is because you are going to add a trim to the cast on last.
    2. Row 1: Work number of rows you wrote down in  step 9a. Work should measure   inches from center back.
    3. Begin with knit side facing. Work exactly as step 4. (Shapes neck.)
    4. Repeat step 5. (Shapes shoulder.) When you knit the last row, work should measure inches from center back.
    5. Repeat 6. (Armhole).  
    6. Repeat 7 by row count, not length. (Shoulder).
    7. Repeat 8 by row count, not length. (Shapes neck.)
    8. Knit even, but work the number of rows you noted in the box in step 3: , or if you are using lengths, until work measures  inches from center back.
  11. Reduce stitches across row as follows: Begin knit side facing.
    1. Knit stitches,
    2. **k2tog knit stitches ** times,
    3. **k2tog knit stitches ** times,  
    4. **k2tog knit stitches ** times,
    5. k2tog  knit stitches.
    6. There should be stitches on the needle. )
  12. Garter stitch trim.  Optional: You may wish to use a smaller diameter needle for the trim.
    1. Work rows, knitting all stitches in all rows. (garter stitch.)
    2. SSK, put stitch back on left needle, repeat, to bind off across row. 
  13. Turn work over. Pick up garment stitches at cast on edge with  a needle.  (See blog for pictures of picking up stitches from cheaters cast on.)  Pull out crochet cotton and throw out waste yarn. There will be stitches on the needle.  Attach garment yarn on the same side where the yarn is dangling. The purl side will be facing you.  Work a reduction row as follows:
    1. Purl stitches,
    2. **p2tog, purl stitches ** times,
    3. **p2tog, purl stitches ** times,  
    4. **p2tog, purl stitches ** times,
    5. p2tog,  purl stitches.
  14. Trim:
    1. Work garter stitch-- purling all rows-- for rows.
    2. Bind off in purl. (**p2 tog, slip stitch on right needle to left needle**, repeat across row.)
    3. Before anchoring last stitch and cutting the yarn, compare the trim knit in all purl to the trim knit in all knit.  If it is obviously looser or tighter, rip back the garter stitch, and change needles to adjust. (My purling is looser than my knitting.)
  15. For reference the body of the sweater with garter stitch trim added has roughly stitches; if knit in stockinette it is expected to use  yds of yarn.

pick up stitchesSleeve:

Make two.

I've posted additional illustrations showing exactly how to pick us stitches on waste yarn  this blog article. which discusses knitting the sweater.

Note: You will need circular or double pointed needles to knit the sleeves in the round.   Double check that your gauge does not change when you change from knitting in back and forth to circular.  If it does, you can either switch to a different needle diameter, or knit back and forth placing the split at the underarm.  I advise changing needle diameter-- otherwise, you'll have to seam!  You will need circular needles either way. 

  1. Mattress stitch shoulders now or later. (I waited until later mostly because it simplifies taking photographs). 
  2. Pick up armhole stitches on two double pointed needles. You should have stitches on the needles.  Make sure you pick up the half stitches on both edges of the row you knit after you knit the crochet cotton. Often the extra half stitch under the underarm just looks like a strand. Don't worry, you will be knitting this together with another stitch on the next row.
  3. stitchesSnip crochet cotton at several places and pull out.  Distribute stitches on three double pointed needles or a circular needle, making sure you can attach yarn and start knitting at the underarm. The armhole will look sort of like the one to the right.  Notice I've placed little loop of crochet cotton to use as a stitch marker at the center of the under arm; you place a slippable marker there too.
  4. With knit side facing, attach yarn at the underarm.  You will begin knitting rounds. 
    1. Preparation round: With knit side facing, knit until you are 1 stitch away from the shoulder seam.  SSK the stitches on either side of the shoulder together.  Then work until you are 1 stitch ahead of the marker, drop the marker off the needle, slip the next stitch, knit the two slipped stitches together. Place stitch marker after this stitch.  There are now stitches.
    2. Option: If you'd like a decorative treatment, purl this round.  That will leave a purl bump that sort of imitates the appearance of a seam. (I don't recommend this if your chest is large compared to your shoulders. The line often ends up in an unflattering location. It can look good on men with broad shoulders.)
  5. The sleeve has approximately    rows to knit in stockinet. 
    1. Advise: Because you are switching from knitting back and forth to knitting in the round, your gauge may change.  Check it after a few rounds and increase or decrease  your  needle size if you need to.
    2. What's happening and more advise: You will reduce the  stitches on the needle as you approach the cuff by working decrease rounds occasionally; the decrease rate is calculated based on both your stitch and row gauge. I am aware that many knitters sometimes cheat and knit short stumpy swatches, and don't have accurate row gauges.  To compensate for this, I provide lengths after the various decrease sections. If you find the sleeve is longer or shorter than predicted, this means your row gauge is different from the one you entered when you designed your sweater.  To fix any problems, just start decreasing at faster or slower rate!  Your goal is to create a sweater that fits-- not follow directions blindly.  If you do need to change the rate, make notes in pencil so you can work the second sleeve identically. You can also test the fit by trying the sweater on from time to time; adjust as necessary; I advise seaming the shoulder before you test the fit.
    3. A decrease round is worked as follow:
      1. Stop working the row before the decrease round when 3 stitches remain before the marker. 
      2. k2 tog, knit 1, slip marker, SSK, work the round.
    4. colochaDo the following times: ** Work rounds plain, work 1 decrease round **   (The sleeve should measure inches and you should have  stitches on the needle when you finish this set of repeats.)
    5. Do the following times: ** Work rounds plain, work 1 decrease round **   (The sleeve should measure inches and have  stitches when you finish this set of repeats. )
    6. Do the following times: ** Work rounds plain, work 1 decrease round **   (The sleeve should measure inches at this when you finish this set of repeats. There should be  stitches on the needle. )
    7. Work straight until sleeve measures inches.  (You will probably knit  rounds.)
  6. Try the sleeve on the test the length. Reduce across row as follows. Begin knit side facing.
    1. Knit stitches,
    2. **k2tog knit stitches ** times,
    3. **k2tog knit stitches ** times,  
    4. **k2tog knit stitches ** times,
    5. k2tog  knit stitches.
    6. There should be stitches on the needle. )
  7. Garter trim: Purl 1 round, knit 1 round, Bind off in purl.
  8. FYI: Each sleeve has approximately   stitches; if knit in stockinette, each sleeve probably  uses yards of yarn.

Trim.

You will add a garter trim at the  hem, neck and sleeves. In all cases, pick up stitches, work the same number of rows as for trim on the front and side edges, then bind off.
  1. Hem: Pick up about stitches at hem, distributing evenly. (It's ok to be off a few. Your goal is to have a trim that doesn't draw in or pull out the hem.  For reference, the hem is approximately   rows long. Usually, you'll find you need to pick up about 5 stitches every 9 to 10 rows. ) Attach yarn at an edge. If you attached with knit side facing,  work rows in garter stitch knitting all rows, bind off. (If you begin knitting with purl side facing work garter stitch in purl. Why? Since you are picking up a side edge of stockinette, beginning with a knit row when the knit side is facing counter the rolling better than beginning with a purl row.)
  2. Pick up stitches at neck edge, distributing evenly.  Work    rows garter stitch, bind off.
  3. Decide where you want to attach the ties.  Using crochet hook, attach yarn from the front side, make a chain the length you like. Break yarn, anchor and tidy loose ends.  Make a second tie.
  4. Remove all markers.  Weave in all loose ends, block as recommended by yarn manufacturer, fold over neck line. 
  5. Take a photograph of yourself wearing the sweater, blog about it and send me the link!  Or send me a donation. Or email me a picture and let me blog about it. Or...


End Note or "You can help with  my knitting empiricism experiment.":

You can help me collect knitting data to test a theory!
My New Year's resolution was to develop a theory to predict how much yarn items knit in stockinette require without knitting a gauge swatch.  I'm actually fulfilling it, as I will discuss at this blog article. The following information is calculated so I can test my theory. 
  • PreShrunk stitch width  = inches.
  • Normalized stitch diameter = inches.
  • Number stitches in sweater =    stitches.
  • According to the current partially tested theory, to knit your sweater and a decent 4" x 4" gauge swatch, you will need  yds or    meters of yarn. This theory worked for my mirror sweater and my mirror vest.  But, I haven't tested further, and it could be totally wrong.  This estimate does not provide any extra yarn; if the theory is correct and you buy exactly this much yarn, you should run out when you knit the very last stitch. I advise buying a little more yarn than suggested.
 
You can help by emailing me the following bits of information for your sweater it will give me more data:
  1. The numbers in the three boxes for the sweater in the first row of the table above.
  2. The weight of the sweater you actually knit. (Weigh it at the post office, or any place reliable. Send the data in grams, ounces, kg, lb. etc.  You can use any units provided you tell me which you use.  )
  3. The yardage and weight of one skein or cone of your yarn. (You can read this on the ball band. Send me the yardage in meters or yards and the weight.  If you list the brand of yarn, that would be nice too.  If it's hand spun,  let me know; it's possible hand spinners don't know their yardage as well as manufacturers or vice versa.)
  4. Tell me if your sweater was knit in stockinette. (If you decided to substitute another stitch, tell me what the stitch. I'll compare outcomes.)
  5. Tell me the brand of yarn, or yarn "type".  "I don't know" is an acceptable answer.  I just want to keep track of whether the yarn is "plain old ordinary smooth yarn", "boucle", "ribbon" etc. just in case that makes a difference.  
If you use the metric system, you may provide information in metric.  Not a problem for me.


If you send me data, thanks in advance!
Lucia

.
All images, programs and text at this site are copyrighted.  Permission is given to knit garments and swatches from the directions provided.  This pattern may be printed from the screen for personal use, provided the copyright statement remains intact.  Patterns are available without charge at Lucia Liljegren's web pages, and cannot be resold.  @copyright 2004, Lucia Liljegren