Green sweaterEZ Swatch: How to make and measure the swatch.

This page describes how to knit the swatch with  mock ribbing for the EZ V neck sweater. You must visit two other pages for complete directions.
If you don't want to make mock ribbing, you will want to scroll down to How To  Measure.

Begun....March 4, 2004
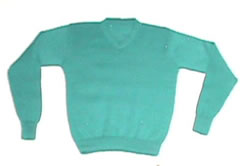
Sweater completed March 12, 2004
Page updated March 13, 2004


Lucia Liljegren
Visit the whole site!


My site is supported by your annual $3 donation.


The swatch.

Knit the swatch using the number of rows and stitches described on the EZ Vneck Swatch page. You may use lycra memory yarn in the ribbing, as I did for this swatch, but it is not required. If you use the lycra steam the ribbing, then let it cool before measuring the swatch.  Steaming "activates" the lycra.  (I bought Lycra Memory Yarn from Bonnie Triola.  Evidently, it is no longer manufactured. It is entirely optional, but I love the stuff.)

No matter how you knit the swatch, let the swatch rest and treat it the way you will treat the final garment before measuring.  This means if you are going to steam it, steam it. If you are going to wash it and let it tumble dry, do that. 

You want to treat the swatch as you plan to treat the garment for two reasons: First, you want the swatch to achieve its final state so that you can chart the sweater to fit properly after the first washing.   Second, you want to make sure the yarn can be treated the way you intend to treat it.  If the colors run, the yarn shrink or any other horrible thing happens, you want that to happen now, not after you make the sweater.

If you are knitting with cotton, you might want to take data both before and after washing and drying the swatch. That will help you feel more confident about your sweater when you are knitting it.  Note that if the swatch shrinks a a lot, and you are hand knitting, you will want to use a row counter when you knit and use the row information to guide your shaping.  The length information will be based on the gauge after you've washed and dried the sweater!

How to  knit 2x1 mock ribbing on a single bed machine


Note: You can also knit 1x1 mock ribbing, which is more common than using 2 x 1 ribbing. I used 2x1 with the  memory yarn to give Jim's cuffs and hem more lateral stretch.  The methods for creating both types of mock ribbing are almost identical.  I will provided modifications below for 1x1 in curly brackets like these {}. 

I have not yet programmed the yarn estimator portion to distinguish between 1 x 1 ribbing and 2 x 1 ribbing.  So, the yarn estimate will be off if you use 1x1 ribbing.

Directions:
Bring the number of needles required for the main swatch  to work position (B on a Brother).  Lower  every third needle to rest position (E on a Brother).  So, you  have 2 in work, 1 in rest. (That's what makes it 2x1.)  {For 1 x 1 ribbing, take every other needle out of work. }

Cast on using your preferred method. (I use a weaving cast on.  Refer to  your manual.)  You are eventually going to remove this waste yarn, so do something easy.

Knit about 9 rows. Hang weights whenever you find it convenient.  Verify that every third needle is out of work, and everything is going ok.  If not, readjust. (This is waste yarn. Don't worry about perfection.)  {For 1 x 1 ribbing, verify that every other needle is out of work. }

Break waste yarn.  Thread mast with a slippery yarn, and knit one row. Break. (The yarn needs to be slippery to pull it out later. I use cheap crochet cotton. You can also spend $$ to buy ravel cord, which is reusable.)

The carriage should now be on the right (COR.)

Now, get ready to actually knit the ribbing.

If you haven't already hung weights, hang weigths.  I find I really need them on the edges when I use the memory yarn.

Thread the right hand mast with the sweater yarn.  If using the lycra memory, run that through other left hand loop on the back of the mast only. Don't put it through the tension wheels or through anything in the tensioning device. Then thread the  memory yarn through the yarn feeder with the main yarn.

You will knit holding the hold the yarn between finger and thumb of your left hand letting it slip through.  The yarn tends to kink and curl; your goal is to get kinks out, putting as little tension as possible on the yarn.   You also don't want the memory yarn to loop around the sweater yarn until it's in the feeder, so hold the yarn away from the fashion yarn in the right mast.

Slowly knit the first row.  Knit the number of rib rows specified in the EZ VNeck page.  Watch the memory yarn a bit to make sure it's not getting tangled.  

Knit the number of rows required for the "ribbing" portion of the swatch trying to move the carriage at the same speed  you will use when you knit the sweater. (I find it very tempting to knit much, much faster over fewer needles. Avoid this.)

When you have completed the last row, break the memory yarn and drop the end far, far away from the sweater yarn. (You don't want it to catch and start feeding in later.)

Next, bring the empty needles into work, so you have the number required for stockinet in work position.  Fill the empty needles with a thread taken from between the two adjecent needles.  (Better yet, use your latch tool, and work 1 knit stitch facing you.  That looks absolutely perfect, but it's  more trouble. ) Then hang the hem. You can either get Marcia Houser to show you how to do this in one fell swoop  using the cast on comb, or do it the slow way I do it.(I just haven't mastered her way.)

Here is what I do:
Find the row of slippery yarn.  You using your one prong tool, hang the right loop for the first row of sweater yarn on the right most needle. By loop, I mean the bottom of the first stitch in fashion yarn!

Do the same on the left side. Then hang a loop from a center stitch near the center needle. 

Now, there will only be loops for each stitch that actually knit. One loop will be wide and one loop will be narrow. Using your two prong tool, hang two first row loops on two needles, skip a needle, hang two more loops etc. until all loops are hung as evenly as possible across the row. (Depending you may find you have one too few extra needles. That's ok.). 

If you are knitting a swatch, lay threads over the needles to create a row marker.   Set the machine to knit and knit the first row carefully.

When you finish knitting the garment of swatch, you will do the following:

Pull out the slippery yarn. ( I cut it in the middle and pull from the sides.)  The waste yarn will fall off.  Throw it away.
Insert a knitting needles or a rod in the "pocket" formed by the mock ribbing.  Hold the garment above the ribbing, and pull down on the ribbing with the knitting needle.  Pull hard. Pull some more.  If necessary, wet the ribbing and pull some more. (I find it looks nice after the first pull,  but I find that lots of pulling makes it look better.)

Now, if you used memory yarn, heat up your steam iron and steam the ribbing. Watch it shrink.  Let it cool.  Play with the really, really springy ribbing.  Grin and say "I don't really need a ribber, do I?"

How to make real ribbing.

I'm not going to give detailed direction. Just cast on and knit the number of rows recommended in the swatch directions.  HK: Find a simple how to knit book. Any ribbing will do.  I like 2x2 ribbing at a hem, but lots of people like 1x1 ribbing.   MK: Read the manual for your ribber or garter carriage. Any ribbing is fine.

How to measure the swatch

You need to measure the length and width of the stockinet swatch (which is the "main" stitch) and the length and width of the ribbing swatch (which is the "welt" stitch.)   If  you followed the directions on the EZ Vneck pattern, the number of rows and stitches is already specified.  Make sure when you enter the length and width that you instructions on the page match those you followed!  Try to measure to within 1/8th inch or better.

If the swatch can be ironed, it is a good idea to press the swatch before measuring.

length Measure length: Illustrated to the left. 
Lay the swatch on a flat surface.  Smooth it, but avoid stretching it.  You want measurements in a natural non-stretched, non-crunched up state.

Lay the swatch flat. with the knit side up.  Measure the length in inches between row markers 1 and 2.  Type this number into the length of stockinet swatch entry form.   Do your best to make sure the ruler lines up with a column of stitches.  Insert this value in the box for the length of the stockinet portion of the swatch.


widthMeasure width:  Illustrated to the right.

Insert pins just inside the two edges stitches on either side of stockinet portion of the swatch.  I threaded thin red cotton to photograph.  Pins didn't show at all.  Actually, the red threads don't show well.  I threaded red cotton between the second and third stitche from the edge from the stockinet side. It's very easy to see the number of stitches on the stockinet side. 

Because the sides curl to the purl side, it's easier to measure from the purl side.   Notice that I am flattening the purl side with the ruler.  I place the 1" mark on the thread, and measure to the record the number on the other side. Naturally, I then subtract the 1"!

You will enter this as width of the main swatch. 

length of ribMeasure length of ribbing: Illustrated to left.

Note: if you  used lycra, make sure  you steamed it before performing this step.

Measure the length of the ribbing from the bottom of the hem fold to the top of the ribbing. 

If you knit regular ribbing, you will be measuring from the cast on to the top of the ribbing.

If you knit mock ribbing, as pictured, don't that worry the hem is folded over. I wrote the program assuming it would be folded!  Some people want to measure the gauge before it's folded. The correct way depends on how a person performs the calculations later on.  If they want you to measure another way, make them write their own calculator. (So there!)

width of ribbingMeasure width of ribbing: Illustrated to the right.

Insert the pins or thread on either side of the two edge stitches.  If the ribbing pulls in, scrunch up the stockinet to try to make the bottom lie in a straight line. (Don't fret too much. )

Lay the ruler near the center of the ribbing and measure across.  Enter this value as the width of the ribbing. (It should be less than the width of the main swatch.)


Repeat the Begging!

If you are thrilled with this generator, knitted yourself a whole sweater and love it, consider supporting my site.  The best way is to make a $3 donation. Click the PayPal logo above!


All images, programs and text at this site is copyrighted.  Permission is given to knit sweaters and swatches from the directions provided.  @copyright 2004, Lucia Liljegren