teddy 

Machine Knit Mittens

This page has a pattern generator (aka program) to create a pattern to help you knit a mittens using a single knitting machine.   Mine were knit on a Brother, but you can knit them on a Studio, Bond or Artisan easily.   The hand knit version of the pattern, knit on two needles, is available here.

You can make your mittens in any yarn; just enter the gauge and head size in the program, and you'll get the pattern you need.

Main siteblog (read the latest), mitten collectionhat collection and  poncho & cape collection.

You must set your browser to run javascript and to accept cookies to run this program.   With some browsers, the address bar should also read "http://www.thedietdiary" at the beginning. If the www's aren't there, stick them in!

Characteristics of the mittens:

  • Knit from bottom up on a single bed.
  • Mock rib hung hem.
  • You may vary size the to fit any hand.
  • You enter the stitch and row gauge for your yarn.

Remember: Like all patterns spit out by my generators, this is mostly shaping directions.  The purpose of the generators is to let you be creative, while eliminating the need to do pesky calculations. 

Lucia

Google
 
Web thedietdiary.com


Patterns are worth something. Custom patterns should be worth even more.  This is sort of "shareware".   If you knit one of these, please send me a $3 donation.  (Pictures are welcome too!)


Enter Data for Your Mittens

You must modify the following data to match the gauge and shape you want!  Just change the numbers; it recalculates automatically.

 
Replace My Gauge Swatch Information Your Gauge Swatch Information
Note your machine setting on your directions in pen.  You must use the same machine setting when knitting the swatch and the mittens!

Enter tension for swatch and mittens: Child's X-small corresponds to 2-4 year olds. Child's medium is for 7 year olds. Child's X-large is for young teens.  "Adult's medium" fits my medium women's hands; adult large fits men's medium hands.  If you want to be more certain, measure a pair off mittens that fit.

If you are making lined mittens, you might want to design them a size  larger than the wearer normally uses. The inner mitten will be a little smaller than the outer mitten, and you need their hand to fit inside the inner mitten.

Based on your input, my program will make mittens  inches long (not counting the ribbing).

Stitches per inch:
Rows per inch:
Size:
Lined: 

Knitting Instructions

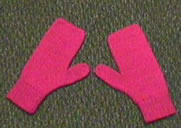
Yarn: About 2-4 ounces for standard bed; 4-6 ounces for mid gauge. The exact amount depends on the mitten size and stitch type you select.   Mine were knit with about 2 ounces of Jagger Spun 3/8 Mainline in Raspberry.

Mitten: Make 2.  They are both identical.

  1. Begin: Set carriage tension to .  Raise  needles to work position; lower every third needle. Cast on.
    1. Option: For lined mittens, waste yarn cast on leave waste yarn after hanging hem.
  2. Mock Rib Cuff:
    1. Knit to RC= rows.   (Optional: carry along a thread of elastic yarn.)
    2. Raise out of work needles; fill empty needles; hang hem.
  3. Set carriage tension to ; knit rows.
  4. Begin Thumb Gusset:
    1. Set row counter to RC=0; 
    2. Increase one stitch at the beginning of each of the next  rows.  (I transfer 3 stitches out using my 3 prong tool, then I fill the empty needle with a stitch taken from the side of the stitch one row below and toward the center of the bed.  This looks pretty and doesn't leave a hole.)
    3. Remove stitches from both edges of the needle bed on waste yarn, leaving the remaining ones on the machine.
  5. Upper Mitten:
    1. Set row counter to RC=0; knit rows.
    2. Transfer every other stitch to an adjacent needle; take empty needles out of work.  Knit 1 row.
    3. Take off on 1 row of crochet cotton (or ravel cord) and several rows of waste yarn.
  6. Knit thumb
    1. Set row counter to RC=0;
    2. Pick up the thumb stitches from waste yarn plus 2 stitches at seam, hang with wrong side facing.
    3. Knit rows.
    4. Transfer every other stitch to adjacent needle to reduce stitches. Then shift stitches toward center to fill empty needles; Take edge needles out of work.   Knit 1 row.  Break yarn leaving a long tail. Thread a double eyed bodkin tool or tapestry needle, and take stitches off on yarn. 
  7. Option: For lined mittens, raise number of needles for required for cast on; do not lower every third needle.  Lower two edge needles; (this makes the inside smaller than the outside.)  With knit side of mitten facing you, hang the top row of the hem evenly over  needles. (The waste yarn helps you see the stitches.  But, pull the ravel cord and remove after hanging.)  Pull all needles out, knit one row carefully.  Then follow directions from step 3 with these changes:
    1. Knit 2 fewer rows in in step 4b. (This makes a shorter thumb gusset with 2 fewer stitches so it fits inside the outer mitten.)
    2. Knit 2 fewer rows in steps 5a. (This makes the inside of the mitten shorter than the outside.)
    3. Pick up 2 fewer stitches in step 6 b.
    4. If you do this, seam the top and the sides just as for the outside mitten. Push inside the outside mitten.
  8. Finish:
    1. Seam top together on machine: Fold mitten in half with right sides facing.  With mitten still folded, hang live stitches at top of mitten on needle bed, with one stitch from each half  of the mitten top.  Remove waste yarn by snipping crochet cotton and pulling, or pulling ravel cord.  If you are right handed, place carriage on left, knit 1 row. Latch tool bind off from right to left.   The top is now seamed.
    2. Pull a knitting needle through hem of mock ribbing, yank to set stitches.  Close side seams and thumb using mattress stitch along inside edge and thumb. Tidy loose ends, steam or block as appropriate for you yarn. Wear. (If you need another mitten, make another one.)
.