Lucia's Ugly Cute Slippers.
This page has a pattern generator (aka program) to create a pattern to knit slippers in your size with your yarn. These can also be felted. I discuss felting the slippers at my blog.
HOME, my blog
 I knit these slippers in two colors to illustrate the construction. I
expected them to be ugly, but they turned out pretty cute. This
comfy, double thick, slipper is very easy to knit on any single bed
knitting machine.
You could knit them by hand too, but if I were hand knitting, I'd knit these. I knit these slippers in two colors to illustrate the construction. I
expected them to be ugly, but they turned out pretty cute. This
comfy, double thick, slipper is very easy to knit on any single bed
knitting machine.
You could knit them by hand too, but if I were hand knitting, I'd knit these.
Choose your own colors and make them as ugly as you like! No matter
how ugly your colors, you'll knit the slipper in one long, strangely shaped
piece, tidy up any threads left from the color changes, fold the slipper
into shape and sew between 0 and 3 seams. While you are knitting,
it will be hard to believe this strange thing will turn into a slipper.
It's miraculous!
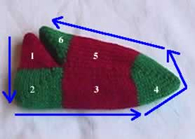
Here's how the miracle evolves. The picture shows the outside of a slipper
knit in two colors. The knitting direction for the outside of the
slipper is illustrated with the blue arrows.
I cast on with waste yarn and ravel cord. Then, I knit section 1 with
red yarn. When I finished section 1, I saw a "pouch" hanging on my machine;
the fold of this pouch formed the top of the heel flap which is labeled
1.
Section 2 is another short row region! I changed to green yarn.
This formed a heel pouch; you can see the diagonal like created by the
short rows in the picture. I knit section 3 in red; this is knit
back and forth over all needles. Voila, sock bottom!
I changed back to green for section 4, which is a short row region.
Looks like a toe! Section 5, I changed back to red and knit back
and forth. To eliminate seaming, I used the "sew as you go" method to sew
portion 5 to 3. (Frankly, I find sew as you go is slow. I have
gotten into the habit of hanging a yarn marker when I am 1/2 way through
section 3. This helps me keep on track when sewing as I am going!)
I changed to green for section 6 and knit short rows as instructed.
A top flap!
I did manage to figure out that steps 7-10 were the lining before I
finished. The lining doesn't show; so, I knit the inside in solid
red. I reduced 2 stitches from the width to make the inside of the
slipper smaller than the outside of the slipper. Other than that,
the lining is knit just like the outside of the slipper.
When I finished section 10, I took the slipper off on waste yarn. I
tied off all the loose ends and anchored them. (You can probably
do this on the machine.) I took off all stitches on waste yarn.
I then folded the lining toe into the slipper toe and pushed the lining
heel into the heel. Then I grafted the seam. Grafting makes a completely
invisible seam which mystifies the recipients!
I also think grafting can be a pain in the neck. So, when I feel
lazy, which is most of the time, I rehang first row of the cast on stitches
and bound off.
Once you have seamed the slipper shut, you just push the lining toe
into the slipper, then push the lining heel into the heel and shape the
flaps. If you feel like it, tack the lining to the inside neatly
so the slipper stays folded when your kids pull them on and off.
Naw. Don't bother. They'll stay folded.
|