Main siteblog (read the latest)hat collection, mittens and gloves, and  Poncho & Cape collection.

scarf

Hand Knit Scarf/Afghan

Knit: My afghan is a "KIP" (Knit in progress.)
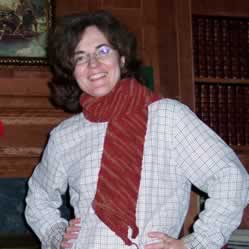
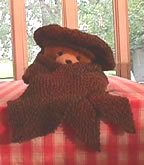
 I'm wearing one of the panels as a scarf. Teddy is wearing another version as a scarf.  I'll post the completed afghan at my blog!

teddyCharacteristics of the scarf/afghan:

  • The afghan is knit in strips which are sewn together to form an afghan.
  • The individual strips make nice scarves.  Due to decreases at the edges, , the long edges don't curl even if the scarf is knit in stockinette. (The hem does curl though. This is easy to fix up after you finish the afghan or scarf.  I like the edges to curl when I felt, because they just make a nice beaded edge.)
  • Knit about 6 scarves to make an afghan-- but you can decide the number for yourself.
  • Can be knit in garter stitch or stockinette.  I'm modeling a scarf knit in stockinette; Teddy's in knit in garter stitch.
  • Looks especially good knit in a variegated yarn.
  • I make some approximations when calculating. So, your afghan and scarf will not be precisely the size entered. But, it should be very close.

Lucia

Google
 
Web thedietdiary.com
Help keep my generators free.  Click and buy your books through  my site!


Enter Data for Your Scarf/Afghan

You must modify the following data to match the gauge and shape you want!  Just change the numbers; it recalculates automatically. 

 
Replace My Gauge Swatch Information Your Gauge Swatch Information

Note your needle diameter on your directions in pen.  You must use the same needle diameter when knitting the swatch and the scarf/afghan.

If you plan to felt your item, knit the swatch at a loose floppy gauge. Measure the gauge.  I wanted this item lightly felted, so they turn out cozy,  I felted by washing my swatch in hot on gentle.   (For things like slippers, I wash in hot on regular.)  After felting, enter the swatch gauge both before and after felting.  (If you aren't felting, enter the before boxes.)
Felted: If you are felting or using a yarn that changes gauge a lot after you wash it, select yes. If not, enter no. If you select "yes", you must enter the gauge both before and after felting. Otherwise, enter only "before" values.

Stitches per inch before felting:  Stitches per inch after felting:  
Rows per inch before felting: Rows per inch after felting:
Stitch Type: If you are felting or using a yarn that changes gauge a lot after you wash it, select yes. If not, enter no. If you select "yes", you must enter the gauge before and after felting. Otherwise, enter only "before" values.

Replace My Shape Parameters with Yours
Remember to click on the page or hit your tab  key after entering your final value to force calculation!
 
Data to enter -- if you are felting, enter size you want after felting.
Information. begin
Width of scarf or panel: inches.
The width before felting will be approximately inches.  (You can double check this as you knit.)
Approximate length of panel or afghan: inches.
You will be instructed to knit the panel until it measures inches from the cast on.
Number of panels for afghan: .

After you sew the panels together, the afghan width will be approximately inches; this will shrink to inches after felting.

Your Pattern

Don't try to edit anything below this point. If you want to change them, change values in the table above.  This is a program; so, please read through al the directions and make sure no negative numbers appear.  (I try to think about where they might appear and create a warning box, but I don't always think of them all.)

Yarn Estimate & Supplies:

Click to see illustration of supplies.
The exact supplies depend on your afghan.
Yarn: I used 150 grams of worsted weight wool yarn for each 10" wide by 51" long panels; (I knit Teddy's scarf a while ago, and don't have good records. I think it took about 1 skein of Lion Brand Homespun.)

Needles:  I used a 16" long circular needle with the diameter for my swatch and afghan; select a diameter suitable for your yarn.  You can also use a straight needle. If you plan to felt the item, pick one or two diameters larger needles to knit the item loosely.  If you tend to cast on tightly, it is useful to have an extra needle one or two diameters larger than the needle you use to knit the scarf/afghan. 

Extra: One a slip-able ring marker. 


Knitting Instructions.

Some abbreviations: K2tog= knit two stitches together. SSK= slip, slip,  knit (a decrease), and M1 = make 1 (an increase)

"Make 1" means increase a stitch. Strictly speaking, it doesn't specify how.  For this pattern, I wanted an invisible increase, and worked my M1  is a "Make 1 in the stitch below", as follows: 
When you work a "before a stitch" make one, knit 2 and then work an and after stitch M1, the two increases will look symmetric.  Strangely enough, when you look at the knitting after a few rows, it will look like the increases come out of one central stitch.

Note: you can make a slightly different looking scarf by substituting yarn overs or "M1 using backward loop" for the M1s.  If you substitute yarn overs, be sure to treat the yarn over strands as stitches on the next row.  The M1 using backward loop makes a small hole, and is slower to work than the other methods. The yarn overs create a slightly larger hole.

Skills:

Knit, purl, increasing, decreasing.

Instructions:

  1. Scarf panel:
    1. Using a 16 inch long circular needle, cast on   stitches loosely using a "single cast on" (AKA "backward loop") cast on.   (To cast on loosely, I use a larger diameter needle that for the remaining work.)
    2. Row 1: 1 row.
    3. Row 2: K1, SSK, Knit , M1 into stitch below,  knit 1, place marker, k1, M1 into previous stitch below, knit , k2Tog, K1.
    4. Row 3 and all odd rows: Repeat row 1.
    5. Row 4 and all even rows: Repeat row 2 but slip marker.
    6. Continue until scarf measures inches from the cast on, measures along an edge.  End with a knit row.  Bind off in purl
  2. Make panels.

Assemble

  1. Weave in all loose strands.
  2. Lay panels with long edges together; mattress stitch edges together.
  3. Optional, if the panels were knit in stockinette, and  you want to "cure" the curl at the top edge, pick up stitches on the top edge of the afghan. Knit 4 rows of garter stitch, but increase two stitches every  other row at each point and decrease 2 stitches every other row when knitting in in each ditch. (I'll explain this better when I get to this point in knitting the afghan.). Bind off. Repeat for bottom.
  4. If the sides of the panels are curling, (which they probably won't), or if you just like the look of a garter stitch trim, pick up stitches on the side edge of the afghan, knit 4 rows of garter stitch; repeat for other side. 
.

Google
 
Web thedietdiary.com


All images, programs and text at this site are copyrighted.  Permission is given to knit sweaters and swatches from the directions provided.  @copyright 2004, Lucia Liljegren