Visit All Brands!Silver Reed SK-840 Studio Standard Gauge  Metal Single Bed Knitting Machine 4.5mm Needle Spacing x 200 Needles

Machine Knit Mittens


teddyKnit January 1, 2005.

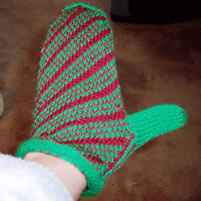
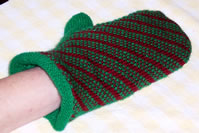
This page has a pattern generator (aka program) to create a pattern to help you knit a mittens using a single knitting machine.  I knit the one modeled on by my  left hand unlined; the one on my right hand is lined. They are similar, but the lined one is warmer.

Mine were knit on a Passap , but you can knit these or similar mittens on any double bed including a Studio, Bond or Artisan easily.  You can knit them using the yarn of your choice. 

The hand knit version of the pattern, knit on on double pointed needles will eventually be available; click here.after

Main siteblog, mitten collectionhat collection and  poncho & cape collection.

Characteristics of the mittens:

  • Knit from bottom up on a double bed machine.
  • These have a small rolled hem. (This avoids rehanging the ribbing.)
  • You can knit make lined or unlined mittens.
  • You can knit the outside in fair-isle, or plain. (You must pick and program your own pattern stitch.)
  • You enter the stitch and row gauge for your yarn. 
  • You must choose your own fair-isle pattern. Mine is a simple pattern programmed into the Passap. If you are knitting unlined mittens, I advise picking a design with very short floats. Otherwise, the floats catch on rings and fingers.  You can risk longer float if you knit a lined mitten.

Skills and special equipment: You need a double bed machine and you must know how to knit and cast on circular using your machine.  If you need mittens to knit on a single bed machine, visit the mitten collection.

Remember: Like all patterns spit out by my generators, this is mostly shaping directions.  The purpose of the generators is to let you be creative, while eliminating the need to do pesky calculations. 

Lucia

Google
 
Web thedietdiary.com


Enter Data for Your Mittens

You must modify the following data to match the gauge and shape you want!  Just change the numbers; it recalculates automatically.

 
Replace My Gauge Swatch Information Your Gauge Swatch Information
Note your machine setting on your directions in pen.  You must use the same machine setting when knitting the swatch and the mittens!
Enter machine tension dial setting for swatch and mittens: When entering the gauge: You will knit the mittens circular.   However, knit the gauge swatch flat using only one bed but patterning as you plan to pattern for the mitten.  Also: enter the number of actual knitted rows per inch (the way the swatch looks to a hand knitter) -- do not enter carriage passes.  

You must also verify that your fair-isle swatch has a similar gauge to stockinet, so the lining ends up the same size as the outer mitten.

If you want to knit double thick mittens, select "yes" for lined. This adds a stitch to the mitten width, so it's bigger than the lining.

Child's X-small corresponds to 2-4 year olds. Child's medium is for 7 year olds. Child's X-large is for young teens.  "Adult's medium" fits my medium women's hands; adult large fits men's medium hands.  If you want to be more certain, measure a pair off mittens that fit.

Click "yes" if you are knitting a two color fair-isle exterior and stockinette lining for the mitten.  If you are knitting both the inside and outside in stockinette, pick "no". 

Based on your input, my program will make mittens  inches long after the change to fair-isle and  inches in circumference.  This should  be wide enough for the hand below the thumb.

Stitches per inch:
Rows per inch in stitch pattern:
Size:
Lined?
Fair-isle exterior?

Knitting Instructions

Yarn: About 2-4 ounces for standard bed; 4-6 ounces for mid gauge. The exact amount depends on the mitten size and stitch type you select.   Mine were knit with about 2 ounces of Jagger Spun 3/8 Mainline in Raspberry.

Note: You must read directions on how to knit and cast on circular on your machine; you must know how to knit circular.  Consult your manual; the terminology and exact techniques vary for all machines. ( I used Passap cast-on #10, and counted the 12 cast on rounds as part off the roll cuff. )

Abbreviation: RC= row count.

Mitten: Make 2.  The second should mirror the first. (I'll indicate the steps that are different.)
In the knitting directions, I say 'knit 2 rows' when I mean 'make two carriage passes'. (Yes, this is the different of entering the gauge in the entry form above.  I don't want to write "make two carriage passes.")

Preliminaries: Enter any programs, or punch any cards you need for the fair-isle pattern.  I programmed my Passap E6000 to do cast on 10, and entered my fair-isle program for the front. I read how to pattern the back in stripes. )

  1. Roll Cuff:
    1. Raise a total of needles to work position, raising  on the front bed and  on the back bed.  Set machine to cast on circular with no stitch pattern. Thread machine with mitten yarn color you want for the roll trim.  Set carriage tension to .  Cast on.
    2. Set carriage tension to .  Knit to RC= .
    3. Raise needles on both edges of both beds.   (There are now  needles in work on each bed.)  Use transfer tool to transfer stitches so that the two outer most needles are full, and keep shifting some stitches outward  until there are two full needles between each empty needle.   Fill empty needles with the bar below the stitch on an adjacent needle.  
  2. Begin actual mitten
    1. If you are knitting fairisle, set machine for pattern knitting.  (I set mine to knit fair-isle on the front, and stripes on the back bed and threaded with both colors of yarn. ).
    2. Set carriage tension to .  Knit rows. (Total RC= )
    3. Thumb opening: On the back bed, hand manipulate to knit the needles on the right hand edge.   Break cotton.    Hand manipulate a second row of crochet cotton over the same needles.  Pull down on the knitting to set these stitches. (When working second mitten, work the thumb opening on the left hand edge.)
    4. Knit rows. (RC= )
    5. With 2 prong transfer tool,  transfer edge stitches in 1 needle.   This empties a total of 4 needles. (Two on each bed.)  Take these empty needles out of work. Knit rows.
    6. Repeat step e  times.  ( At this point needles remain in work on each bed and total RC= .)
  3. If you are knitting single thickness mittens, bind off.  Seam top of mitten.  Skip to knitting the thumb. (Step 8)  If you stop here, the mitten will resemble the photo below-- but there will be no lining. My lining is on the left in the picture below.

  4. no thumbIf you are knitting double thick mittens:
    1. If this is a fair-isle mitten, note that there will be half as many rows for the mitten lining. Otherwise, the total number or rows for the mitten and lining are the same.
    2. Set row counter to zero.  Pick yarn color for interior. Set machine to for plain circular knitting on both beds; (CX/CX on Passsap) .
    3. Knit 2 rows.
    4. Knit  2 rows.  Raise an empty needle on each edge of the work on both beds. (Four needles raised.)  Using 2 prong transfer tool, transfer edge needles out 1 needle.  
    5. Repeat step d until    needles are in work on each bed.
  5. Knit straight to RC= .
  6. Thumb Gusset.  When you knit the first mitten, the thumb is on the right.  When you knit the second mitten, change "right" to "left" to reverse shaping. 
    1. On the back bed, count over  needles from the right hand edge.  
    2. With crochet cotton, manually knit 1 row on the needles you counted out on the right side.  Break cotton.  Manually knit a second row.  Break cotton.   When knitting the next for rows, check the cotton stitches don't come off the machine.  
  7. Knit to RC= . Take off on waste yarn or bind off, as you prefer.
  8. When you remove the mittens from the machine, they will resemble the picture above and to the right.  The thumbs stitches are picked up from the crochet cotton.
  9. Knit thumb
    1. Set row counter to RC=0;
    2. Raise  needles on both beds.  Remove crochet cotton from thumb opening, and place stitches two doubled eyed bodkins. Pick up an extra stitch on each edge.  Hang stitches from one side of the opening on one bed, and the rest of the stitches on the other bed.   When knitting the first few rows, check the stitches don't come off the  machine.
    3. Set machine to knit plain circular.  Set carriage tension to .  Knit rows.
    4. With 2 prong transfer tool,  transfer edge stitches in 1 needle to decrease.   This empties a total of 4 needles. (Two on each bed.)  Take these empty needles out of work.   Knit 2 rows.  Repeat until stitches remain in work on each bed.
    5. Transfer every other stitch to adjacent needle,  knit 2 rows. Thread one eyed bodkin tool and take stitches off on a thread.  Pull thread tight, and anchor stitches. 
    6. If you are making lined mittens, knit a thumb on the lining. The lining thumb has 1 fewer stitch, so raise 1 fewer needle on each bed than indicated in step "b".  Also, knit 2 fewer rows before you being shaping so the inner thumb is slightly shorter from the outer thumb.
  10. Finish:
    1. If the mitten is lined, push the lining into the mitten with knit side on outside, and seam the first row of fair-isle knitting to the final row of the lining. (This leaves the decorative roll trim single thickness.)  Seam top of mitten closed.  If you like, tack the lining thumb to the mitten thumb. Tidy loose ends, steam or block as appropriate for you yarn. If felting, throw in washing machine; then steam and press.  Wear. 
    2. If you need another mitten, make another one putting thumb on the opposite side.
.

All images, programs and text at this site are copyrighted.  Permission is given to knit garments and swatches from the directions provided.  This pattern may be printed for personal use, provided the copyright statement remains intact.  Patterns are available without charge at Lucia Liljegren's web pages, and cannot be resold.  @copyright 2004, Lucia Liljegren