What do these hip and cuff shaping adjustment buttons mean?This is the second most frequently asked questions. Yep, it's confusing. Read this, and you'll know how to crete the sweater pattern you want. This page describes the operation of these two very confusing, very helpful buttons, which appear on every order form.The two buttons will look something like this. |
| Click here to return to my main page. |
Choosing "yes" permits you to pick the exact cuff dimension width, and may or may not require you to increase or decrease stitches at the cuff. This schematic was generated for a case where the main stitch gauge was 10 st/in, and the well stitch gauge was 15 st/in. These relative stitch gauges could occur if the main stitch pattern spread and the welt is knit from a tight rib. Examine the Stitch-Row diagram immediately below and to the right. Notice that the number of stitches in the welt is greater than the cuff. When you choose "yes", the program will force the cuff to be a dimension you specify on the second part of the order form. (A specific example is shown below the True Shape Schematic.) The number of stitches in the cuff may be larger or small. The instructions will tell you to increase or decrease evenly across a row at the end of the welt. (This is easy for hand knitters. Machine knitters find it a bit tedious to increase or decrease stitches evenly across a row. But it can be done.) |
||
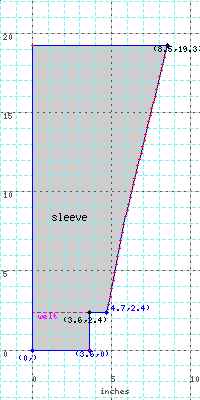
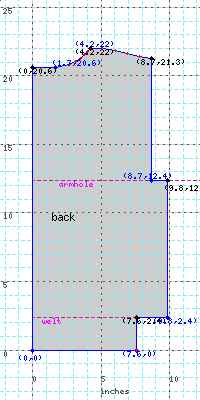
| True Shape Schematic
To create a sleeve of this shape, I first chose "yes" to the cuff rib spacing. I then also specified: Wrist dimension: 6.7"
The detailed dimensions and ease were entered into appropriate boxes in the Arm Dimensions portion of the 2nd order form, that's the long order form. Note that the cuff is 6.7" + 0.27" = 7" wide; the half width is 3.5" as shown. Note that the width after the cuff is 6.7 + 2.7 = 9.4". The half width of 4.7 is shown. (Values are rounded.) |
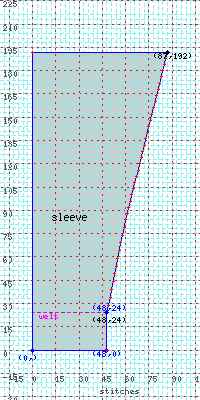
Stitch-Row Diagram
Note that the number of stitches above and below the cuff differ. This will usually happen when you pick "yes". The number of stitches above and below the welt will be calculated to shape the sleeve to the dimensions you want. In this example, number of stitches in the cuffs is equal to 106 = 2
* 53. The number above the cuff is 96 = 2 * 48. You would need
to decrease stitches above the cuff. You might get directions
like this if your ribbing is very, very tight.
|
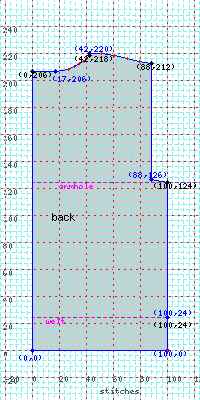
If you select "no", the number of stitches in the hip welt will be equal to the number of stitches just above the hip welt. See the "stitch-row" schematic in the right hand column below; the welt line is shown in violet. This piece would be very easy to knit because there is no need to increase or decrease stitches after the welt. Because the stitch used for the rib welt is different from the stitch used for body of the sweater, the welt may be wider or narrower than sleeve immediately above the cuff. This can be good or bad depending on your preference. When you run the program, you can always see the true shape of the sweater in the "true shape" diagrams. There are many, many reasons knitters might pick "yes" for the button shown above. These include:
|
||
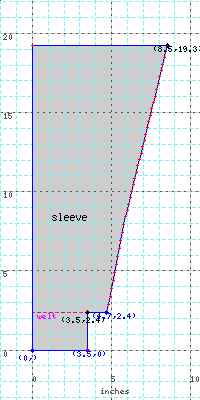
| True Shape Schematic
|
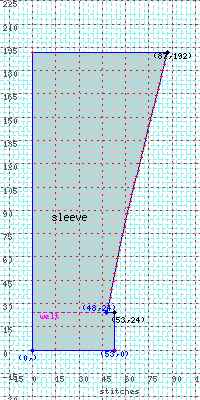
Stitch-Row Diagram.
|
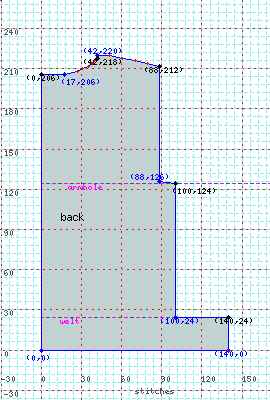
If you select "yes", the width of the rib welt will take on the dimension you specify on the second page of the order form. Sort of. If you understand the "cuff" discussion, you think you already know what this section is going to say! But determining the hip cast on is more complicated. Because when I wrote this program, I figured you want to be sure the sweater fits over your bust too! The schematics below were generated selecting "yes" for the hip rib shaping option. I also specified a main stitch gauge of 10 st/in, and the welt stitch gauge of 15 st/in. These relative stitch gauges could occur if the main stitch pattern spread and the welt is knit from a tight rib. If you created a pattern and chose "no" with these stitch gauges, the hip welt will really, really draw in and hug. I don't want any sweater to hug my hips and gut! Examine the Stitch-Row diagram below and to the right. Notice that the number of stitches below the welt line greater than above the welt line. When you choose "yes", the program will force the hip welt to be a width you specify on the second part of the order form. This make the true shape take the form you want; see the True Shape diagram below. The instructions will tell you to increase or decrease evenly across a row at the end of the welt. |
||
| True Shape Schematic
Once you select "yes" for this hip rib shaping choice you can control the hip rib a large number of ways! This gives you flexibility, but it's also confusing. The best way it to fiddle. |
Stitch-Row Diagram
|
|
The settings I used to create the two back schematics shown above are provided in the table below. The table is in the same format you will see when you are filling out the second order form (that is, the long one!) For reference, the chosen body style was "straight". Because I chose "yes" for final "estimate" question in the table below, the program actually estimated my dimension at the cast on. It used the my back waist length, the distance from my waist to my hips, my hip dimension and my waist dimension to do this! It guessed that I measure about 37.05" at the sweater hem. That's why it put the 37.05" in the little box you see below. I didn't change that. So, now you figure: The program thinks Lucia's measurement at the cast on level is 37.05". And she asked for a hip ease of 1.2". And she asked the rib ease to be -0.6". Well, why didn't the cast on end up to be 37.05 - 0.6 = 35.45"? And why isn't the part after the welt 37.05 + 1.2 = 38.25"? Well, the program would have chosen those measurement except..... The program noticed that my bust was 37" and I wanted 2.4" of bust ease. So, the program made my sweater 39.4" wide! Notice 9.8" is one quarter of that, and that's the width at the bust. Since this is a straight sweater, that's also the width above the cast on! Yep, it wasn't going to make the sweater only 38.25" wide when I needed it wider for my chest. So, what about the hips? The hip rib ease of -0.6 was applied though. Notice that program thinks I measure 37.05" at the cast on level. It applied the ease of -0.6" that I asked for. This means I asked for a rib of 36.45. When divided by four and rounded, this becomes 9.2", the number on the diagram! When you read the final knitting instructions, the program will tell you which numbers it used. So, you can whether you got what you wanted. If you didn't get what you wanted, go back and adjust the measurements. |
| Click here to return to my main page. |
Copyright © The Knitting Fiend, All Rights Reserved.