Visit All Brands. Silver Reed LK150 Studio Mid Gauge Hobby Single Bed Knitting Machine 150 Needles spaced 6.5mm apart

Newsboy Hat

from The Knitting Fiend.
Main siteblog (read the latest)hat collection and  Poncho & Cape collection.

teddy This page has a pattern generator (aka program) to create a pattern to help you knit a newsboy hat using a knitting machine.  (For the hand knit version, click here.)  You can knit 
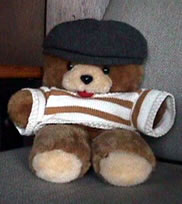
this, and just wear it-- like teddy. Or, if you knit the hat in wool, 
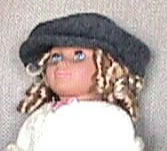
you knit it, throw it in the wash, and felt it.  Colocha inherited Teddy's hat after I felted it.  The felt hat is less floppy, and also more wind proof.  

You can make your hat in any yarn; just enter the gauge and head size in the program, and you'll get the pattern you need.

dollCharacteristics of the hat:

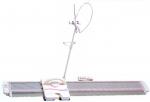
  • Knit sideways using short rows.
  • I -Cord edging.
  • You may vary the band size to fit any head.

Remember: Like all patterns spit out by my generators, this is mostly shaping directions.  The purpose of the generators is to let you be creative, while eliminating the  need to do pesky calculations.  This generator will let you make exactly the cap shown, but I encourage you to add your own touches.  I've seen some very plain newsboys hats and some with feminine touches. To see how people are wearing these, click the search box and look in some catalogs.

Lucia

Google
 
Web thedietdiary.com


Patterns are worth something. Custom patterns should be worth even more.  This is sort of "shareware".   If you knit one of these, please send me a $3 donation.  (Pictures are welcome too!)


.

Enter Data for Your Hat

You must modify the following data to match the gauge and shape you want!  Just change the numbers; it recalculates automatically. 

 
Replace My Gauge Swatch Information Your Gauge Swatch Information
Note your machine setting on your directions in pen.  You must use the same machine setting when knitting the swatch and the hat!
If you plan to felt your hat, felt the swatch and enter the gauge after felting.  The hat will be too big, but will shrink in the wash.

Stitches per inch:  (If you plan to felt your hat, felt the swatch and enter the gauge after felting.)
Rows per inch:

Replace My Hat Shape Parameters with Yours
Remember to click on the page or hit your tab  key after entering your final value to force calculation!
 
Data to enter.
Information.
Mimimum hat circumference  you want:
inches.
Newsboy hats are worn slightly loose, so enter your head circumference.  My value is for medium woman's head.  Men's heads are 1-2" bigger.  Kids are 2-3" smaller.  It's best to measure heads. They vary a lot.

Due to the fact that the number of rows must be a multiple of twelve your hat circumference has been rounded to inches.  (The I -Cord may take this in a little.)


Results: Your Hat Pattern

Don't try to edit anything below this point.  If you want to change them, change values in the table above.  This is a program; so, please read through al the directions and make sure no negative numbers appear.  (I try to think about where they might appear and create a warning box, but I don't always think of them all.)

Yarn Estimate:

This depends on your yarn. Hats rarely take more than 4 ounces.


Knitting Instructions.

Some abbreviations: RC = Row count read out.  COR= Carriage on Right. COL = Carriage on Left.

Main Hat Piece.

Read about knitting short (partial) rows. 
  1. Raise     needles to work position (B). ( If possible, raise     on the right hand side of zero, and the rest on the left hand side of zero; that simplifies working the short rows.)  Note that needle number and note the right hand needle number here:   R= __________.
  2. Cast on with waste yarn.  Knit a few rows end with COR.
  3. Thread machine with fashion yarn, and set to your chosen machine tension.
  4. You will work short rows to shape the hat.
    1. Set row counter to zero. RC=0. Begin COR.
    2. Knit 1 row. End COL
    3. Set machine to partial knitting (Hold on a Brother.)
    4. Move    in work needles on far right to hold position (E).  K1 row, wrap a needle. K1 row. End COL.
    5. Move     in work needles on far right to hold position (E). K1 row,  wrap.  K1 row. End COL.
    6. Repeat "d" and "e" until you have moved     needles on the right into hold position and made the carriage passes.  If necessary, move fewer stitches the last time you move needles and work the carriage passes.  You should end when  RC=     (You are 1 row past the center of the short row wedge.)
    7. Now reverse shaping by moving needles in E position to D position the same rate you moved them to hold during steps "d", "e" and "f".    (Needles in D position will knit and move to B when you pass the carriage over them.)  When you are done, RC=  ; end COR.
  5. Repeat step 4,     times. (This makes    wedges.)
    1. As you work, you will notice the hat curving around and forming a circle.  Keep track of the number of "wedges", but you can count if you forget.  When counting, remember the "ray" formed by the short rows is in the middle of the wedge; so count those!

Make I -Cord

Note: When making and using I-Cord, rehanging will be easier if you make too much and then unravel the extra. Otherwise, you will need to determine the center of the I-Cord  precisely and hang very exactly.  The values in my box give you about 3 extra loops per side, which is the bare minimum you need to sew things together and tack things under when you sew things up.  See general instructions for I-Cord.
  1. Knit 5 stitch I-Cord until RC=  .  Knit  extra rows "to be safe".  This is I-Cord #1.
  2. Knit another 5 stitch I-Cord until RC= .   This is I-Cord #2.

Make little bill and attach

  1. Bring    needles to work position.  Hang I-Cord  #1 over needles. You will want to hang I-Cord 4 loops every 3 needles over the center=    needles and 3 loops every 2 needles over the side needles.   You should have a little bit of I -Cord on either side of the bed.
  2. Pull needles out and push I-Cord against gatepegs. 
  3. Place carriage on right side of bed; thread.  Thread carriage with yarn, set machine to knit, and k1 row.  COL.  Look carefully to make sure stitches pulled through the I-Cord.
  4. Set carriage to hold, move  needles on far right out of work, k1 row and wrap. COL. Move the same number of needles on far left out of work, k1 row, wrap. COL.
  5. Move 3 out of work needles on right into work. K1 row, wrap. Move 3 on left into work, k1 row, wrap. COL
  6. Move 2 out of work needles on  right into work. K1 row, wrap. Move 2 on left into of work, k1 row, wrap. COL
  7. Repeat step 6 until all needles are back in work and have been knit. End COL
  8. Take work off on garter bar or waste yarn.   Turn and rehang near the center of the bed.  The knit side is facing you.   Raise needles on the left and to the right of those in work.
  9. Hang I-Cord # 2 over these needles with 1 loop per needle.  There should be a little bit of I-Cord on either side of the bed.
  10. With purl side facing you, hang the edge of the hat on the needles. Hang 1 wedge on the empty left needles, 3 wedges on the center needles and 2 wedges on the right hand needles. 
  11. If you are right handed, place carriage on left side, thread.  Pull out needles, push work against gate pegs. Knit 1 row.  COR.  
  12. Hang long edge of hat with purl side facing you.  Pull needles all the way out and push hat against gate pegs. Remove any waste yarn to make it easier to move the carriage.  
  13. If you are right handed, place carriage on left.  Thread carriage.  Set machine to knit and knit 1 row. COR Bind off.

Assemble

  1. Graft stitches on waste yarn, or hang on machine and seam.  Unravel any excess I-Cord and anchor. 
  2. Optional: Pull the front down so the edge is even with the front of the bill. Optional: Tack the front to the bill inconspiciously, working from inside the hat.
  3. Tidy all loose ends, steam, wear.
.


Google
 
Web thedietdiary.com

General Instructions for I cord:

Using waste yarn, cast on over stated number of stitches.  Knit a few rows.  Set machine to knit in one direction only. (Push in a part button on Brother.)  Knit 6 rows to make sure that's taken.  Set row counter to zero.  Thread machine with fashion yarn.  Knit stated number of rows.  Take off on waste yarn.


All images, programs and text at this site are copyrighted.  Permission is given to knit sweaters and swatches from the directions provided.  @copyright 2004, Lucia Liljegren