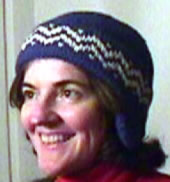
lu in hat

Hand Knit Ear Flap Hat

Main siteblog (read the latest), hat collection and  Poncho & Cape collection.

This page has a free pattern generator (aka program) to create a pattern to help you knit a hat with earflaps by hand.    You can make your hat in any yarn; just enter the gauge and head size in the program, and you'll get the pattern you need. A machine knit version of this hat is available;  click here.

Characteristics of the hat:

  • Hand knit bottom to top in the round using circular needles and finished with double pointed needles. (Moderately experienced knitters can covert this to knit flat by dividing and seaming at the back.  It will require a slight amount of figuring; email  me if you are wondering what to do.  I'll admit, I can't imagine why a moderately experienced knitter  would knit the hat flat.)
  • Double thickness over ears.
  • Cute ear flaps -- optional!
  • Pattern gives tips to make this into a head band. (Just don't knit the top of the hat.)
  • Fully shaped crown. (Instructions to make the top pointy are provided as an option).
  • Optional braids at bottom. ( I left them off.)
  • You may vary the hat size to fit any head. (For information on head size, click here. )
  • A weekend project: I spent four hours knitting this hat using worsted weight yarn.  You can knit it in thicker yarn, and be finished even faster.

Remember: Like all patterns spit out by my generators, this is mostly shaping directions.  The purpose of the generators is to let you be creative, while eliminating the  need to do pesky calculations.  You might want to look at jester hats to get ideas for how to modify your hat, or color choices!

Have fun knitting and wearing your hat,
Lucia

Enter Data for Your Hat

You must set your browser to run javascript and to accept cookies to run this program.   With some browsers, the address bar should also read "http://www.thedietdiary" at the beginning. If the program complains, and the www's aren't there, stick them in!

 You must modify the following data to match the gauge and shape you want!  Just change the numbers; it recalculates automatically.   To design your hat you must pick a head diameter,  and a tightness factor.  You must also specify the your stitch and row gauge.

 
Replace My Gauge Swatch Information Your Gauge Swatch Information
Knit a swatch using the needles you plan to use for the hat.  You must achieve the gauge you entered when knitting the hat, or your hat won't fit! 

Needle diameter used to knit your swatch.  Poor fit problems are more often due to not matching gauge than guess the head size incorrectly by a 1/2 inch!  Please enter your stitch and row gauges to at least 2 significant figures.

That is: if you knit a gauge swatch with 4.4 stitches per inch, enter 4.4 stitches per inch in the box to the left.  Do not round to 4.   (If you do round 4.4 down to 4, and try to design a 20" diameter hat, the hat will end up nearly 2" too small!)

I prefer to enter to three significant figures; for example, I enter 4.25 rather than 4.2.
Stitches per inch: 
Rows per inch:

Replace My Hat Shape Parameters with Yours
 
Data to enter.
Information.
Head circumference inches.
This is a medium woman's head.  Click for size information
Tightness factor percent.  If you like a very snug hat band, enter a larger number. If you like a very loose one, enter zero.
Based on your head circumference and tightness factor, the hat band circumference will be inches around.


Results: Your Hat Pattern

Don't try to edit anything below this point. If you want to change them, change values in the table above. The summary tables are for informational purposes only.   This is a program. So, please read through al the directions and make sure no negative numbers appear.  (I try to think about where they might appear and create a warning box, but I don't always think of them all.)

Knitting Instructions

Abbreviations:  K2 tog= knit two together (this is a decrease).   SSK = slip, slip  knit (this is another decrease.)

Materials:

The hat I am modeling is 21" in diameter and is knit from a 3.5 oz ball of "Brown Sheep NaturSpun Worsted Weight" in blue, I used a small amount of white.   I suspect I used a total of 2.5 ounces of yarn.  Each ball, has 245 yards per skein.   The manufacturer suggests the yarn should be knit at 5 st/inch and 7 rows per inch, but I like it knit more loosely, and got 4.5 st/inch, and 6.4 rows/ inch on my gauge swatch.

If you knit the hat out of thicker yarn  you will need more yarn by weight; you will need less if you use thinner yarn.  (You need less yardage if it's thicker, and more if it's thinner.)  Obviously, you need more yarn for a bigger hat, less for a smaller hat!

Needles: You will need one circular needle just long enough to hold the hat stitches; 16" long should do for an 20" hat.  (I didn't have a 16" needle, and had to use a longer one. Arghhh! I find I knit faster when I use the shortest circulars that can hold the stitches.  I wish I could find 11" ones like my mom has in her stash.)  You will also need a double pointed needles to finish the top and to work the hem seam.

After you make your first hat, you should play around and add a pattern.  You can introduce stripes after working the earflaps,  as illustrated in the ad to the right.  You can add a fair isle pattern, as I did in the hat I am modeling at the top of the page.    If you decide to introduce patterns, you can use this handy knitters graph paper to see how the pattern will look in your gauge. 

Instructions (with options interspersed):

  1. Cast on stitches using size needle. Slip first stitch, knit up to last stitch, slip last stitch. Join round by stretching the stitches around the needle, then slipping the final stitch back to the working needle, and knitting the first and last stitch together. Be careful not to twist row.  (You now have stitches on the needle.)
  2. Knit underside of a hem: Knit all stitches until you have worked  rounds counting the cast on round as 1 round. ( Work should measure about  inches from the cast on, but you need to count rows to ensure the both sides of the hem have the same number of rows.   )
  3. Ear Flaps:  If you want ear flaps, work two. Otherwise, if you don't want earflaps, just skip to the front hem.  
    1. Explanation: You will be knitting short rows back and forth.  I will have you place two colors of markers to mark the back and front of the hat.  I'll call them "red" and "white" for the purpose of description. The colors don't really matter. 
    2. Increase Round: On next round, increase  stitches, distributing increases uniformly. (You'll be increasing roughly 1 every 19 to  21 stitches (depending on whether the program rounded up or down). When you finish, you'll have stitches on the needle.)
    3. Preparation round:   Place a white marker, knit stitches,  place a white marker; knit stitches, place a red marker; (You are at the front).  Knit    stitches, place a white marker, knit  stitches, place a white marker, knit  stitches.  Place a marker red marker (marks back). Knit stitches, (You should have reached a white marker.)
    4. You will now form an earflap by knitting short rows between the sets of white markers.  You will also form a "purl bump" on the stitches not involved in the earflaps.  This makes a crisp hem fold.
    5. Slip white marker. You have reached the beginning of the first earflap.  During the "decrease" portion of knitting the earflap, you will form a small triangle. Click here to see how the work looks when you reach step "k".
    6. Knit until you are 1 stitch away from the next white marker. [Bring yarn in front of work, slip stitch, bring yarn behind work, turn work, slip first stitch purlwise.] (The operation inside the [] brackets is called wrapping and prevents a hole. You should see the yarn wrapped around the stitch you slipped twice.)
    7. Purl until you are 1 stitch away from the marker.  [Slip stitch, turn work, bring yarn forward, slip the stitch, bring yarn back.] (That's another wrap.)
    8. Now knit until you are 2 stitches away from the  white marker, wrap.  Next row purl until you are 2 stitches away from the white marker.
    9. Now knit until you are 3 stitches away from the  white marker, wrap.  Next row purl until you are 3 stitches away from the white marker. 
    10. Continue knitting between markers, decreasing the number of stitches knit by 1 each round, until you are purled only 4 stitches in a particular row;  wrap on the final turn. 
    11. Now, reverse the shaping; increasing the number of stitches worked each row.   (As you are knitting the hat flap will fold in on itself. Click here to see the flap when you have finished step 5.)
    12. Knit 5 stitches, wrap, turn. Purl 6 stitches, wrap turn.
    13. Knit 7 stitches, wrap, turn; purl 8 stitches, wrap turn. 
    14. Continue, knitting one more stitch each row until you knit the last stitch before the white marker while knitting a purl row.  (Slip markers on when you finally need to.)  Wrap  the stitch after the marker and turn work so knit side is facing you.
    15. Knit to the white marker at the end of this earflap. (If necessary, pick up stitches on stitch holder.)   Purl to the white marker, at the edge of the next earflap.
    16. Work as for first earflap.  When finished, knit across the ear flap stitches, then purl until you reach the next earflap. (You will pass the back marker.
  4. Front of hem: 
    1. Option: You could finish the next round, ending at the back, and begin a fair isle pattern at the back of the hat. Here's what I did:  My hat had a multiple of 6 stitches on the needle and I instruction 4b, said I needed 18 rounds for the front hem.  When I got to this point in the knitting, I dug up my copy of  Traditional Fair Isle Knitting by Sheila McGregor.  I selected a  9 row tall fair isle pattern with a 6 stitch repeat, I centered the pattern vertically by knitting  4 rounds blue, then knit the 9 row fair isle pattern and finished with knit 5 rounds blue; (4 + 9 + 5 = 18 rounds.)  Click to see the little pattern.
    2. Knit  rounds. (You will probably want to drop the stitch markers.  It is useful to mark the center back with a safety pin so you can find it when you get to instruction 7.)
  5. Seam hem:
    1. Option: If you want a head band, work a three needle bind off.
    2. Seam hem: (This is similar to a three needle bind off, but you don't bind off!)  With the a double pointed needle, pick up stitches from cast on edge, at a rate of 1 stitch for ever stitch cast on.  Fold along the purl bump with the knit side of the hem facing out.    Knit each picked up stitch together with hat stitches but knitting  extra hat stitches  without a picked up stitch.  (You do this because there are fewer hem stitches because you increased before making the earflaps. You'll be skipping 1 approximately every 20 hat stitches. Advice: it is  easiest to pick up a few stitches, then knit to seam, then pick up a few more.  If you really hate seaming like this, you can skip this step, and sew the hem up when you are finished.  The purl bump will help you make a nice straight fold.)  
  6. Hat body:
    1. Option: This is another cute place to start or continue a fair isle pattern.  If you are planning fair isle pattern to continue from the hem to the end of the hat body, it is convenient to know there will be approximately  rows from the hem turn.
    2. Knit around until hat measures  inches from the hem turn.
  7. Shape crown: You are now going to divide the top of the hat into 6 decrease regions and begin to shape the top of the hat. The 6 regions may or may not all have the same number of stitches.  You will need to change to double pointed needles as you finish this section.  Begin at the back of the hat. 
    1. (Option: Some people continue a fair isle pattern in here. If you want to do that, you will want to chart these decrease regions on knitters graph paper.  You'll probably want small, simple patterns in this part of the hat.  )
    2. ** Place white marker, knit  stitches place red marker, knit  stitches;  place red marker, knit  stitches;  **  Repeat instructions between **'s  but stop when you are 2 stitches from the white marker that indicates the back of the hat. 
    3. Work a decrease round: **k2 together, slip marker, k1,  ssk, knit until you are 2 stitches from the marker.**  Repeat until you reach the end of the round. (At the end of the round, you will have reduced 12 stitches, which is the same as 2 reduced in each of the 6 decrease regions.)
    4. Work 2 rounds without decreasing.   (Option: If you like a pointy top, increase the number of plain rounds here and later in the instructions to 3 rounds. If you want a stocking cap, you can work even more rounds between decrease rounds.  )
    5. Now, alternate working 1 decrease round followed by 2 rounds non-decrease rounds until there are fewer than 29 stitches on the needle at the beginning of a decrease round.  (You will be able to tell when you need to stop repeating  because there will be fewer 4 stitches to work with between the first two markers. You won't be able to follow instruction "7c").
    6. Knit 2 together across round; if there is an extra stitch, just knit it. Work 1 round without decreasing. 
    7. Knit 2 together, cut yarn and using a tapestry needle, thread through live stitches.  Pull tight.
  8. Finish:  Optional:  Cut 1 yd long pieces of yarn, thread through ends of ear flaps and braid.  Make a knot in the end to anchor.  If you like pom-pom's  make a big one and add it to the top of the hat.  Tidy up, steam hat and wear. 
.