Rosie Bucket Hat

Hand Knit Bucket Hat

Hat completed Dec. 22, 2004.
 
This page has a pattern generator (aka program) to create a pattern to help you knit a bucket hat  by hand.  The machine knit version is available here


Main siteblog (read the latest)hat collection, and Poncho & Cape collection.

Characteristics of the hat: 

  • Knit from the hem to crown.
  • You may vary the hat size to fit any head, and you may also vary the overall diameter of the hat.
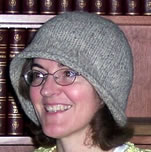
  • Felting is not required, but strongly recommended.  I pressed the excess roll out of the brim. If you knit this in acrylic, and cannot press the hat, the brim will roll up. (I think that looks cute, but it looks different from the one I'm wearing.)
  • Has a small flared out brim.

To design your hat you will need to enter your head circumference and tightness factor below.  You must also specify the stitch and row gauges. 

Have fun knitting and wearing your hat,
Lucia
Google
 
Web thedietdiary.com
You will need:

Circular needles Bamboo Circular Knitting Needles Size 7  16''

Double pointed needles
8  Rosewood Double Point Knitting Needles -Size #7

Stitch markers
Locking Stitch Marker

About 3 ounces of yarn. (More if you use chunky yarn.)


Patterns are worth something. Custom patterns should be worth even more.  This is sort of "shareware".   If you knit one of these, please send me a $3 donation.  Pictures are welcome too!


Enter Data for Your Hat Data

You must modify the following data to match the gauge and shape you want!  Just change the numbers; it recalculates automatically. 


Replace My Gauge Swatch Information Your Gauge Swatch Information
Felted: If you are felting or using a yarn that shrinks a lot after you knit it, select yes. If not, enter no.  If you select "yes", you must enter the gauge before and after felting. Otherwise, enter only "before" values.
You must use the same machine setting or Bond Key plate when knitting the swatch and the hat.  Note your machine setting in pen.

 If you  plan to felt the hat, knit the yarn at a loose gauge.  It will tighten up when you felt it.

Wash, dry and if appropriate, steam the swatch using the method you plan for your garment before entering the gauge. If you are felting this hat, use wool or some yarn that felts.  Knit your swatch, then throw it in the washing machine with a load of whites.  Take it out, press it, and measure the gauge after felting.
Stitches per inch before felting:  Stitches per inch after felting:
(Yes, my swatch grew wider! This is unusual.)
Rows per inch before felting: Rows per inch after felting: 


Replace my doll's head circumference with yours and pick a tightness factor. 
Data to enter.
Information.
Head circumference
inches.
This is sized for me, my doll.  A medium woman's head would be about 22".  Men's heads are 1-2" bigger.  Kids are 2-3" smaller.  It's best to measure heads; measure around your head.  If you don't know someone's head size, you can guess by reading typical sizes at this page of head sizes.
Tightness factor percent.  If you like a very snug hat band, enter up to 10%.  If you like a very  loose hat enter -10%.
Based on your head circumference and tightness factor, and rounding to the nearest multiple of 2 stitches, the hat circumference will be inches around.  (As you can see, I made my hat larger than my head. )


Results: Your Hat Pattern

Don't try to edit anything below this point. 

This is a program. So, please read through al the directions and make sure no negative numbers appear.  (I try to think about where they might appear and create a warning box, but I don't always think of them all.)


Yarn Estimate & supplies:

This depends on your yarn. Hats rarely take more than 4 ounces -- mine required 100 grams.   You will need:


Knitting Instructions.

Some abbreviations: SSK= slip, slip, knit. (A decrease.)

Main Hat Piece.

Notes:
  1. Foundation: (For curl control.)
    1. Using the larger diameter needle,  cast on   stitches using cable cast on.  Be careful to cast on loosely, otherwise the cast on may draw in the brim.
    2. Foundation row: With circular needle, slip 1 stitch knit    stitches. Slip final stitch.  
    3. Stretch stitches stitches around circular needle to join, begin careful not to twist. Slide the last slipped stitch stitch back onto the left. Knit next two stitches together. There should be stitches on the needle.
    4. Knit 1 round. 
    5. You are now going to cause the rows you just knit to become reverse stockinette.  Bring yarn forward as if to purl, slip one stitch, bring yarn back as if to knit. Turn work, slip stitch. The purl side is facing you.  Knit 1 round. (The previous rounds will seem to be purl rounds.)
    6. If you have not reflexively pushed the work inside so side you are knitting is closer to you, push the work through the hole, and force it to be near you.  See inside out knitting.
    7. On next row, use two colors or markers: the first should be color 1, all others should be color 2. 
  2.  Decrease rounds: (For brim.) 
    1. If instruction c or d says to do something '0' times, just skip to the next lettered instruction.
    2. Place markers 1: Place a color 1 stitch marker.  **( slip   stitches, place a color 2 stitch marker)  times then (slip   stitches, place color 2 stitch marker)   times.** repeat instructions between **'s to end of the round.  (There should be 8 markers around the hat.) You will now decrease; after the first decrease round,  there should be stitches on the needle.
    3. First shape rate: (Do this step a total of    times.)
      • Round 1: (slip marker,  SSK , knit to next marker ) 8 times.  (You should reach the first marker.  )
      • Knit    rounds, without increasing or decreasing.
      • Repeat the two bullets as specified above.  There should be stitches on the needle.
    4. Second shape rate: (Do a total of   times.)
      • Round 1: (slip marker,  SSK , knit to next marker ) 8 times.   
      • Knit    rounds, without increasing or decreasing.
      • Repeat the two bullets as specified above.
    5. Adjustment: In next round, work a decrease round, but decrease only  stitches. (If the box says zero, just knit a round. If it says 2, work the  decrease at the 1st and and 5th markers.  If it says 4, work a decrease, skip one etc.)
    6. There should be stitches on the needle. 
  3. Non-increase region:
    1. Hang a row marker.  
    2. Knit all stitches in every round until the length from the row marker is inches.  (If you are counting rounds, this require rounds.)
    3. Note: You will almost certainly want to drop the stitch markers while working this section. If you are a stickler for symmetry, place a safety pin at the beginning of the round so it's easy to find later on when you start the shaped region.
  4. Shaped region:
    1. Change to the double pointed needles when you find it's difficult to stretch the stitches around the longer needle.   Also, if instruction c or d says to do something '0' times, skip to the next lettered instruction..
    2. Place markers 1: Place a color 1 stitch marker, ** ( slip   stitches, place color 2 marker) times then ( slip   stitches, place color 2 marker)   times.** Repeat instructions between **'s to end of the round.  (There should be 8  markers around the hat.)  You will now decrease stitches; after the first time you decrease there should be stitches on the needle.
    3. First shape rate: (Do a total of     times.)
      • Round 1: (slip marker,  SSK , knit to next marker ) 8 times.  (You should reach the first marker.  This reduces 8 stitches per round.  )
      • Knit    rounds, without increasing or decreasing.
      • Repeat the two bullets as specified above.
      • When you have finished this step, there should be stitches on the needle.
    4. Second shape rate: (Do a total of   times.)
      • Round 1: (slip marker,  SSK , knit to next marker ) 8 times.   
      • Knit    rounds, without increasing or decreasing.
      • Repeat the two bullets as specified.
      • When you have finished this step, there should be stitches on the needle.
    5. Next round: SSK, repeat across the round.  There should be stitches on the needle.
  5. Finish Top:
    1. Break off yarn leaving a long strand.  With a tapestry needle or crochet hook, pull a strand through all the stitches and yarn overs on the needle. Be very careful not to miss any stitches.  Then slide the stitches off the needle.   The hat will have a hole in the center as in this figure. (Which shows a beret.)  Pull the strand tightly to close the hole.  Draw the tail to the inside of the hat, anchor and weave in.  Weave in al loose ends.

Assemble

  1. beforeFeltingIf you are felting this hat, throw it in the washing machine.   To the right, you can see my bucket hat was long relative to its diameter,  and had a slight point in the crown before felting.   This will often be the case prior to felting, because rows shrink more that stitches. The brim also curled in a lot.
  2. Find some type of suitable hat block with a circumference close to planned circumference of the hat.  Put the hat on it, and let the hat dry.  
  3. Press with hot iron and steam (if appropriate for your hat), wear.  (Wool and cotton hats hats can be steamed very, very hard to refine the shape as you see fit.)
.

Google
 
Web thedietdiary.com


All images, programs and text at this site are copyrighted.  Permission is given to knit sweaters and swatches from the directions provided.  @copyright 2004, Lucia Liljegren