teddy 

Hand Knit Beret or Tam

Colocha This page has a pattern generator (aka program) to create a pattern to help you knit a beret by hand.  Machine knit directions are available here.  You can make your hat in any yarn; just enter the gauge in the program, and you'll get the pattern you need.  
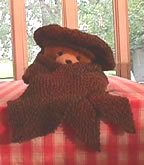
Every hat shown here was knit from a pattern generated by this program, I just entered different yarn gauges and different head sizes.

Main siteblog (read the latest)hat collection, and  Poncho & Cape collection.

orange

Characteristics of the hat:

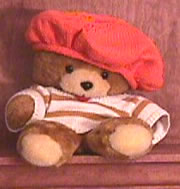
  • Knit from the brim up using circular needles.
  • Small roll brim.
  • You may vary the band size to fit any head, and you may also vary the overall diameter of the hat. (This one is dramatically large and uses a factor of "2".  The one on the machine knit page is smaller -- using a factor of "1.5".  That information may make sense when you design your hat!)

Remember: Like all patterns spit out by my generators, this is mostly shaping directions.  The purpose of the generators is to let you be creative, while eliminating the  need to do pesky calculations.  This generator will let you make exactly the beret shown, but I encourage you to add your own touches.

Lucia

Google
 
Web thedietdiary.com


Patterns are worth something. Custom patterns should be worth even more.  This is sort of "shareware".   If you knit one of these, please send me a $3 donation.  Pictures are welcome too!


.
Dimensions

Enter Data for Your Hat

You must modify the following data to match the gauge and shape you want!  Just change the numbers; it recalculates automatically.   To design your hat you must pick a head diameter, an outer circumference multiple  and a tightness factor.  You must also specify the your stitch and row gauge.

 
Replace My Gauge Swatch Information Your Gauge Swatch Information
Note your machine setting on your directions in pen.  You must use the same machine setting when knitting the swatch and the hat!

Stitches per inch: 
Rows per inch:

Replace My Hat Shape Parameters with Yours
 
Data to enter.
Information.
Head circumference inches.
This is a medium woman's head.  Men's heads are 1-2" bigger.  Kids are 2-3" smaller.  It's best to measure heads. They vary a lot.  But you can also look at this list of head sizes.
Tightness factor percent.  If you like a very snug hat band, enter a larger number. If you like a very  loose one, enter zero.
Based on your head circumference and tightness factor, the hat band circumference will be
inches around.
Outer circumference multiple factor . (  I entered 2 for this hat, which makes the dramatic that extends a large distance past your head; I entered 1.5 for my MK beret. )
The outer circumference of the beret will be inches.  The hat diameter will be inches.  A diameter of 10.5" fits plate as shown above and to the right.
Band depth inch. This is the knit depth of the hat band depth, which is a little band of fabric that rolls up.  It rolls up a lot and looks much shorter when you wear it.  I made mine 1.8" and you can see it rolls up to less than an inch.   Very small band depths look more beret like; deeper ones look more like tams.


Results: Your Hat Pattern

Don't try to edit anything below this point.  If you want to change them, change values in the table above. The summary tables are for informational purposes only.   This is a program. So, please read through al the directions and make sure no negative numbers appear.  (I try to think about where they might appear and create a warning box, but I don't always think of them all.)


Knitting Instructions.

Some abbreviations: K = knit; YO= yarn over; Inc=increase ; k2tog= knit 2 together. (a decrease).
This hat is knit in stockinette.  You can substitute another stitch.  Fair Isle looks wonderful in the "non-increase" region, and it's easy to fit in.   That region is always a multiple of 6, so if you find patterns that fit in a multiple of six, they are usually easy to fit in. 

Materials: (For the brown hat Teddy is wearing.)

You can substitute any yarn you like, but the amount of yarn will differ. If you use fingering yarn, you will need less by weight, but more by yardage.  I'll add an estimator for  yardage later!

Skills:

Knit, yarn over, increasing, decreasing.

Instructions:

  1. Foundation:
    1. Using 16” long circular needles, cast on   stitches.  Be careful to cast on loosely. (If necessary, use a larger diameter needle.)
    2. Foundation row: Slip 1 stitch Knit    stitches. Slip final stitch.
    3. Stretch stitches stitches around circular needle to join, begin careful not to twist. Slide the last slipped stitch stitch back onto the left needle.   Knit  last stitch stitch and first stitch together to join the round.  ( stitches on needle.)
  2. Roll Brim:
    1. Round 1: Knit all stitches.
    2. Repeat round 1 until length from cast on is  inches.  The work will curl up; this forms the roll brim.  Place a stitch marker to note the beginning of the round.
  3. Increase row:
    1. I increase picking up a stitch from the horizontal bars between the two stitches in the row below.  This leaves a hole, but that's ok for this hat. I later make a draw string and pull it through the holes to tighten the brim -- that's what the Marines do, why shouldn't I?  If you don't want a hole, pick up from the vertical bar of the stitch below.
    2. Next round:  increase  stitches evenly. (I suggest:  [(Increase 1, knit  times then (Increase 1, knit  ) ]; repeat the instructions inside [] brackets  times, then, if necessary, continue first part of the increase pattern to the end of the round. (End with stitches.)
  4. Non-increase region:
    1. If you want to add a pretty fair-isle pattern, this is the easiest spot. The number of stitches will be a multiple of 6; the number of rows is approximately rows.  It's fine to make this region a bit longer, and add more rows. Don't make it shorter or it will distort the shape of the hat.
    2. If you are having difficulty cramming stitches on the short needles, change to 24” long needles.
    3. While knitting this portion, try on the hat on after a few rounds to make sure the brim is snug but comfortable. If it is not, you will need to recalculate the hat.  If it doesn't fit right, you  either a) mis-measured your head b) picked a tightness factor you don't actually like or c) aren't getting the stitch gauge you thought you'd get. (Did you knit a swatch? No?! )
    4. Knit all stitches in every round until the length from the row marker is  inches. (The hat should measure    in length from the cast on. )
  5. Shaped region:
    1. Notes:  Change to the shorter needles whenever you think it's difficult to stretch the stitches around the longer needle. Eventually,  you may find it difficult to stretch the stitches around the shorter needle; at that point use both circular needles and start to knit rounds from one needle to the other. 
    2. Place a row marker on the next round. The color of the stitch markers doesn’t actually matter.  However, you want 5 of one color and 1 of the other color so you identify the beginning of a round.  For the purpose of writing directions, I instruct you to use five red markers and one green one.
    3. Round 1: Place a green stitch marker. Knit  ; then (place a red stitch marker, k ) 5 times.  (You should reach the green stitch marker which marks the beginning of a round. )
    4. Round 2: (Slip marker, k2 tog, knit , k2 tog, knit ) 6 times.  (You should reach the green marker.  There should now be  stitches between stitch markers.)
    5. Rounds 3,4 &5: Knit 3 rounds without increasing or decreasing.
    6. Round 6 (Slip marker, k2 tog, k , k2 tog, k ) 6 times. (There should be  stitches between each each  marker.)
    7. Rounds 7, 8 & 9.  Knit 3 rounds without increasing or decreasing.
    8. Repeat rounds 6-9, but reducing the number of stitches between decreases each time.  (That is, the number of stitches in those little boxes decreases each time.)
    9. Continue  until there are only stitches between stitch markers when you are about to begin a decrease round.
    10. Next round: (K2 tog, yo, K2 tog) repeat across the round. (If the total number of stitches isn't a multiple of 4, just skip the last yo, k2tog.  Fudging is essential to knitting! )
  6. Finishing:on plate
    1. Break off yarn leaving a long strand.  With a tapestry needle or crochet hook, pull a strand through all the stitches and yarn overs on the needle. Be very careful not to  miss any stitches.  Then slide the stitches off the needle.   The hat will have a big hole in the center as in figure 2.  Pull the strand tightly to close the hole.  Draw the tail to the inside of the hat, anchor and weave in.  Tidy and trim any loose strands of yarn. Weave in all loose ends. Remove all row markers. 
    2. Optional chord:  With a crochet hook, make a long chain 8” longer than your head dimension. Draw the cut ends of yarn through the chains to finish off nicely   Using a crochet hook or a big tapestry needle, weave it through the holes formed when you  increased after the brim.  Draw the ends of the chain to the inside.  Use this chain to tie the hat snugly  on you head. Tuck it inside the hat to hide it. If you cannot crochet a chain take three strands of yarn and make a braid.  Tie knots in either end and finish off nicely. Click to see the drawstring  hanging out of the bottom of the hat  in figure 3.
    3. Optional: Dampen hat. Stretch over a dinner plate and allow to dry. This helps for a nice crease to emphasize the beret shape.
  7. Wear: Pull one edge down toward the side in a jaunty fashion.  Walk around to admiring praise. 
.


Google
 
Web thedietdiary.com


All images, programs and text at this site are copyrighted.  Permission is given to knit sweaters and swatches from the directions provided.  @copyright 2004, Lucia Liljegren