Manly Cardigan: Seamless Knit Raglan Cardigan Pattern

NOTE: In progress. There's something wrong right now. But fiddle and see the coolness of it all anyway. :) Get updates about my new patterns at my blog (The Knitting Fiend.)
needs buttons
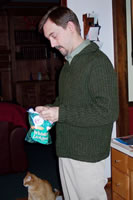
The pattern generator on this page will create a pattern to knit a basic raglan cardigan.  I added a decorative cable at the shoulders and pockets to Jim's sweater.  The pattern created by the program doesn't describe how to knit those, but I'll give you links.  (Jim's wearing the sweater right now, but I haven't gotten him to stand still for the photo opportunity yet!)

A pattern generator is a program that creates a pattern.  If you want to customize for your size, your yarn or anything else, click the go-away box on the pattern window that popped up. Then, scroll down, and make changes. Then click any the pop-up window button you find on this page. opening. That will create your customized pattern.

Here is a list of features available with this generator:
  • You can run it for free, but a donation is requested if you knit the sweater.
  • As usual, enter the gauge for your yarn.
  • Shape: Raglan cardigan knit bottom to top.
  • Directions will describe how to knit a simple raglan slant decrease.  Other decreases are described at the blog: Four Stitch Wide Raglan Slant, and Decorative Cable Inserted In Raglan Decrease.
  • Crew neck.
  • Yarn Estimator: Stockinette, Broken Rib Stitch.  Other stitches may take more or less yarn.
  • JimMen's 38 displayed; you can change this to Women's 4-22; Men's 32-50.  18" doll and children's sizes.  Custom setting lets you modify the size to better suit you. Jim's sweater is a men's size 38, but I then picked "custom", and shortened the sleeves and body.
  • Click this pop up pattern button to get your pattern. (I advise clicking it now. Really.)
  • If the window doesn't pop up, scroll to the bottom and read the final instructions about pop-up windows.
If you've used my pattern generators, you know you can get directions in nearly any gauge. Here is what I used for the sweater illustrated on this page:
  • 8 skeins of Araucania "Nature Wool Chunky".  I bought mine at Zora's Yarn! in Naperville, Illinois.  The Nature Wool has 131 yards (120 m) per 100 grams; presumably this is chunky.  The manufacturer's label recommend a gauge of 3.5 st/ inch; I liked it knit a bit tighter and used a gauge of 3.8 st/inch.
  • Denise circular needles with size 8 tips attached for main stitch and size 6 for trim.  Using the Denise needles let me change the length of the cable.  It needs to be very long when you put all the stitches on the yoke; smaller is better when you knit the top of the sleeves.
  • Crystal Palace double pointed needles for the cuffs and bottom of the sleeves.
  • Two very small diameter double pointed needles to help pick up stitches.
  • Tapestry needle to sew the underarms.
  • A crochet hook to fix occasional mistakes.
  • 5 - 7 buttons in a size you like.  I used five 7/8" for Jim's sweater.
I generally blog as I work on a project. This means you can find detailed instructions for each step.  Pages discussing aspects of this sweater:
  • Raglan 'seams'. Nifty Cables I wedged between the decreases.  (Pattern instructions will create 2 stitch wide seams.)
  • Picking up stitches for button bands.
  • Spacing buttonholes.  I used five buttonholes; next time I knit a cardigan for Jim I plan to use six.
  • Working buttonholes.   I knit 2 stitch wide buttonholes.
  • Insert pockets.  Detailed tutorial on adding pockets; I added 4" deep pockets to Jim's sweater.  You'll need to make a note on your pattern, and remember to add the opening when the sweater measures 4" above the ribbing.
Lucia

Donation Requested

If you use my patterns and enjoy it, consider donating so I can maintain the site, buy yarn and make more generators.


The Pattern Generator

Enter your specifications to create your pattern. Just type over my numbers, the directions will automatically change.  After reviewing your entry, click "pop up pattern" below.  Your full pattern will appear.

Enter Your Swatch Data

Knit two swatches: Data for one of them are entered here.  The swatch for the button band is discussed below.  I don't force you knit a ribbing swatch; I estimate the gauge based on the stockinette swatch.  However, I discuss the ribbing at the blog.

Remember: The gauge you enter here, and the gauge you knit your sweater with must match, or  your sweater won't fit.  Poor fit problems are more often caused by failing to achieve gauge, rather than not knowing your size.
Enter number of rows and stitches knit in stockinette.
stitches by
  rows.
swatch
Enter dimensions measured after washing and blocking.
These are used to calculate the number or rows and stitches required to knit the sweater.

inches wide by
  inches long (or tall).

If this yarn shrinks (or grows) after washing and blocking, select "different"; if it doesn't shrink or grow, toggle "same"
If you picked "different", enter  dimensions measured before washing and blocking.
These values are used to estimate the amount of yarn required and to indicate the length of pieces prior to washing.
inches wide  by
  inches long (or tall).
Stockinette gauge. This is calculated based on the dimensions entered above.
stitches/inch and
rows/inch.
Needle diameter you used.
D=
Select stitch multiple:
The program has to round. It can either round to make the number of stitches across then neck even or odd.  This matters if you need to center a fancy stitch pattern.
  • Select "odd" if you want the number of neck stitches to be odd. (I recommend this if you knit the sweater is broken rib.  )
  • Select "even" if you want the number of neck stitches to be even.
  • If you don't care, it doesn't matter which you select. (If you are knitting in stockinette, you probably don't care.)


Select stitch type for yarn estimate:
So far, I only have data for two stitch types.  If you use a different stitch type, you'll need to use your judgment to guess if the stitch uses more or less yarn than the ones I have tested.


Pick the sweater size.

Pull down to select the size range, then use the appropriate menu below.  The program will recommend values for your sweater.
You may also select 'custom' within any size range. If you want to customize, I suggest you first pick the size that fits best, for example "Men's 42". Let the form fill the boxes; then go through the form and set the toggles to the value you want. That will fill in all my recommended values for that size and style.  Afterwards, scroll back up,  toggle back to 'custom' and modify the body or sweater measurements you wish to modify.  

 If you are customizing, you can find handy size information here: Women and Men's, children & teens.

Pull down size range to the right: 
After you select the range to the right, pull down the size from the appropriate menu below.

Misses's size: Men's chest size:
Children:

According to the standards table, the a person who wears the currently selected size is about inches tall and weighs about lbs.
(If the boxes say '??' it means the standards table didn't suggest the height and weight for the size you selected.)

Schematic

raglan schematicRefer to the schematic for the basic sweater dimensions.  Note that that when the sleeve is assembled and worn,  the top of the sleeve contributes to the sleeve length and yoke depth.  The knitted lengths are a bit shorter.  The values in the design boxes here correspond to the longer lengths as worn.

Sweater Design Data.

Body
Enter the chest circumference of the sweater.
This should equal the wearer's chest size plus 1 to 4 inches.
inches.
Enter the Total Length of the sweater including ribbing:
Sweater length is a matter of taste and current fashion. When I knit this sweater for myself, I plan to use used 23" which hits me about 7" below my waist and a bit high on my hips.
inches.
Trim at hem of sweater:

Enter the depth of the trim and decide if you want the trim snug. If you select snug, the instructions will have you cast on approximately 10% fewer stitches for the ribbing compared to the body of the sweater.
inches deep and

Enter the Raglan Armhole Depth:
The absolute minimum value for the depth is equal to 1/2 the circumference of the wearer's upper arm plus another inch to account for the shoulders.   Other than that, you can adjust.
inches.
Enter the Shoulder Slope for the sweater:
This is not used for normal raglan designs.  (It will be if I ever add a shoulder dart option to fit very tall, skinny people with very square shoulders; otherwise, I'd just delete this row.)
This affects the shoulder shaping. It is a very, very difficult quantity to measure.  On other sweater styles I advise making it 1/2" for an adult with very, very square shoulders (or if you like shoulder pads). Make it 2" if  your shoulders slope a lot.  If I were knitting for myself, I would use a value of 1.2" for my sweater with drop sleeves.
inches.
Select a neckline style.
  • This will be a crew neck cardigan. The button band and collar will be identical in width.
    (Someday I may code for other choices.)
  • You can  modify the button band width.  The main reason to do this is if you want to use bigger or smaller buttons as accents.

inches wide.

Neck Width before adding any trim or button band neck trim:
inches.


Design Your Sleeves.
Wearer's arm length. (Click to learn how to measure. )
inches.
Wearer's shoulder width. (Click to learn how to measure.  This is used to estimate the knitted sleeve length that would reach your wrist. ) inches
Knitted length of a sleeve that would reach your wrist: (This value is calculated based on some body and sweater measurements and displayed for information only.  People who customize can decide if they want the sleeve longer or shorter than their wrist and adjust the length below.)
inches
If you want the sweater shorter than your wrist, enter a positive value to the right:

Result: Knitted sleeve length to  knit for this sweater including the rib. (If you customize, enter the knitted sleeve length you want here. Use the box immediately above for guidance. I entered 1" shorter than the arm length for my doll sweater.)
inches.


inches
Length of trim for cuff.

State whether you want the trim to be "not snug", "snug" or "super snug".  I use "snug" when I use ribbing and "very snug" when using a roll trim. That's because I like my trim to draw the hem of the sleeves in a little.  (Snug results in 10% fewer stitches in the cuff.  "Very snug results in 20% fewer stitches in the cuff.)
inches

Cuff width: 
You know how cuffs often "poof out" above ribbing?  Enter the width of the bottom of the main portion of the sleeve -- that is, the wider width above the ribbing or trim.   See schematic; and find "cuff width".

For reference: Based on the degree of snugness you selected, and how tight you knit the ribbing, the actual cuff will pull in.  Based on your current choices, the ribbing should comfortably fit a inch wrist.  You can change this by either changing the "snug" setting above, or adjusting the stockinette portion above cuff width.
inches

Sleeve Circumference: Enter your choice to right. 
Based on the current chest dimension and neck width, the minimum sleeve circumference is:  inches. If you need a narrower sleeve, you must either make the chest smaller or the neck wider. (Or wait for me to code a generator with shoulder shaping.)
inches
Back neck depth. (For information only.)
The first value is the depth if you skip the extra short rows to raise the back neck; the second is after working short rows.

These are calculated based on the chest dimension, the sleeve dimension and the neck width.  It is equal to half the width of the top of the sleeve. If you need a larger back neck depth, you must make the sleeve circumference smaller than it currently is, or make the neck wider, or make the chest bigger. 

inches.
inches
Front neck depth without placket.  This will be the depth if you pick crew neck. (For information only. This can't be edited).

inches

Get your pattern:


Copyright Lucia Liljegren 2005